Saturday, April 28, 2012

Classic Beef Enchiladas


My grandmother was still in her teens when she married my grandfather, a man ten years her senior.  She was one hundred percent German.  He was one hundred percent Hispanic (mostly Mexican).  You can guess that food and favorite dishes were not a point of one hundred percent agreement between the two of them.  Needless to say, my grandma learned all about cooking chorizo and tamales and enchiladas--her mother-in-law's way--pretty quickly.  My dad and his brothers and sister grew up eating homemade Mexican dishes on a regular basis.  By the time I came along, tamale-making was a steadfast family tradition at Christmas, and my dad had recipes for fidello and picadillo and homemade flour tortillas close at hand.  And there is most certainly a "Mexican" section in my own recipe binder now.  My grandma still makes the world's best German potato salad.  But now she leaves most of the Mexican cooking up to us. :)

As promised, here's the recipe for my dad's classic enchiladas.  This is another one where I scribbled down some notes and later turned them into a real recipe with measurements and numbers.  Most of these family recipes focus more on technique and ingredients than specific amounts--those are left up to your own tastes and preferences.  Feel free to taste as you go, but don't skip important steps like lightly frying the tortillas or using from-scratch taco meat.  You won't regret it.  Yum.

Classic Beef Enchiladas
Time:  50-55 minutes (doesn't count the 20 minutes to prepare meat)
Serves 6-8

1 can (15-16 oz.) tomato sauce
1 heaping tsp. chili powder
1/4 tsp. garlic salt
1/4 tsp. seasoned salt
14-15 corn tortillas
2 cups (approx.) sharp cheddar cheese, diced
1 small to medium onion, diced
1/2 to 3/4 lb. taco meat
canola oil, for frying

Combine first 4 ingredients in a bowl; set aside.  Set up a work station with onions, cheese, and meat in separate bowls nearby.  Lightly grease a 9x13 casserole or pan (glass or metal both work) and set near your work station.

Make sure tortillas are dry (especially if they have been frozen and thawed).  Have lots of paper towels close at hand.  Heat about 1/4" oil in a large skillet over high heat (I use a skillet with 2" sides to prevent the oil from spattering).  The oil is ready when a drop of water sizzles when added to pan.  Reduce heat to medium high.  Using a pair of tongs, cook tortillas one by one in oil until softened, but NOT hard, about 10 seconds on each side.  Place on a plate lined with paper towel.

Assemble tortillas in sets of four or five, working quickly so they do not harden.  (It helps to have a second person rolling up the tortillas while the other fries them.)  Fill each tortilla with meat, cheese, and diced raw onions; roll up and place seam down in 9x13 pan.  You should be able to fit about 14 filled tortillas into the pan.

Cover completed tortillas with sauce; sprinkle with more cheese.  Cover.  Bake at 375 F for 20-30 minutes or until cheese is melted and enchiladas are heated through.  May be frozen before baking.

Basic Taco Meat


You there.  Yes, you.  Step away from the taco seasoning packet.  Do you really think that stuff is going to result in anything but nasty beef?  What?  The real stuff takes too long?  Um, clearly you haven't given it a try.  As long as you're browning up a batch of meat, you might as well chop up an onion and throw in some real spices instead of that salt lick you've got there.

In case you're not convinced, here's a list of the ingredients on a name-brand taco seasoning packet:  Yellow corn flour [since when does flour count as a seasoning?], salt [that explains the 430 mg. per serving], maltodextrin [huh?], paprika [that's better, I guess], "spices," modified cornstarch, sugar [this isn't dessert, people], garlic powder [finally something tasty], citric acid, autolyzed yeast extract [I'm not even going to ask], natural flavor [whatever that means], caramel color [because all the flour and salt means this stuff would be a sickly white otherwise].  I don't know about you, but I'm pretty sure real Mexican cooks use stuff with names like cumin and chili powder and garlic to flavor their food.  And while I'm a fan of convenience as much as anybody, it really isn't that difficult to measure out a few spices, especially if you're a fan of food that, well, tastes good.

This is my dad's recipe--sort of.  My dad doesn't actually have the recipe written down; he just throws stuff together until it tastes right.  So if you like a little more cumin, feel free to add it.  If the chili powder scares you, tone it down if you want (but this really isn't spicy at all).  If you have the space, this is a great recipe to make in big batches and freeze in half- or one-pound amounts for later.  As far as turning this into a meal, the possibilities are endless--you can use it in tacos, of course, or in enchiladas, tostadas, nachos--you name it.


Basic Taco Meat
Yield:  1 pound
Time:  15-20 minutes

1 lb. ground beef
1 medium onion, diced
2 roma tomatoes, diced (canned diced tomatoes work also--use about half a can, drained)
1 garlic clove, minced (or dash garlic powder)
1 T. cumin powder
1 T. chili powder
dash seasoned salt (optional)
dash black pepper

In a large pan over medium heat, cook beef and onion until beef is browned.  Drain (I like to keep the grease in an old glass jar in the refrigerator; when it gets full, just throw the whole thing out).  Add remaining ingredients; simmer, stirring occasionally, until tomatoes are tender, about five minutes.

Freezes well.  Use in tacos or tostadas, enchiladas, or other Mexican recipes.

Next up: put your taco meat to good use with these amazing authentic enchiladas.

Monday, April 23, 2012

Cranberry Chicken Salad


This chicken salad is a) one of my favorite summer meals and b) basically awesome.  It doesn't hurt that it is required by law to be served on flaky, buttery croissants, the best bread known to chicken salad-dom.  And since croissants come in all sizes, these sandwiches are great for any occasion.  Pile up mini croissants for a fancy shower or tea.  Pack a basket of standard-size sandwiches for a picnic lunch.  Stuff one of those giant croissants to split with your sweetie--or to devour yourself.  (I may have just done exactly that, which is what happens when I'm left to forage for dinner by myself.)

The star of these sandwiches (besides the croissant, of course) is the dried cranberry.  These little guys burst with flavor and color and almost make you think that you're eating health food.  This time I found my dried cranberries at Aldi in a 6 oz. bag for $1.39.  I was so excited about the great deal that I didn't read the package very closely.  It wasn't until I was two bites into my sandwich that I realized my cranberries were cherry flavored.  Um, no.  Aldi does carry regular dried cranberries; you just have to hunt around for them.  I also think most grocery stores carry a generic version of Craisins; either way, you don't have to shell out half your paycheck to make these mouth-watering sandwiches.

Cranberry Chicken Salad (based on this recipe)
Serves:  4
Time:  15-20 minutes

1/4 cup diced celery
1/4 cup dried cranberries (preferably unsweetened)
1/4 cup sliced almonds
2/3 to 3/4 cup mayonnaise (start with the smaller amount and add more if necessary; I use olive oil or low-fat mayo)
2 T. chopped red onion (optional)
1/4 tsp. pepper
dash salt
2 cups cooked chicken breast, cubed
4 croissants, split
4 lettuce leaves (optional)

In a large bowl, combine first seven ingredients.  Add chicken.  Spoon onto croissants; add lettuce, if desired.

Saturday, April 21, 2012

Edible Vegetable Flowers

I was never a picky eater.  Neither were my brothers.  Sure, we turned up our noses at lima beans and brussels sprouts, but there was The Rule: we always had to try a little of everything, even if we thought (or knew) that we didn't like it.  Eventually we must have figured out it wasn't worth the fight.  Besides, my dad actually liked lima beans and brussels sprouts, and there was always the dream that he might actually agree to eat our share.  Yeah, right.

As a result, we were known far and wide (at least by our grandparents' friends and cashiers and mailmen and hair stylists) as the children who ate everything on their plates.  They shouldn't have been so impressed.  One grandma served us spammies (yes, Spam sandwiches) and dinosaur cookies and pecans and grilled cheese sandwiches with real Velveeta and other exotic foods.  Our other grandma baked us cookies and took us all out to Russ's and Bill Knapp's and other old people restaurants, where we could order anything we wanted.  It's no wonder we cleaned our plates.  There were no brussels sprouts on those kid's menus.

One of my brothers, though, developed a curious taste for raw kale--you know, the stuff they tuck next to the pickle spear as a garnish.  He would collect the kale from everybody's burger platters and eat them while the grandparents marveled.  I'm pretty sure he kept this up for a couple of years before realizing that he was a human, not a goat, and should be eating Grandma's spammies instead.

Some garnishes are pretty 
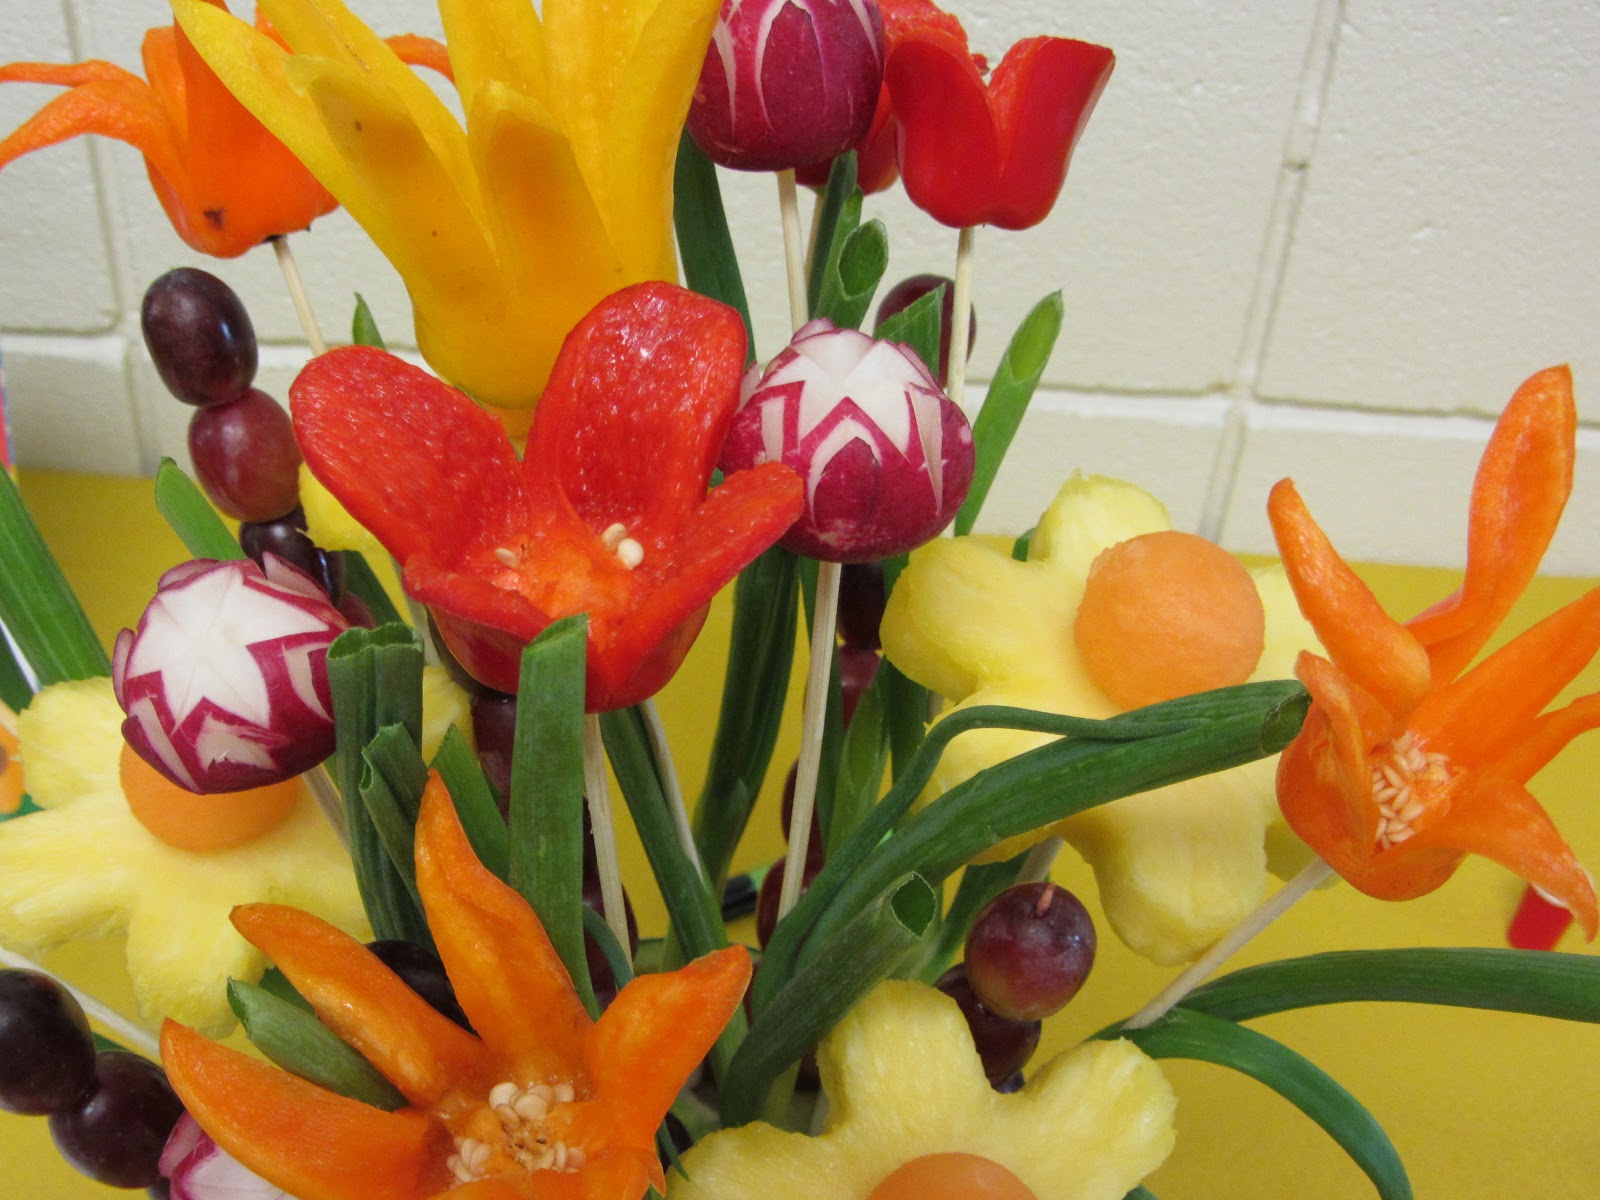
and delicious, though (yes, I am going somewhere with this, and it isn't to the land of Spam).  A couple weeks ago I made an edible bouquet of fruit and vegetable flowers for an event at work, which turned out like this:


It was all edible, down to the green onion leaves.  And now I have a new skill set to put on my resume.  Or at least on my blog.  I wouldn't want you to feel left out.

Flower Pots and Vases

For the base of my arrangement, I hollowed out a large cantaloupe, first cutting out an opening on top (as you would a Halloween pumpkin), then scraping out the seeds, and finally scooping out the flesh with a melon baller.  I trimmed a little piece off the bottom so it wouldn't wobble.  Then I packed the empty rind with large chunks of iceberg lettuce, an inexpensive filler into which you can poke skewer "stems."


If you don't want to spend the time making an edible vase, you can stuff chunks of lettuce into a flower pot or other container.  Or just arrange the flowers in a vase.  Or don't give them stems at all.  It's up to you.

Stems and Leaves

If you do want to arrange your flowers in some kind of container (as opposed to setting them on a plate as garnish), you'll want to start with some leaves and stems.  For each flower, you'll need one green onion and one skewer.  Skewers are $1-2 for a package of 100 at Meijer, Kroger, Target, Walmart, etc.  Look in the kitchen gadget section.  I use the 12-inch ones that are about 3mm in diameter.  The thicker ones are good for supporting pineapple flowers, but they won't fit inside a green onion.

Trim off the root end of the green onion, as well as the tips of any discolored or ragged leaves.  I like to trim all the cut-off leaves on a diagonal.  Insert the pointed end of a skewer into the root end of an onion, and carefully push it all the way up until about an inch or two of skewer sticks out at the bottom.  If the skewer ends up inside a leaf (this happens a lot), poke a hole so that the leaf can hang down naturally and the end of the skewer is visible.  Refrigerate until ready to use.


Radish Roses
Begin 8 hours in advance.

Pick evenly rounded radishes without any big dents or soft spots.  Trim off any little hair-like roots.


Cut a thin slice off the stem end so the radish can stand upright.


Using a sharp paring knife, cut a V-shaped wedge in the root end, about 1/4" deep.  Most of the root should come off; if not, it's okay.


Make two identical V-shaped cuts in the shape of an X over the first cut.  This completes the top of the rose.


If you look at the radish from the side, you will see six red points.  Underneath each point you will cut a petal.  Using just the tip of the paring knife, make two shallow facing cuts to create one petal (see pictures below).  The knife should not point into the center of the radish--this would make too deep a cut.


Use the tip of the knife to ease the petal open slightly.  Repeat all the way around for a total of six petals.


Float the completed radishes in a bowl of ice water in the refrigerator for at least 8 hours--this allows the petals to open.

Pepper Lilies and Tulips
Begin 8 hours in advance.

I use mini sweet peppers (available at Aldi and any grocery store) for these flowers, but bell peppers can be cut in a similar manner.  Select peppers that are straight and fairly uniform in shape; the ones on the left will work, but the others will not (extra peppers can be frozen for cooking).


Insert your paring knife straight down into the pepper, all the way through, about 3/4" from the stem.  Make a cut from there to the opposite end.


Make two similar cuts to divide each half in thirds, this time cutting through only one wall of the pepper.  You should end up with six equally sized segments attached at the bottom.


Now for the tricky part:  Carefully trim each of the six "petals" to remove any ribs or excess flesh; you can also trim the sections into points if needed.


Leave the seeds intact; you may need to remove the surrounding ribs, however.


Float the peppers in a bowl of ice water in the refrigerator for at least 8 hours; the petals will spread open, creating a lily shape.

To make a tulip, cut off the end of a pepper; the remaining section (stem end) should be about as long as it is wide.


Make two cuts in the shape of a cross about halfway down the pepper.


Trim each of the four segments into a rounded petal.  Leave the seeds intact, but trim away any ribs.


Float in ice water in the refrigerator for at least 8 hours.

Finishing Touches

One your eight hours are up, the radishes and peppers should have opened up into beautiful flowers.  Drain them on paper towels and cut off any stems with kitchen shears.  Any of the flowers can be used as garnishes, or you can pile them up in the center of a veggie tray (the pepper flowers are particularly tasty with hummus or white bean dip).


Or you can attach the flowers to their green onion stems.  Simply stick the flower onto the pointed end of the skewer--gently rotate the flower back and forth until it's secure.


Finally, arrange the stems in a vase, or stick the exposed skewer into your lettuce-stuffed container.  Voila!

Thursday, April 19, 2012

Bacon-Wrapped Jalapeño Poppers


I know what you're thinking.  Yes, I did just stuff these babies with cheese and wrap them in bacon.  No, there aren't any left.  Sorry.  You'll just have to make your own.

My husband thinks it's a little strange that I call these "jalapeño poppers."  Apparently, some people who categorize such things think that in order for a jalapeño to be considered a "popper," it must be breaded and deep-fried.  In my opinion, a "popper" is something that you "pop" straight into your mouth because it's so delicious you can't be bothered with such civilities as a knife and fork.  If you want to be a stickler, feel free to call them "jalapeños that have been stuffed with all sorts of cheesy deliciousness, wrapped in bacon, and grilled until they give off such a tantalizing aroma that you burn yourself trying to eat them."  But while you do that, I'm going to snag the last one.

I ended up buying a lot of the ingredients since I made these to share with friends, but if you wait long enough, locally grown jalapeños will start showing up en masse at the co-op.  Mine were $1.68/lb (I think) at Kroger.  Cilantro is $.50/bunch at Kroger, and as I've probably mentioned before, you can always rinse and chop the leftovers and freeze them for guacamole.  Green onions are under a dollar at Kroger and Meijer, and they freeze well too.  I used fresh Parmesan cheese because I had a little left over from my lamb, but the powdered stuff in a can works just as well here.

The finished poppers are surprisingly mild--the grilling (or broiling) process takes out some of the heat, although they definitely have a kick.  Before cooking, however, the raw jalapeños pack a punch, so you'll want to wear rubber gloves when handling them.  If you don't have gloves, wear bags over your hands.  You'll look dumb, but it's worth avoiding getting the juice into a cut on your hand (my hands burn even if I don't have any cuts) or in your eyes (not. fun.).

Bacon-Wrapped Jalapeño Poppers
Yield:  10-12 poppers (serves 5-6)
Time:  1 hour

2 oz. cream cheese, softened
3 T. Parmesan cheese
1 small tomato, finely chopped (about 1/4 to 1/3 cup)
2 T. thinly sliced green onions
2 T. chopped fresh cilantro
coarse-ground pepper, to taste
10-12 large jalapeño peppers (mine were 3-4 inches long)*
10-12 slices bacon, uncooked (one per pepper)*

Combine first six ingredients; set aside.  (If the cream cheese is too firm to mix easily, microwave for 5 seconds to soften it a little.)


Grab your rubber gloves.  Rinse the jalapeños thoroughly.


Cut off the stem end of each pepper.  Using a small paring knife and beginning at the cut end of the pepper, cut a slit that goes to the opposite tip.  Don't cut the pepper in half.  Carefully spread the pepper open so you can cut out the seeds and ribs (the especially spicy parts).  You should end up with this:


Still wearing the gloves, fill each pepper with cream cheese mixture.  Roll each one up in a single strip of bacon.


Grill or broil poppers until bacon is cooked and peppers are tender, about 3 minutes on each side.  If you're grilling, you may want to either place perforated foil under the peppers or put them on skewers, so they don't fall through the grates.


*You can also use smaller peppers (2 inches or so), although it's more time-consuming.  Use 12-15 peppers, and cut them in half lengthwise if you have trouble getting the seeds out (keep the halves paired; the stuffing stays in better that way).  Wrap each one in just half a slice of bacon; secure with a toothpick if needed.  Line your grill or broiler pan with foil, as the cheese tends to leak out of the small poppers more easily.

Saturday, April 14, 2012

Homemade Pizza


Probably the biggest ongoing disagreement in my marriage has to do with pizza.  Our list of domestic disputes is short.  We don't argue about the proper way to use up a tube of toothpaste, or whether the end of the toilet paper goes on the front of the roll or on the back, or which way the silverware should point in the dishwasher (mostly because we don't use our dishwasher).  However.  I, being a (mostly) rational and intelligent person, use a pizza cutter to cut my pizza, while my husband insists that the job must be done with a pair of kitchen shears.  His greatest triumph occurred when we received a pizza stone as a wedding shower gift, complete with a pair of scissors.  If I ask him to cut the pizza before dinner, you can guess that he doesn't grab the tool designed for the purpose.

Whatever.  At least we agree on the important things, such as the deliciousness of pizza.  And now that we're finally getting the hang of making really good homemade pizzas (after lots and lots of mediocre ones), we're turning it over to you.  If you already know how to make a perfect pizza, keep it up (and tell us how you do it).  If you've turned out some flops like I have, give these tips a try and let us know how it goes.  And if you believe that scissors are the only way to slice your food, just don't tell my husband.


Homemade Pizza
Time:  Begin at least 2-1/2 hours in advance
Yield:  One 14-inch pizza

From the bottom up...

The Crust
After experiments with Jiffy pizza crust mix (quick but lame) and from-scratch yeast dough (tasty but time-consuming), I finally broke down and gave our garage sale bread machine a try.  If you have one, I would definitely recommend using it for pizza dough.  It takes 90 minutes to do its thing, but you don't have to worry about kneading or temperature control or any of that mess.  If you don't have a bread machine, there are lots of traditional recipes out there.  Just don't do Jiffy.  Trust me.

For a single 12" or 14" crust:
3/4 cup + 3 T. warm tap water
2 T. oil
2 1/2 cups all purpose flour
1/2 tsp. sugar
1/2 tsp. salt
2 tsp. dry yeast (one packet usually has about 2 1/4 tsp. yeast)

Add liquids to bread machine pan.  Add dry ingredients in order, putting yeast into a small well at the top of other dry ingredients.  Program machine for dough (should take 90 minutes).

When dough cycle is complete, remove and knead 1 minute on a lightly floured surface.  Let rest 15 minutes.  Roll out into 12" or 14" inch circle (depending on your pan).  I like to sprinkle the surface with cornmeal before rolling; it makes it easier to move the dough around and transfer it to the pan, especially if you're working with a hot pizza stone.  Let rise 20-25 minutes before transferring to pan.

The Pan
I honestly think a pizza stone does a much better job than a regular pizza pan or baking sheet.  I just wish I had figured this out a long time ago.  For the first few uses, you'll want to season the stone with oil and cornmeal (the stone should come with directions).  For baking, place the stone in a cold oven and let it heat to 450 F (I put it in after rolling out the dough).  Pull it out of the oven, add the crust that's been rising for 20 minutes, add your toppings, and turn the heat down to 425 F for baking.  It helps to have two people to transfer the dough to the hot stone and quickly arrange the toppings.

If you don't have a pizza stone, you can let the crust rise right on the pizza pan.  Preheat the oven to 425 F while you wait.

The Sauce
If you have a source for homemade pizza sauce, lucky you.  If not, you can still doctor up the canned or jarred stuff for extra flavor.  I use about 1 cup (8 oz.) sauce for a 14-inch pizza.  Regardless of whether it's seasoned pizza sauce or plain tomato sauce, I always add (per cup of sauce):

1 tsp. dried basil
1 tsp. dried oregano
1/2 tsp. garlic powder
2-3 T. Parmesan cheese

The Cheese
I never believed it would work, but my husband showed me a neat trick that's quite delicious:  put the cheese on after the sauce and before the other toppings.  Just do it.  And don't skimp on the cheese.  It's one of the best parts.

For a basic pizza, I generally use pre-shredded mozzarella, which is usually the same price as chunk cheese; Kroger often has the 1-lb. bags on sale for $3.  They freeze well, so stock up if you see a good deal.

The Toppings
Make sure all your toppings are ready in advance.  You don't want to be rushing to chop olives while your pizza stone sits there getting cold (and/or baking the empty crust as it sits).  Resist the urge to use fifty different toppings all at once.  Go with two or three that compliment each other.  For the one in these pictures, I used pepperoni (Aldi has the best price for that), sauteed onions (red or white/yellow are both good), and chopped jarred artichokes (water packed or marinated, also from Aldi).  Sauteed or (gasp!) canned mushrooms are another favorite of mine.

The.. um... Baking
Bake your completed masterpiece in a preheated 425 F oven for 10-15 minutes.  My oven makes perfect pizzas at 13 minutes; you may need to keep a close eye on yours and do a little trial-and-error experimentation before you figure out the best timing for your oven.

Monday, April 9, 2012

Artichoke Stuffed Leg of Lamb, Part 2

As promised, here are a few photos of this year's rolled leg of lamb, start to finish.  I decided to be extra adventurous and bone and butterfly the meat myself, with the help of Lance the Butcher and his "leeg of laimb."  If you're planning to try this yourself, I would definitely follow the video and not my pictures, but I thought it would be interesting to show the whole process.

Start with your leg of lamb.  Mine was 7 pounds and semi-boneless, which basically meant the hip bone and socket had already been separated and the extra piece removed.  You can see the exposed hip bone in the upper center of the cut part here.


Get used to working with the meat by cutting off any excess fat, especially on the skin side of the meat.  This helps reduce any gamey flavors.  I ended up removing at least half a pound of fat.


Carefully cut around the exposed hip bone with the tip of your (freshly sharpened) knife, separating it from the surrounding meat and tendons.


Cut along both sides of the bone on both ends, beginning to free it from the surrounding meat while at the same time keeping the meat in a single piece.


Turn the whole thing over and cut along the bottom side of the bone (hoof end), pulling the meat back from the bone on the bottom half.


Repeat on the other end (near the hip joint).


Eventually you will be able to cut the bone free from a single piece of meat.  Don't forget to freeze the bone for making broth or stew.


Make a few more cuts to open up the thickest parts, and there you have it: a butterflied leg of lamb!


Spread with your delicious artichoke/bacon/Parmesan concoction (prepared the day before).


Roll the whole thing up.


Tie with kitchen string so it all stays together and looks fancy.


Roast; remove string; plop on a platter.  Ooh and aah.


Carve at the table.  Or let your husband do it.  Whatever.


Devour.