Showing posts with label vegetables. Show all posts

Monday, June 18, 2012

Creamy Asparagus Penne

You know it's hot when your eyelids start sweating.  Everything's sort of in a haze.  Even the flies know better than to attempt productivity.  And you just know that if you try to turn on the oven, the result will be instant vaporization.  Not that it matters--can you think of anything less appetizing on a hot summer day than chicken pot pie?  Nope.  Meatloaf?  I can almost feel myself melting.

Well, this creamy pasta recipe still requires the use of the stovetop, but it's the best I can do.  I'm still not ready to get out the crock pot after my last attempt.  And this is light and fresh and springy.  (Hopefully it's not too late to find some decent asparagus out there.)  Pair this with a nice salad or side dish for a cool summer meal, or toss in some cooked chicken or crumbled bacon to beef it up a little.  You could also stir in a cup or two of chopped fresh spinach for extra flavor.

I originally made this recipe as found here, but I decided the lemon was a little too strong.  What follows is my version, with some optional add-ins.  I'm still learning how to make cream sauces, so if you have a better recipe, feel free to use it instead (and don't forget to send it my way!).


Creamy Asparagus Penne
Serves 4
Time:  30-35 minutes

8 ounces penne (I used whole-wheat)
1 bunch asparagus, trimmed and cut into 3/4-inch pieces (about 1 pound)
1 1/2 cups milk (whole or 2%)
4 tsp. whole-grain mustard
4 tsp. flour
1/2 tsp. salt
1/2 tsp. freshly ground black pepper
2 tsp. olive oil
3 T. minced garlic (3-4 large cloves)
1/2 cup grated Parmesan cheese, divided
2 cups chopped fresh spinach (optional)
1 cup chopped cooked chicken OR 1/4 cup chopped cooked bacon (optional)

Bring a large pot of water to a boil.  Add pasta and cook for 3 minutes less than the package directions.  Add asparagus and continue cooking until pasta and asparagus are just tender, 3 minutes more.  Drain and return to pot.

Meanwhile, whisk milk, mustard, flour, salt, and pepper in a medium bowl.  Set aside.  Heat oil and garlic together in a medium saucepan over medium heat, stirring frequently, until fragrant, 30-60 seconds.  Whisk in the milk mixture.  Bring to a simmer, stirring constantly, and cook until thickened, 1-2 minutes.

Stir sauce into pasta and asparagus.  Cook over medium-high heat, stirring, until the sauce is thick, creamy, and coats and pasta, 1-2 minutes.  Stir in 1/4 cup Parmesan.  Toss with spinach and chicken or bacon, if desired.  Sprinkle individual portions with remaining Parmesan.

Thursday, May 31, 2012

Pasta Salad


Tomorrow is the first day of June.  I find this hard to believe.  I'm pretty sure it was just yesterday that I was posting about soup and how much I love soup and how one winter we ate soup almost every day for a month because it's so wonderful and amazing and delicious.

Now Memorial Day is over and we've hit 90-plus degrees and I want nothing to do with soup.  (Yeah, so I'm fickle.  You know you don't want soup either.)  Now I want salads.  Giant pasta salads.  Salads bursting with fresh vegetables out of the garden and tasty stuff like couscous and quinoa and lentils and barley.  When it got too hot to cook (yes, that does happen in Michigan), my mom always used to make a giant vat of pasta salad, and we'd eat it on the pool deck with fruit and popsicles and other munchies that didn't require the use of an oven.  You don't need a pool to enjoy pasta salad, though.  In fact, it doesn't even have to be summer yet.  I've made two big batches already, and they were just as delicious as I remember.  And much better than soup.

This recipe is great because you can change it based on what's in your refrigerator or garden.  I've listed the typical ingredients that I use, but feel free to add whatever you like.  In addition to veggies like cucumber or avocado, consider adding chopped pepperoni or grated mozzarella.  Be creative!  For the dressing, I usually use regular or "zesty" Italian dressing from a bottle.  Don't use any of the creamy versions.  I've also tried using Good Seasons Italian dressing from a packet; it worked, but the flavor wasn't quite as strong as I like.  Set any remaining dressing out on the table so people can add a bit more if they like.

Another trick I use is adding the broccoli and carrots to the boiling pasta water for a few seconds.  Blanching these crunchier vegetables makes them a little less, well, crunchy.  Just be sure not to overcook them; the last thing you want is a bunch of soggy, nasty broccoli mixed into your beautiful salad.  About 60 seconds for the carrots and 30 seconds for the broccoli is plenty.


Pasta Salad
Time:  30 minutes
Serves:  8+

1 package (12-16 oz.) tri-color rotini (my favorite) or another bite-size pasta (like farfalle or small shells)
3-4 carrots, peeled and diced
1 medium head broccoli, cut into bite-size pieces (I peel the "trunk" and cut it up too)
1-2 bell peppers, diced (any color)
1 large tomato, diced (or 3/4 to 1 cup cherry or grape tomatoes, halved)
1/2 cup black olives (about half a can)
1/4 cup grated Parmesan
1 cup (8 oz.) bottled Italian dressing, plus more to taste

Boil pasta in a large pot according to package directions.  One minute before pasta is done, add carrots to pot.  Thirty seconds later, add broccoli.  (Vegetables should be just barely tender-crisp and very bright in color--don't overcook!)  Drain immediately; toss with a few ice cubes to cool.  Add remaining ingredients;  refrigerate until chilled.  Toss before serving.

Tip:  If making salad in advance, add tomatoes just before serving, as they tend to lose their freshness more quickly than the other vegetables.

Wednesday, May 23, 2012

Garden Fresh Couscous Salad


This morning as I was browsing Pinterest, trying my hardest to ignore the mountains of laundry and dirty dishes piling up around me (okay, not quite, but I was definitely avoiding packing for this weekend's camping trip), I ran across a "recipe" for bacon-wrapped corn on the cob.  Then (okay, maybe there were a few dirty dishes waiting for me) I found one for deep-fried corn.  I started searching for the most ridiculous corn recipes I could find (who needs clean laundry, anyway?).  Chocolate fans will be disappointed to learn that my search for "chocolate-covered corn" did not result in tips for dipping whole ears in chocolate, but I did find chocolate-covered caramel corn and chocolate-covered corn dogs.

Seriously, people?  Just because you can do it, doesn't mean you should.  Bacon is delicious.  Chocolate is delicious.  Deep-fat frying is fattening and, well, delicious.  But why ruin a perfectly good ear of corn with that stuff when you can turn it into this wonderfully fresh and flavorful couscous salad?

This is one of my favorite summer salads, and it's perfect for a picnic or Memorial Day cookout (you can even pair it with your bacon-wrapped bacon).  The fresh corn (please don't use canned or frozen unless you absolutely must) is my favorite part, but the feta, cucumbers, cherry tomatoes, and couscous certainly don't hurt, either.  Toss it with a light vinaigrette, and you can almost eat this stuff as a meal in itself (and sometimes I do).

The best part is that almost all of the ingredients are frequently available in the co-op.  Corn is only $0.16 an ear this week at Meijer--the best price I've seen yet this season.  I have used both regular and whole-wheat couscous with equally delicious results.  If you can't find it in the co-op, it's okay to buy the less expensive couscous mixes--just leave out the seasoning packet.  I usually buy my feta from Aldi, but next time I'd like to get it from George's International Market (on the corner of Broadway and Taylor).  I can't remember the exact price, but I saw it there once for something like $2/lb. for a large block.  Fresh parsley is under $1 for a bunch at Meijer or Kroger, and it keeps for quite a while in the fridge (put it in an unsealed zip-top bag along with a damp paper towel).  Don't bother with dried parsley; it's not worth it.


Garden Fresh Couscous Salad (original recipe found here)
Time:  30-40 minutes
Serves:  8-9 (this makes a big batch, and it's best to eat it within 2-3 days)

3 medium ears sweet corn, husks removed
1 cup chicken broth or vegetable broth
1 cup uncooked couscous
1 medium cucumber, peeled, halved lengthwise, and sliced
1-1/2 cups cherry tomatoes, halved (or bigger tomatoes, diced)
1/2 cup crumbled feta cheese
1/4 cup chopped red onion
3 T. minced fresh parsley
3 T. olive oil
3 T. lemon juice
1 tsp. dried oregano
3/4 tsp. ground cumin
1/2 tsp. salt
1/2 tsp. pepper

Wrap ears of corn in a single layer of plastic wrap; microwave on high for about 5 minutes.  Remove from microwave (wear oven mitts!) and slit plastic open; allow to cool.  (You can also boil the corn, but I find microwaving is the easiest and fastest cooking method.)

Meanwhile, in a small saucepan, bring broth to a boil. Stir in couscous. Remove from heat; cover and let stand for 5-10 minutes or until water is absorbed. Fluff with a fork and set aside to cool.

In a large bowl, combine the cucumber, tomatoes, cheese, onion and parsley. Cut corn kernels from the cobs (if they are still too hot to handle, run cold water over them; pat dry). Add to cucumber mixture. Stir in couscous.

In a small bowl, whisk together oil, lemon juice, and seasonings. Pour over couscous mixture; toss to coat. Serve immediately or cover and refrigerate until chilled.

Sunday, May 20, 2012

Guacamole

My brother came down for a visit this weekend.  He came even though I warned him that he would have to spend all his time with me, since my husband is working on a 20-page paper and doing a billion other things besides.  He came even though I'm a wee bit jealous of his fancy camera and make him take all sorts of food pictures for my blog.  I figure it makes up for all the guacamole he devours when he comes to visit.

Anyway, while my husband slaved away, my brother and I took a trip to the Foellinger-Freimann Botanical Conservatory in downtown Fort Wayne.  He took some cool pictures of the Butterflies of Malaysia exhibit that's there right now:


And some others of the various growing things around the conservatory:


I also dragged him along with me to Meijer, where we found an entire cart of clearance avocados.  Tomatoes were on sale, too.  Coincidence?  I think not.  In payment for his photography efforts (or maybe just to keep him from devouring all my food), I made two huge bowls of guacamole over the weekend.  And then made him take some pictures of it.

This is my own guacamole recipe.  (That's right--for once I'm not stealing it from someone else!)  It makes a pretty small batch, but it can easily be multiplied based on the number of avocados.  I usually increase the other ingredients by a smaller amount; for example, a triple recipe would use three avocados but only two tomatoes, two tablespoons lime juice, etc.  I try not to spend more than $.75 per avocado.  Aldi frequently has them on sale for $.49, and you can sometimes find them on clearance at Meijer (I paid $2 for three).  Cilantro is usually $.89/bunch at Meijer and $.50 at Kroger.  Fresh jalapenos cost next to nothing if you buy just one or two in bulk.  The other ingredients are usually available at the co-op.  My favorite tortilla chips are the multigrain ones at Aldi; they're just $1.69 (other Aldi varieties are cheaper still).


Guacamole
Yield:  1 cup
Time:  30 minutes

1 large avocado
1 T. fresh lime juice
1 roma tomato, finely diced
1 T. onion, finely minced (OR 1 T. green onion, thinly sliced)
1 garlic clove, minced
1 small fresh jalapeno, seeds removed and finely chopped (don't forget the gloves)
1 heaping T. minced cilantro
2 tsp. Frank's Red Hot sauce (or your favorite red pepper sauce)

Cut and peel the avocado (for tips go here).  Scoop out the flesh with a spoon; place it in a bowl and gently mash with a fork.  Add lime juice; combine well.  Add remaining ingredients; serve with tortilla chips.

Tips:
~ For smoother guacamole, puree the finished mixture in a food processor.
~ For chunkier guacamole, peel the halved and seeded avocado (the skin should peel right off unless it is underripe), then dice the flesh (overripe avocados will not work as well).
~ The lime juice helps prevent the guacamole from turning brown.  When making a large batch of guacamole, add the juice to the bowl first, then toss it with each avocado that you add.
~ Reserve one of the avocado seeds and add it to the finished guacamole; this will help prevent browning as well.  Guacamole should be eaten immediately, if possible, but covering it with plastic wrap (right on the surface of the mixture) can help prevent discoloration (do this with leftovers too).

Saturday, April 21, 2012

Edible Vegetable Flowers

I was never a picky eater.  Neither were my brothers.  Sure, we turned up our noses at lima beans and brussels sprouts, but there was The Rule: we always had to try a little of everything, even if we thought (or knew) that we didn't like it.  Eventually we must have figured out it wasn't worth the fight.  Besides, my dad actually liked lima beans and brussels sprouts, and there was always the dream that he might actually agree to eat our share.  Yeah, right.

As a result, we were known far and wide (at least by our grandparents' friends and cashiers and mailmen and hair stylists) as the children who ate everything on their plates.  They shouldn't have been so impressed.  One grandma served us spammies (yes, Spam sandwiches) and dinosaur cookies and pecans and grilled cheese sandwiches with real Velveeta and other exotic foods.  Our other grandma baked us cookies and took us all out to Russ's and Bill Knapp's and other old people restaurants, where we could order anything we wanted.  It's no wonder we cleaned our plates.  There were no brussels sprouts on those kid's menus.

One of my brothers, though, developed a curious taste for raw kale--you know, the stuff they tuck next to the pickle spear as a garnish.  He would collect the kale from everybody's burger platters and eat them while the grandparents marveled.  I'm pretty sure he kept this up for a couple of years before realizing that he was a human, not a goat, and should be eating Grandma's spammies instead.

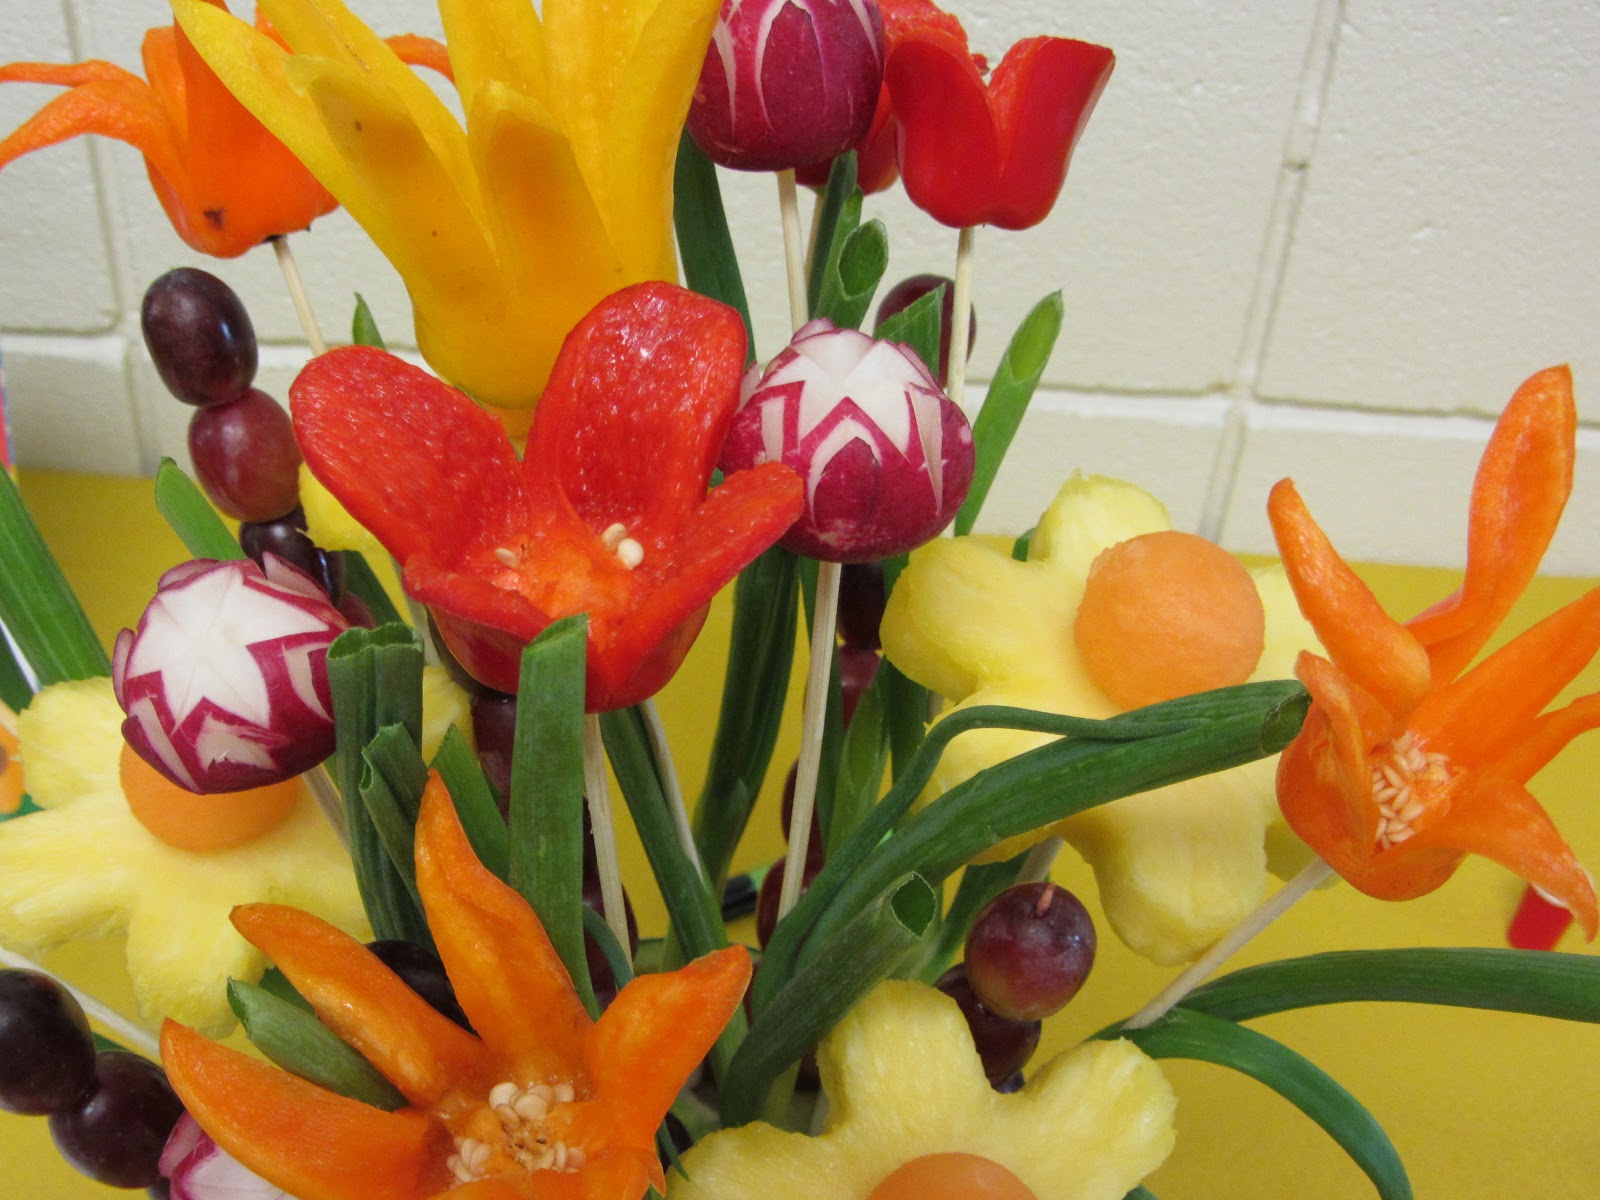
Some garnishes are pretty and delicious, though (yes, I am going somewhere with this, and it isn't to the land of Spam).  A couple weeks ago I made an edible bouquet of fruit and vegetable flowers for an event at work, which turned out like this:


It was all edible, down to the green onion leaves.  And now I have a new skill set to put on my resume.  Or at least on my blog.  I wouldn't want you to feel left out.

Flower Pots and Vases

For the base of my arrangement, I hollowed out a large cantaloupe, first cutting out an opening on top (as you would a Halloween pumpkin), then scraping out the seeds, and finally scooping out the flesh with a melon baller.  I trimmed a little piece off the bottom so it wouldn't wobble.  Then I packed the empty rind with large chunks of iceberg lettuce, an inexpensive filler into which you can poke skewer "stems."


If you don't want to spend the time making an edible vase, you can stuff chunks of lettuce into a flower pot or other container.  Or just arrange the flowers in a vase.  Or don't give them stems at all.  It's up to you.

Stems and Leaves

If you do want to arrange your flowers in some kind of container (as opposed to setting them on a plate as garnish), you'll want to start with some leaves and stems.  For each flower, you'll need one green onion and one skewer.  Skewers are $1-2 for a package of 100 at Meijer, Kroger, Target, Walmart, etc.  Look in the kitchen gadget section.  I use the 12-inch ones that are about 3mm in diameter.  The thicker ones are good for supporting pineapple flowers, but they won't fit inside a green onion.

Trim off the root end of the green onion, as well as the tips of any discolored or ragged leaves.  I like to trim all the cut-off leaves on a diagonal.  Insert the pointed end of a skewer into the root end of an onion, and carefully push it all the way up until about an inch or two of skewer sticks out at the bottom.  If the skewer ends up inside a leaf (this happens a lot), poke a hole so that the leaf can hang down naturally and the end of the skewer is visible.  Refrigerate until ready to use.


Radish Roses
Begin 8 hours in advance.

Pick evenly rounded radishes without any big dents or soft spots.  Trim off any little hair-like roots.


Cut a thin slice off the stem end so the radish can stand upright.


Using a sharp paring knife, cut a V-shaped wedge in the root end, about 1/4" deep.  Most of the root should come off; if not, it's okay.


Make two identical V-shaped cuts in the shape of an X over the first cut.  This completes the top of the rose.


If you look at the radish from the side, you will see six red points.  Underneath each point you will cut a petal.  Using just the tip of the paring knife, make two shallow facing cuts to create one petal (see pictures below).  The knife should not point into the center of the radish--this would make too deep a cut.


Use the tip of the knife to ease the petal open slightly.  Repeat all the way around for a total of six petals.


Float the completed radishes in a bowl of ice water in the refrigerator for at least 8 hours--this allows the petals to open.

Pepper Lilies and Tulips
Begin 8 hours in advance.

I use mini sweet peppers (available at Aldi and any grocery store) for these flowers, but bell peppers can be cut in a similar manner.  Select peppers that are straight and fairly uniform in shape; the ones on the left will work, but the others will not (extra peppers can be frozen for cooking).


Insert your paring knife straight down into the pepper, all the way through, about 3/4" from the stem.  Make a cut from there to the opposite end.


Make two similar cuts to divide each half in thirds, this time cutting through only one wall of the pepper.  You should end up with six equally sized segments attached at the bottom.


Now for the tricky part:  Carefully trim each of the six "petals" to remove any ribs or excess flesh; you can also trim the sections into points if needed.


Leave the seeds intact; you may need to remove the surrounding ribs, however.


Float the peppers in a bowl of ice water in the refrigerator for at least 8 hours; the petals will spread open, creating a lily shape.

To make a tulip, cut off the end of a pepper; the remaining section (stem end) should be about as long as it is wide.


Make two cuts in the shape of a cross about halfway down the pepper.


Trim each of the four segments into a rounded petal.  Leave the seeds intact, but trim away any ribs.


Float in ice water in the refrigerator for at least 8 hours.

Finishing Touches

One your eight hours are up, the radishes and peppers should have opened up into beautiful flowers.  Drain them on paper towels and cut off any stems with kitchen shears.  Any of the flowers can be used as garnishes, or you can pile them up in the center of a veggie tray (the pepper flowers are particularly tasty with hummus or white bean dip).


Or you can attach the flowers to their green onion stems.  Simply stick the flower onto the pointed end of the skewer--gently rotate the flower back and forth until it's secure.


Finally, arrange the stems in a vase, or stick the exposed skewer into your lettuce-stuffed container.  Voila!

Tuesday, January 17, 2012

Glazed Steamed Carrots (and Other Veggies)

Meet my steamer basket.


I use this thing at least once a week.  Steaming is probably my favorite cooking method for basic, unadorned vegetables (except for grilling, of course, but my husband doesn't like to stand out in the snow every day).  Forget boiling and microwaving.  Steamed vegetables taste ten times better (in my opinion), plus they're quick and easy.

My mom actually had two steamer baskets when I was growing up, which is probably why I'm such a fan.  I even used mine to cook some pork ribs the other day (they were okay), and I think it might even work for Chinese steamed buns or wontons (maybe).  Anyway, if you're sick of eating watery, overcooked vegetables, or if you've got this weird looking metal contraption buried in the back of your kitchen cabinet and don't know what to do with it, today's your lucky day.  (If you don't have a steamer basket, they're usually about $6 to $7.  Kroger has them half off through tomorrow for $3.50.)

My favorite vegetables for steaming are carrots, broccoli, and green beans.  (Cauliflower works too, but it's currently banned from our house for reasons of taste.)

Start by rinsing, peeling/trimming, and cutting your vegetable of choice into bite-size pieces.  Place your steamer basket into a saucepan that is big enough to hold all the vegetables (make sure the saucepan has a tightly fitting lid).


Fill the pan with just enough cold water that you can see it starting to come up through the holes in the basket.  Add your vegetables, replace the lid, and set on the stove over high heat.  After the water comes to a boil, reduce the heat to medium-high.  Check the vegetables after about five minutes, then every 2-3 minutes after that.  Vegetables are done when they are bright in color and easily pierced with a dinner fork.  (You can also rinse a piece in cold water and do a taste test.)

That's it.  You're done.  On weeknights, I often just serve the veggies right out of the saucepan with a dot of butter.  Just make sure to remove the saucepan lid or vent it, as the vegetables will keep cooking otherwise (I have, sadly, ruined some perfectly good broccoli that way).  You can also drain your vegetables and add sauces, glazes, and other delicious toppings, as I did with these freshly steamed carrots.


Glazed Carrots (adapted from The Good Housekeeping Illustrated Cook Book)

4-5 large carrots, cut in bite-size pieces, steamed
1 T. butter
1 1/2 tsp. sugar
dash ground nutmeg
dash salt (optional)

In a small saucepan, combine all ingredients.  Cook, stirring constantly, until sugar is melted and carrots are glazed.

Tuesday, January 10, 2012

Melt-in-Your-Mouth Acorn Squash


Butter and brown sugar make everything better.  This is my favorite way of preparing (and eating) acorn squash (actually, I think it's the only way I've ever eaten it, so if someone wants to suggest some new ideas, go for it).  It always reminds me of my parents' big garden back home, and how my dad would plant a whole row of acorn squash, usually resulting in more produce than the six of us could ever hope to eat in a year (we tried hard, but the summer squash and zucchini sort of got in the way).  All autumn long, my mom would pop those babies in the microwave, and they emerged dripping with a buttery, tender, deliciousness.  I could never resist.  Yum.

Acorn Squash with Brown Sugar and Butter
Serves 2
Time:  15 minutes

1 acorn squash
2 T. butter
2 T. brown sugar

Using your biggest kitchen knife, split the squash in half horizontally.  Scoop out the seeds and pulp; place both halves on a microwave-safe plate.  (I like to use a quiche dish because it has sides to keep the juices contained.)  Place 1 T. each of butter and sugar in each half.  Loosely cover with wax paper.  Microwave on high for 6-10 minutes (if your microwave doesn't have a turntable, stop halfway through and turn plate).  Squash flesh should be easily pierced with a fork when done.  Let cool slightly before serving (they will be very hot!).

Sunday, December 4, 2011

Sugared Asparagus

This is the recipe that turned me from an asparagus-hater into an asparagus-sort-of-lover.  (Don't worry, broccoli.  You're still my favorite dark green veggie.)  Seriously, though, how can you go wrong with butter and brown sugar?

The hardest part about making this recipe co-op worthy was cutting it down to fit a half-pound bag--the original recipe calls for two pounds.  You'll also want to make it within a day or two, since it tends to get mushy quickly.  (That's why I didn't post a picture.  My asparagus was a little sad-looking.)  The co-op asparagus also tends to be quite thin, which makes it nice and tender but also decreases cooking time.  Just keep an eye on it so it doesn't overcook.

Sugared Asparagus (from this recipe)
Time:  30 minutes
Serves:  2

1 T. butter
2 tsp. brown sugar
1/2 pound fresh asparagus
1/3 cup chicken broth

1. Prepare asparagus:  Snap off ends, then snap asparagus in half (for larger asparagus, break into 2-inch pieces).  Rinse.
2. In a medium skillet over medium-high, heat butter and brown sugar until sugar is dissolved.  Add asparagus pieces; saute for 2 minutes.  Stir in chicken broth; bring to a boil.
3. Reduce heat; cover and simmer 8-10 minutes or until asparagus is crisp-tender.  (Start checking after 5 minutes or so.)  Remove asparagus to a serving dish and keep warm.
4. Cook sauce, uncovered, until reduced by half (5-10 minutes).  Pour over asparagus and serve immediately.

Saturday, November 12, 2011

Italian Sausage-Stuffed Peppers


My first experience with stuffed peppers was an amazing concoction of black beans, corn, rice, chicken, and all kinds of tasty morsels crammed into a mountain of poblano peppers, courtesy of my dear husband. Maybe someday I'll tell you all about it. For now, though, you'll have to satisfy yourself with stuffed bell peppers, which aren't so bad either. I found a pair of giant orange ones on clearance at Meijer, but the green ones that are usually at the co-op will work too.

This is another dish that can be modified to suit your tastes (or refrigerator leftovers). My version uses Italian sausage, which already has lots of tasty seasonings in it, but you could substitute ground beef and use whatever herbs and spices you want. You could also use cooked diced potato in place of the rice. The fresh parsley ($.79 at Meijer) adds a nice flavor—the dried stuff can't compete, even though I'm just as guilty as anyone of having a giant shaker of it in my pantry. Oops. Be sure to pull the leaves off the stems before chopping them. The leftover parsley can probably be frozen, if you're not going to use it right away. I haven't tried freezing it yet, though, so don't quote me on that.

Some recipes call for a tomato-based sauce, but I've had some bad experiences lately with using tomato where it shouldn't be (I was just following the recipes, I promise!), so I just put some diced tomato in the filling. Feel free to use some warm pasta sauce if you want a little something extra.

Italian Sausage-Stuffed Peppers (based on the recipes here and here)
Time: 1 hour
Serves: 2

1/2 pound bulk Italian sausage
1/2 onion, diced
2 large bell peppers (any color)
3/4 cup cooked rice
1/2 cup chopped fresh parsley leaves (I used curly parsley)
1 small tomato, diced (about 1/3 cup)
pinch red pepper flakes

1. Preheat oven to 350 F. Fill a large pot with water (deep enough to cover the peppers) and bring to a boil. Also, cook the rice if you haven't done so already.

2. Prepare the peppers: Cut off the top of each pepper, leaving about an inch around the stem for a “lid” (sort of like a mini Jack-o-lantern). Shake out the seeds and pull out the membranes. If the peppers wobble when placed on a flat surface, remove a thin slice from the bottom; dice for use in the filling.

3. Cook the Italian sausage and onion in a large skillet until sausage is browned and onions are tender, stirring frequently to break up any large pieces. Remove from heat. Add rice, parsley, tomato, red pepper flakes, and any diced pepper pieces from step 2.

4. Carefully add peppers and tops to the pot of boiling water; parboil until just tender, 2 to 3 minutes. Remove with tongs or a slotted spoon and drain on paper towels. Pack each pepper with filling and replace tops. Place peppers in a baking dish; add just enough water to cover the bottom, about 1/8 inch deep. Bake for 25-30 minutes, until peppers are tender and filling is heated through.

If you have leftover filling, it tastes good all by itself. Just trust me on that one. Or, if you have a lot left (and a highly advanced level of self-control), I'm sure it freezes well. Not that I would know.

Saturday, November 5, 2011

Parsnip Muffins

Yes, really.  Don't run away yet.

Despite the fact that I grew up next to a field where parsnips frequently grew in abundance, I think I've only eaten them once in my life.  My brothers and I tended to think of them more as toy swords and play food that were left behind after the harvest, and the one time my mom decided to cook them we were more than a bit skeptical.  But after watching a Good Eats episode on parsnips and seeing a bin of them at the co-op, I decided to give these muffins a try.  I was pleasantly surprised.  They definitely have that unique parsnip flavor, sort of spicy and earthy.  Still a bit unusual, but the spices and almonds balance out the flavors for a tasty, autumn-y snack.

Now if I can just figure out what to do with the rest of my parsnips...

Parsnip Muffins (based on Alton Brown's recipe)
Total time:  1 hour 15 minutes
Yield:  1 dozen

10 ounces parsnips (about 3 small)
1/3 cup sliced almonds
1 1/2 cups flour
1 tsp. baking powder
 3/4 tsp. baking soda
1/4 tsp. nutmeg
1/2 tsp. cinnamon
1/4 tsp. salt
3 eggs
3/4 cup plain yogurt (OR sour cream)
1/4 cup applesauce (OR vegetable oil)
3/4 cup sugar

1.  Prepare parsnips:  Cut off both ends, peel, and grate with a box grater.  Or, if you're like me and prefer to keep your knuckles intact, cut the peeled parsnips into large chunks and chop in a food processor.  Either way, you should end up with about 2 1/2 cups.

2.  Preheat oven to 375 F. Place the almonds in a single layer in a pie pan and place in oven while it heats. Bake the nuts until lightly toasted, approximately 10 minutes (check them every few minutes; you should also be able to smell them when they're ready). Meanwhile, thoroughly grease or spray a standard 12-cup muffin tin (don't skimp on the grease—the batter is really sticky).

3.  Combine next six ingredients (flour through salt) in a medium mixing bowl; mix with a wire whisk. Whisk the eggs, yogurt, applesauce, and sugar in a large mixing bowl until combined. Add the flour mixture and parsnips; fold with a rubber spatula until all of the flour is moistened. (Use as few strokes as possible; too much mixing, and the muffins will turn out rubbery. You should still see some flour lumps in the batter.) Divide the mixture evenly among the muffin cups. Sprinkle the top of each muffin with the toasted almonds. Bake for 20 to 25 minutes or until the muffins reach an internal temperature of 210 degrees F and are golden brown, rotating halfway through baking.

4.  Use a small knife to loosen the muffins and immediately remove them from the tin to a cooling rack; cool for 15 minutes. Serve warm. Store completely cooled muffins in an airtight container for up to 3 days.