Thursday, April 19, 2012
Bacon-Wrapped Jalapeño Poppers
I know what you're thinking. Yes, I did just stuff these babies with cheese and wrap them in bacon. No, there aren't any left. Sorry. You'll just have to make your own.
My husband thinks it's a little strange that I call these "jalapeño poppers." Apparently, some people who categorize such things think that in order for a jalapeño to be considered a "popper," it must be breaded and deep-fried. In my opinion, a "popper" is something that you "pop" straight into your mouth because it's so delicious you can't be bothered with such civilities as a knife and fork. If you want to be a stickler, feel free to call them "jalapeños that have been stuffed with all sorts of cheesy deliciousness, wrapped in bacon, and grilled until they give off such a tantalizing aroma that you burn yourself trying to eat them." But while you do that, I'm going to snag the last one.
I ended up buying a lot of the ingredients since I made these to share with friends, but if you wait long enough, locally grown jalapeños will start showing up en masse at the co-op. Mine were $1.68/lb (I think) at Kroger. Cilantro is $.50/bunch at Kroger, and as I've probably mentioned before, you can always rinse and chop the leftovers and freeze them for guacamole. Green onions are under a dollar at Kroger and Meijer, and they freeze well too. I used fresh Parmesan cheese because I had a little left over from my lamb, but the powdered stuff in a can works just as well here.
The finished poppers are surprisingly mild--the grilling (or broiling) process takes out some of the heat, although they definitely have a kick. Before cooking, however, the raw jalapeños pack a punch, so you'll want to wear rubber gloves when handling them. If you don't have gloves, wear bags over your hands. You'll look dumb, but it's worth avoiding getting the juice into a cut on your hand (my hands burn even if I don't have any cuts) or in your eyes (not. fun.).
Bacon-Wrapped Jalapeño Poppers
Yield: 10-12 poppers (serves 5-6)
Time: 1 hour
2 oz. cream cheese, softened
3 T. Parmesan cheese
1 small tomato, finely chopped (about 1/4 to 1/3 cup)
2 T. thinly sliced green onions
2 T. chopped fresh cilantro
coarse-ground pepper, to taste
10-12 large jalapeño peppers (mine were 3-4 inches long)*
10-12 slices bacon, uncooked (one per pepper)*
Combine first six ingredients; set aside. (If the cream cheese is too firm to mix easily, microwave for 5 seconds to soften it a little.)
Grab your rubber gloves. Rinse the jalapeños thoroughly.
Cut off the stem end of each pepper. Using a small paring knife and beginning at the cut end of the pepper, cut a slit that goes to the opposite tip. Don't cut the pepper in half. Carefully spread the pepper open so you can cut out the seeds and ribs (the especially spicy parts). You should end up with this:
Still wearing the gloves, fill each pepper with cream cheese mixture. Roll each one up in a single strip of bacon.
Grill or broil poppers until bacon is cooked and peppers are tender, about 3 minutes on each side. If you're grilling, you may want to either place perforated foil under the peppers or put them on skewers, so they don't fall through the grates.
*You can also use smaller peppers (2 inches or so), although it's more time-consuming. Use 12-15 peppers, and cut them in half lengthwise if you have trouble getting the seeds out (keep the halves paired; the stuffing stays in better that way). Wrap each one in just half a slice of bacon; secure with a toothpick if needed. Line your grill or broiler pan with foil, as the cheese tends to leak out of the small poppers more easily.
Saturday, April 14, 2012
Homemade Pizza
Probably the biggest ongoing disagreement in my marriage has to do with pizza. Our list of domestic disputes is short. We don't argue about the proper way to use up a tube of toothpaste, or whether the end of the toilet paper goes on the front of the roll or on the back, or which way the silverware should point in the dishwasher (mostly because we don't use our dishwasher). However. I, being a (mostly) rational and intelligent person, use a pizza cutter to cut my pizza, while my husband insists that the job must be done with a pair of kitchen shears. His greatest triumph occurred when we received a pizza stone as a wedding shower gift, complete with a pair of scissors. If I ask him to cut the pizza before dinner, you can guess that he doesn't grab the tool designed for the purpose.
Whatever. At least we agree on the important things, such as the deliciousness of pizza. And now that we're finally getting the hang of making really good homemade pizzas (after lots and lots of mediocre ones), we're turning it over to you. If you already know how to make a perfect pizza, keep it up (and tell us how you do it). If you've turned out some flops like I have, give these tips a try and let us know how it goes. And if you believe that scissors are the only way to slice your food, just don't tell my husband.
Homemade Pizza
Time: Begin at least 2-1/2 hours in advance
Yield: One 14-inch pizza
From the bottom up...
The Crust
After experiments with Jiffy pizza crust mix (quick but lame) and from-scratch yeast dough (tasty but time-consuming), I finally broke down and gave our garage sale bread machine a try. If you have one, I would definitely recommend using it for pizza dough. It takes 90 minutes to do its thing, but you don't have to worry about kneading or temperature control or any of that mess. If you don't have a bread machine, there are lots of traditional recipes out there. Just don't do Jiffy. Trust me.
For a single 12" or 14" crust:
3/4 cup + 3 T. warm tap water
2 T. oil
2 1/2 cups all purpose flour
1/2 tsp. sugar
1/2 tsp. salt
2 tsp. dry yeast (one packet usually has about 2 1/4 tsp. yeast)
Add liquids to bread machine pan. Add dry ingredients in order, putting yeast into a small well at the top of other dry ingredients. Program machine for dough (should take 90 minutes).
When dough cycle is complete, remove and knead 1 minute on a lightly floured surface. Let rest 15 minutes. Roll out into 12" or 14" inch circle (depending on your pan). I like to sprinkle the surface with cornmeal before rolling; it makes it easier to move the dough around and transfer it to the pan, especially if you're working with a hot pizza stone. Let rise 20-25 minutes before transferring to pan.
The Pan
I honestly think a pizza stone does a much better job than a regular pizza pan or baking sheet. I just wish I had figured this out a long time ago. For the first few uses, you'll want to season the stone with oil and cornmeal (the stone should come with directions). For baking, place the stone in a cold oven and let it heat to 450 F (I put it in after rolling out the dough). Pull it out of the oven, add the crust that's been rising for 20 minutes, add your toppings, and turn the heat down to 425 F for baking. It helps to have two people to transfer the dough to the hot stone and quickly arrange the toppings.
If you don't have a pizza stone, you can let the crust rise right on the pizza pan. Preheat the oven to 425 F while you wait.
The Sauce
If you have a source for homemade pizza sauce, lucky you. If not, you can still doctor up the canned or jarred stuff for extra flavor. I use about 1 cup (8 oz.) sauce for a 14-inch pizza. Regardless of whether it's seasoned pizza sauce or plain tomato sauce, I always add (per cup of sauce):
1 tsp. dried basil
1 tsp. dried oregano
1/2 tsp. garlic powder
2-3 T. Parmesan cheese
The Cheese
I never believed it would work, but my husband showed me a neat trick that's quite delicious: put the cheese on after the sauce and before the other toppings. Just do it. And don't skimp on the cheese. It's one of the best parts.
For a basic pizza, I generally use pre-shredded mozzarella, which is usually the same price as chunk cheese; Kroger often has the 1-lb. bags on sale for $3. They freeze well, so stock up if you see a good deal.
The Toppings
Make sure all your toppings are ready in advance. You don't want to be rushing to chop olives while your pizza stone sits there getting cold (and/or baking the empty crust as it sits). Resist the urge to use fifty different toppings all at once. Go with two or three that compliment each other. For the one in these pictures, I used pepperoni (Aldi has the best price for that), sauteed onions (red or white/yellow are both good), and chopped jarred artichokes (water packed or marinated, also from Aldi). Sauteed or (gasp!) canned mushrooms are another favorite of mine.
The.. um... Baking
Bake your completed masterpiece in a preheated 425 F oven for 10-15 minutes. My oven makes perfect pizzas at 13 minutes; you may need to keep a close eye on yours and do a little trial-and-error experimentation before you figure out the best timing for your oven.
Monday, April 9, 2012
Artichoke Stuffed Leg of Lamb, Part 2
As promised, here are a few photos of this year's rolled leg of lamb, start to finish. I decided to be extra adventurous and bone and butterfly the meat myself, with the help of Lance the Butcher and his "leeg of laimb." If you're planning to try this yourself, I would definitely follow the video and not my pictures, but I thought it would be interesting to show the whole process.
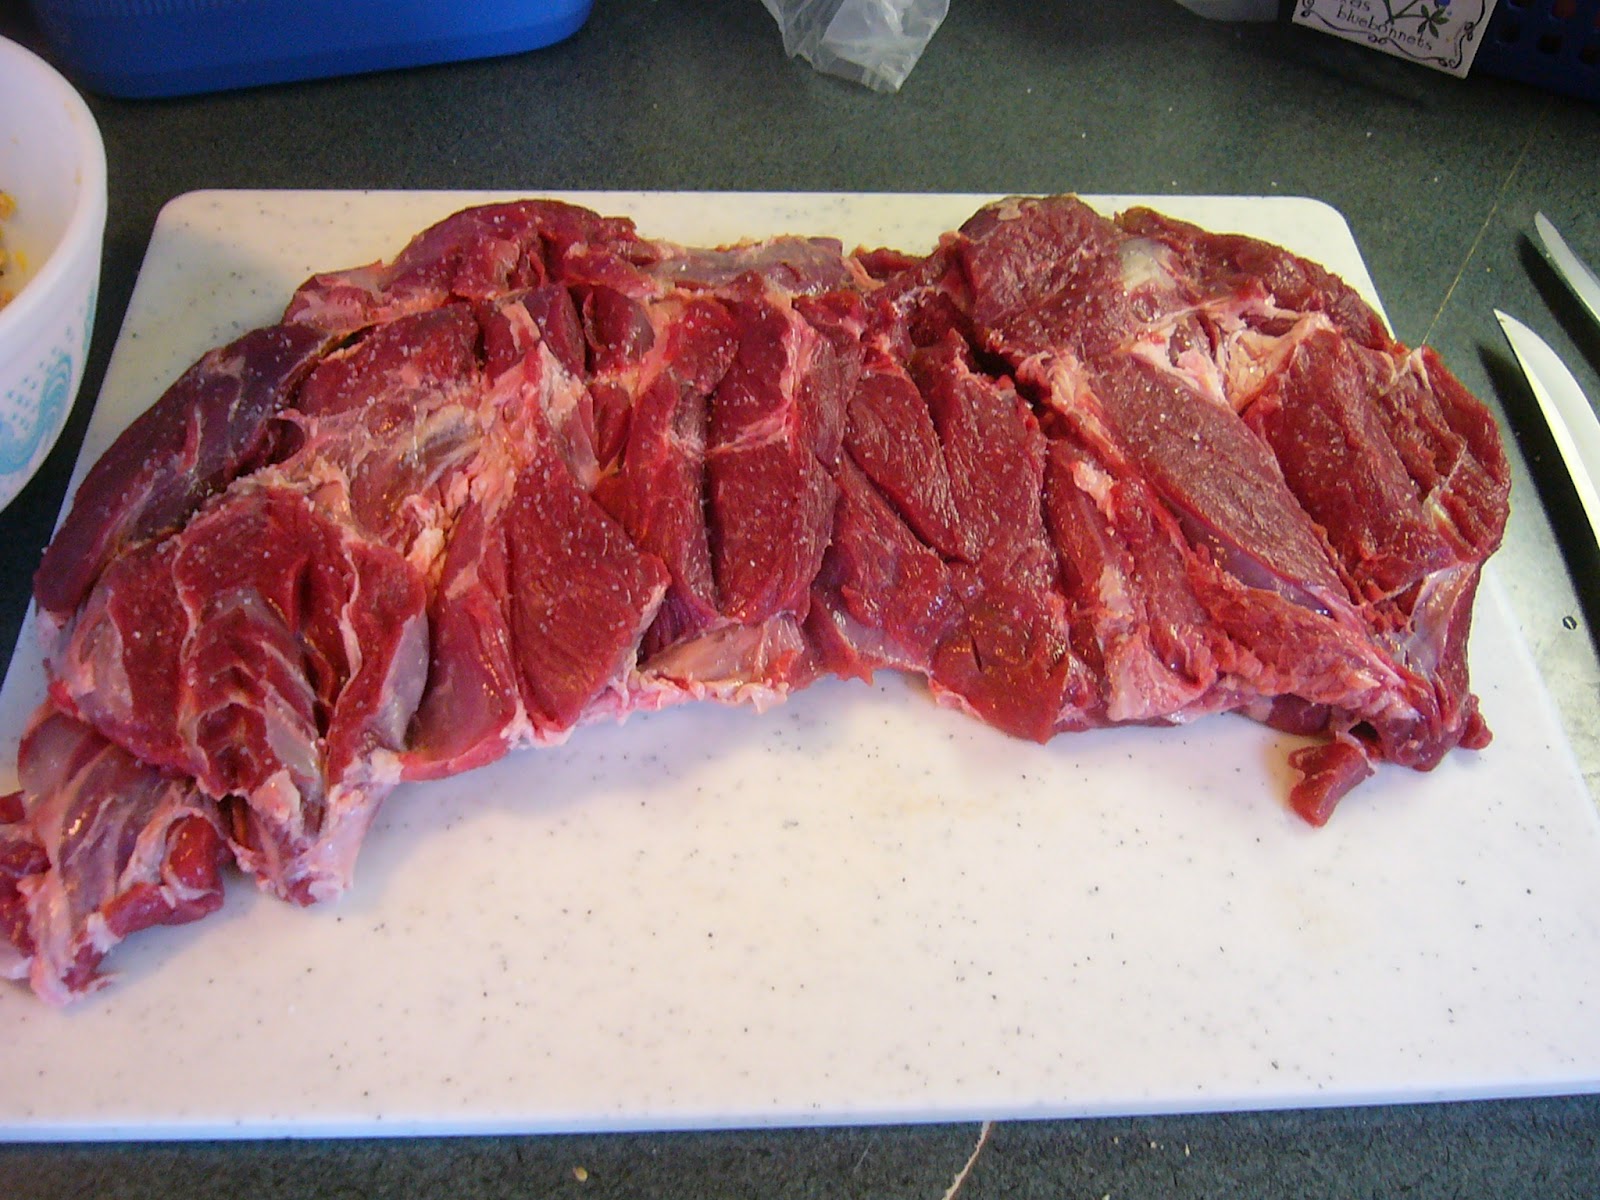
Start with your leg of lamb. Mine was 7 pounds and semi-boneless, which basically meant the hip bone and socket had already been separated and the extra piece removed. You can see the exposed hip bone in the upper center of the cut part here.
Get used to working with the meat by cutting off any excess fat, especially on the skin side of the meat. This helps reduce any gamey flavors. I ended up removing at least half a pound of fat.
Carefully cut around the exposed hip bone with the tip of your (freshly sharpened) knife, separating it from the surrounding meat and tendons.
Cut along both sides of the bone on both ends, beginning to free it from the surrounding meat while at the same time keeping the meat in a single piece.
Make a few more cuts to open up the thickest parts, and there you have it: a butterflied leg of lamb!
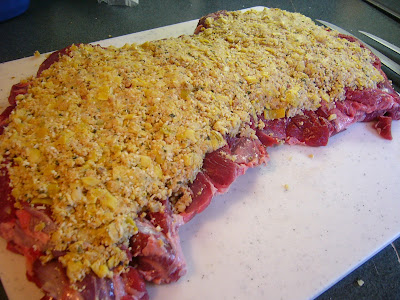
Spread with your delicious artichoke/bacon/Parmesan concoction (prepared the day before).
Roll the whole thing up.
Tie with kitchen string so it all stays together and looks fancy.
Roast; remove string; plop on a platter. Ooh and aah.
Carve at the table. Or let your husband do it. Whatever.
Devour.
Start with your leg of lamb. Mine was 7 pounds and semi-boneless, which basically meant the hip bone and socket had already been separated and the extra piece removed. You can see the exposed hip bone in the upper center of the cut part here.
Get used to working with the meat by cutting off any excess fat, especially on the skin side of the meat. This helps reduce any gamey flavors. I ended up removing at least half a pound of fat.
Carefully cut around the exposed hip bone with the tip of your (freshly sharpened) knife, separating it from the surrounding meat and tendons.
Cut along both sides of the bone on both ends, beginning to free it from the surrounding meat while at the same time keeping the meat in a single piece.
Turn the whole thing over and cut along the bottom side of the bone (hoof end), pulling the meat back from the bone on the bottom half.
Repeat on the other end (near the hip joint).
Eventually you will be able to cut the bone free from a single piece of meat. Don't forget to freeze the bone for making broth or stew.
Spread with your delicious artichoke/bacon/Parmesan concoction (prepared the day before).
Roll the whole thing up.
Tie with kitchen string so it all stays together and looks fancy.
Roast; remove string; plop on a platter. Ooh and aah.
Carve at the table. Or let your husband do it. Whatever.
Devour.
Wednesday, April 4, 2012
Artichoke Stuffed Leg of Lamb
After much deliberation, I have decided that I am not really a fan of ham. Especially for Easter. First you devour giant slices of it with scrambled eggs at the church Easter breakfast. Then you eat clove-studded, honey-glazed slabs for Easter dinner at your grandmother's. Then you pick at the leftovers all week, until ham sandwiches and ham spread are coming out of your ears and the very mention of ham makes you run for a glass of water.
In my house, ham sits in the freezer for months until I finally run out of dinner ideas and reluctantly get it out to thaw. Maybe I'm just not a ham-cooking expert (actually, I know that's the case), but about two bites in, I usually decide that I'm really not a fan. So it sits in the fridge for a week, while I bravely try to put it on sandwiches and salads and turn it into spread. Then we forget about the spread until it turns an interesting shade of gray and my husband decides he'd rather not risk dying by eating it. I try to tell him it always does that, then I take a few halfhearted bites before deciding that I don't feel like dying either. And so the ham dies instead.
Forget the ham. This year, make this beautiful leg of lamb--boned, butterflied, stuffed with artichokes and bacon and Parmesan, rolled, roasted, and served in mouthwatering glory--instead. It may have been beginner's luck, but mine turned out perfectly last year. Hopefully this year's attempt goes just as smoothly. My mouth is watering just thinking about it.
Of course, you're not going to find leg of lamb at the co-op. This recipe is a splurge, but it's well worth it. Meijer has a good sale on semi-boneless leg of lamb this week for $3.99 a pound (regularly $7/lb.). Last year they boned and butterflied it for me; I just had to go back the next day to pick it up. If you want to do the work yourself, try following a YouTube video like this one (the lady is kind of obnoxious, but you have to love the New Zealand accents).
Jarred artichokes (get water packed, not marinated) are $2.49 at Aldi. Pre-shredded Parmesan is $1.99 for 5 oz., also at Aldi. If you use bacon (the original recipe calls for pancetta), be sure to remove as much excess fat as possible. Fresh mint is under $2 a bunch at Meijer (and don't omit the mint sauce--it's so much better than that nasty mint jelly stuff). All that, plus a few ingredients that you probably already have on hand, adds up to about $35--not too bad for a fancy entree that serves 8 to 10.
Plan at least 2 hours for prep time and 2 hours for cooking and resting. You can do a lot of the work, such as preparing the sauce and stuffing, in advance. An instant-read thermometer (or a meat thermometer at minimum) is a must; I found mine at Wal-Mart for a decent price and I use it all the time. You'll also need to buy kitchen twine; last year I could only find it at Bed Bath and Beyond, for maybe $5. It lasts forever and will come in handy for cooking turkey, not to mention your future adventures in lamb roasting.
Artichoke Stuffed Leg of Lamb (based on this recipe from Martha Stewart Living)
Time: 2 hours prep, 2 hours cooking/resting
Serves 8-10
1 whole head garlic
4 ounces bacon (uncooked), finely chopped
1/2 cup finely grated Parmesan cheese (1 oz.)
1/2 cup fresh plain breadcrumbs (don't use the dry kind in a can)
1/4 cup fresh mint, finely chopped
3 T. fresh lemon juice (from about 1 1/2 lemons)
coarse salt and freshly ground black pepper
2 jars (12 oz. each) quartered artichoke hearts packed in water (NOT marinated), finely chopped
1 leg of lamb, bone removed (7-8 pounds), butterflied
olive oil, for rubbing
Mint sauce:
1/2 bunch fresh mint, finely chopped
1/2 cup olive oil
1 T. white-wine vinegar
1 1/2 tsp. fresh lemon juice
1/2 tsp. sugar
1/2 tsp. coarse salt (or 1/4 tsp. table salt)
Prepare stuffing: Place head of garlic in a small saucepan lined with a steamer basket. Add 1 cup water (or enough to reach the bottom of the steamer). Cover; bring to a boil. Reduce heat; simmer 10 minutes. Transfer garlic to a plate; let cool. Squeeze garlic out of the skins into a food processor. Add bacon, cheese, breadcrumbs, mint, lemon juice, 1 tsp. coarse salt (or 1/2 tsp. table salt), and some pepper. Pulse until combined. Add artichokes; pulse a few times, keeping mixture chunky.
Prepare mint sauce: Combine all ingredients in a jar. Cover; shake to combine. Refrigerate until ready to use (keeps up to 1 month).
Prepare lamb: Lay lamb flat on a work surface (I use a large cutting board), skin side down. Remove any excess fat (it's good to have a little fat, but that's where any gamey flavors will come from). Season with salt. Spread artichoke mixture over top, leaving a 1/2-inch border all around. Tightly roll lamb, and tie with kitchen twine at 2-inch intervals to hold (here's how). (Prepared lamb can be refrigerated for up to 4 hours; bring to room temperature before roasting.)
Rub lamb with oil, and season generously with salt and pepper. Transfer to a roasting pan fitted with a roasting rack, and add water to pan (about 1/2 inch). Roast for 30 minutes at 450 F. Reduce oven temperature to 350 F. Continue to roast until an instant-read thermometer reaches 135 degrees (for medium-rare), 1 hour to 1 hour 15 minutes. Let rest (loosely covered with foil) for 20 to 30 minutes before carving. Serve with mint sauce on the side.
----
I took a few pictures of the process last year; unfortunately, none of my pictures of the finished roast turned out. I'll have to post more after this year's attempt.
In my house, ham sits in the freezer for months until I finally run out of dinner ideas and reluctantly get it out to thaw. Maybe I'm just not a ham-cooking expert (actually, I know that's the case), but about two bites in, I usually decide that I'm really not a fan. So it sits in the fridge for a week, while I bravely try to put it on sandwiches and salads and turn it into spread. Then we forget about the spread until it turns an interesting shade of gray and my husband decides he'd rather not risk dying by eating it. I try to tell him it always does that, then I take a few halfhearted bites before deciding that I don't feel like dying either. And so the ham dies instead.
Forget the ham. This year, make this beautiful leg of lamb--boned, butterflied, stuffed with artichokes and bacon and Parmesan, rolled, roasted, and served in mouthwatering glory--instead. It may have been beginner's luck, but mine turned out perfectly last year. Hopefully this year's attempt goes just as smoothly. My mouth is watering just thinking about it.
Of course, you're not going to find leg of lamb at the co-op. This recipe is a splurge, but it's well worth it. Meijer has a good sale on semi-boneless leg of lamb this week for $3.99 a pound (regularly $7/lb.). Last year they boned and butterflied it for me; I just had to go back the next day to pick it up. If you want to do the work yourself, try following a YouTube video like this one (the lady is kind of obnoxious, but you have to love the New Zealand accents).
Jarred artichokes (get water packed, not marinated) are $2.49 at Aldi. Pre-shredded Parmesan is $1.99 for 5 oz., also at Aldi. If you use bacon (the original recipe calls for pancetta), be sure to remove as much excess fat as possible. Fresh mint is under $2 a bunch at Meijer (and don't omit the mint sauce--it's so much better than that nasty mint jelly stuff). All that, plus a few ingredients that you probably already have on hand, adds up to about $35--not too bad for a fancy entree that serves 8 to 10.
Plan at least 2 hours for prep time and 2 hours for cooking and resting. You can do a lot of the work, such as preparing the sauce and stuffing, in advance. An instant-read thermometer (or a meat thermometer at minimum) is a must; I found mine at Wal-Mart for a decent price and I use it all the time. You'll also need to buy kitchen twine; last year I could only find it at Bed Bath and Beyond, for maybe $5. It lasts forever and will come in handy for cooking turkey, not to mention your future adventures in lamb roasting.
Artichoke Stuffed Leg of Lamb (based on this recipe from Martha Stewart Living)
Time: 2 hours prep, 2 hours cooking/resting
Serves 8-10
1 whole head garlic
4 ounces bacon (uncooked), finely chopped
1/2 cup finely grated Parmesan cheese (1 oz.)
1/2 cup fresh plain breadcrumbs (don't use the dry kind in a can)
1/4 cup fresh mint, finely chopped
3 T. fresh lemon juice (from about 1 1/2 lemons)
coarse salt and freshly ground black pepper
2 jars (12 oz. each) quartered artichoke hearts packed in water (NOT marinated), finely chopped
1 leg of lamb, bone removed (7-8 pounds), butterflied
olive oil, for rubbing
Mint sauce:
1/2 bunch fresh mint, finely chopped
1/2 cup olive oil
1 T. white-wine vinegar
1 1/2 tsp. fresh lemon juice
1/2 tsp. sugar
1/2 tsp. coarse salt (or 1/4 tsp. table salt)
Prepare stuffing: Place head of garlic in a small saucepan lined with a steamer basket. Add 1 cup water (or enough to reach the bottom of the steamer). Cover; bring to a boil. Reduce heat; simmer 10 minutes. Transfer garlic to a plate; let cool. Squeeze garlic out of the skins into a food processor. Add bacon, cheese, breadcrumbs, mint, lemon juice, 1 tsp. coarse salt (or 1/2 tsp. table salt), and some pepper. Pulse until combined. Add artichokes; pulse a few times, keeping mixture chunky.
Prepare mint sauce: Combine all ingredients in a jar. Cover; shake to combine. Refrigerate until ready to use (keeps up to 1 month).
Prepare lamb: Lay lamb flat on a work surface (I use a large cutting board), skin side down. Remove any excess fat (it's good to have a little fat, but that's where any gamey flavors will come from). Season with salt. Spread artichoke mixture over top, leaving a 1/2-inch border all around. Tightly roll lamb, and tie with kitchen twine at 2-inch intervals to hold (here's how). (Prepared lamb can be refrigerated for up to 4 hours; bring to room temperature before roasting.)
Rub lamb with oil, and season generously with salt and pepper. Transfer to a roasting pan fitted with a roasting rack, and add water to pan (about 1/2 inch). Roast for 30 minutes at 450 F. Reduce oven temperature to 350 F. Continue to roast until an instant-read thermometer reaches 135 degrees (for medium-rare), 1 hour to 1 hour 15 minutes. Let rest (loosely covered with foil) for 20 to 30 minutes before carving. Serve with mint sauce on the side.
----
I took a few pictures of the process last year; unfortunately, none of my pictures of the finished roast turned out. I'll have to post more after this year's attempt.
| Butterflied leg of lamb--you may need to make a few cuts to get it to lay flat. |
| Topped with artichoke stuffing. |
| Rolled and tied. |
| Oh, and I made this delicious lemon-blueberry bundt cake last year--recipe here |
Thursday, March 29, 2012
Baked Macaroni and Cheese
Every Sunday after church, my family eats macaroni and cheese for lunch. The kind from a box. With powdered orange "cheese." With peanut butter and crackers on the side. What a bunch of weirdos.
Actually, they probably eat much more sophisticated lunches now that I'm out of the house.
And actually, my husband and I started the tradition on vicarage of eating boxed mac and cheese every Sunday after church.
And actually, we still do.
*Sigh*
I've honestly never been much of a fan of homemade macaroni and cheese, probably because I was used to the boxed stuff as a kid and thought that it was the real thing, to which no other macaroni could compare. On the other hand, I can't even remember the last time I've tried a bowl of the homemade stuff. Apparently, I've been missing out. This week, inspired by the Good Eats episode "For Whom the Cheese Melts 2" (recipe here), I made a baked version from the magazine Fine Cooking. It was good. Not that you can really go wrong with three kinds of cheese and a crispy, golden brown topping.
As usual, I made a few minor changes, like substituting panko for the fresh breadcrumbs. (Panko, by the way, is great for all kinds of toppings and breadings. It's under $2 for a box and keeps forever. You should be able to find it in the Asian section at Meijer or Kroger.) Next time, I'll probably cut down on the thyme, which was slightly overpowering this time around. I stuck with the basic version, but the recipe also suggests some extras, like ham or hot chilies, that you can add for a new level of deliciousness. Maybe next Sunday I'll add some bacon. You can bet I won't be opening a box.
Baked Macaroni and Cheese (based on this recipe)
Serves 4
Time: 45 minutes
Kosher or coarse salt
3 T. butter
1 small onion, finely diced
3 T. flour
1 1/2 tsp. Dijon or spicy mustard
2 cups 2% or whole milk
1 large sprig fresh thyme, plus 1/2 tsp. chopped fresh thyme leaves (OR 1/4 tsp. dry thyme leaves)
1 bay leaf
4 oz. (1 packed cup) grated extra-sharp Cheddar
2 oz. (1/2 packed cup) grated Monterey Jack
1/4 tsp. Worcestershire sauce
1/4 tsp. Tabasco sauce
freshly ground black pepper
1 1/2 tsp. Dijon or spicy mustard
2 cups 2% or whole milk
1 large sprig fresh thyme, plus 1/2 tsp. chopped fresh thyme leaves (OR 1/4 tsp. dry thyme leaves)
1 bay leaf
4 oz. (1 packed cup) grated extra-sharp Cheddar
2 oz. (1/2 packed cup) grated Monterey Jack
1/4 tsp. Worcestershire sauce
1/4 tsp. Tabasco sauce
freshly ground black pepper
1/2 lb. elbow macaroni or other small pasta, such as small shells
3 T. butter, melted
1 cup panko (Japanese breadcrumbs)
1/4 cup Parmesan
1 cup panko (Japanese breadcrumbs)
1/4 cup Parmesan
Heat the oven to 400°F and put a large pot of well-salted water on to boil over high heat.
Meanwhile, in another large pot or Dutch oven (I only have one big pot, so I used a large skillet with high sides), melt 3 T. butter over medium heat. Add the onion and 1/4 tsp. salt and cook, stirring occasionally with a wooden spoon, until softened, 4 to 5 minutes. Add the flour and cook, stirring, until slightly darker, 1 to 2 minutes. Stir in the mustard.
Switch to a whisk and gradually add the milk, whisking constantly. Go slowly at first, whisking until the mixture is smooth before adding more milk.
Switch back to the spoon and stir in the thyme sprig, bay leaf, and 1/4 tsp. salt. Bring to a bare simmer, and cook, stirring frequently, for 15 minutes (reduce the heat to medium low or low as needed to maintain the bare simmer). Discard thyme sprig and bay leaf. Add Cheddar and Jack cheeses, stirring until melted, then add the Worcestershire and Tabasco. Season to taste with salt and pepper. Keep warm, stirring occasionally.
In a medium bowl, toss the panko, Parmesan, melted butter, chopped thyme, 1/4 tsp. salt, and 1/8 tsp. pepper. Scatter mixture evenly over the pasta.
Bake, uncovered, until topping is golden, about 15 minutes. Let rest for 5 to 10 minutes before serving.
Wednesday, March 21, 2012
Crispy Chicken Quesadillas
It's hot. Today it was hotter in Fort Wayne than in Dallas, Atlanta, Miami, and, yes, even the Bahamas. Eighty-seven degrees. In March. In Fort Wayne. Pretty soon the Floridians are going to be planning spring break trips to Indiana so they can work on their tans. And while I haven't turned on the air conditioning like some of you wimps out there, I determined that using the oven was still a dumb move. Instead, I broke out the food processor and made ham and cheese spread. It's not the healthiest meal out there. I don't think it even qualifies as a meal. It is, quite literally, ham and cheese and mayonnaise and more cheese on crackers. Seasoned with sherry, mustard, pepper, and... definitely not salt. My brain must've melted--it's the only possible reason I could have been talked into eating that stuff for dinner. Or pure laziness. Did I mention it was hot?
Anyway, if you're looking for something a bit more reasonable that also doesn't involve turning your kitchen into a blazing inferno (more on that another time), I suggest these tasty quesadillas. I adapted them from a recipe found on Pinterest, and you can make your own changes too, although the combination of chicken, rice, and black beans is hard to top. I used small tortillas, which worked either as quesadillas or folded in half and stuffed; larger (burrito size) tortillas can be made into wraps, as described in the original recipe.
Crispy Chicken Quesadillas
Time: 30 minutes (plus rice- and chicken-cooking time)
Serves 6
1 1/2 cups cooked rice (I used one bag of boil-in-bag brown rice to save time)
1 1/2 cups cooked shredded chicken
1 can black beans, rinsed and drained
1 green onion, finely sliced (white and green parts)
1 (4 oz.) can diced green chilies
1/4 cup fresh cilantro, chopped
juice of 1 lime
2 tsp. chili powder
2 tsp. ground cumin
1/2 tsp. garlic salt
butter or cooking spray
1 pkg. small flour tortillas
about 2 cups shredded cheese (I used sharp cheddar
sour cream, shredded lettuce, and diced tomatoes, for serving (optional)
Thoroughly combine first 10 ingredients (through garlic salt). If necessary, heat mixture in microwave (it should be warmer than room temperature).
Preheat a skillet over medium heat. For each quesadilla, butter two tortillas on one side only. Place one tortilla, butter side down, on hot pan. Quickly sprinkle cheese over tortilla, leaving narrow border around edges, then allow to partially melt (to speed this process, top with a lid--avoid overcooking the tortilla). Spread chicken mixture over cheese. Top with second tortilla, butter side up. When bottom tortilla is browned, flip the whole quesadilla and brown the second side (I use two spatulas, one to flip and the other to "catch" the quesadilla on its way down).
Serve with sour cream, lettuce, and tomato (avocado is yummy, too!).
Sunday, March 18, 2012
Venison-Bacon Burgers
You know you want one. The weather's perfect, the grill is calling, and you've got one last little bit of venison in the freezer. And did I mention the bacon? Why waste perfectly good bacon by covering it in chocolate or deep-frying it to death, when you can turn it into a deliciously juicy burger?
Venison-Bacon Burgers (from this recipe)
Time: 1 hour or less
Serves 6
6 slices bacon
2 minced shallots (I used green onions)
2 lbs. ground venison
1 tsp. minced garlic (about 1 clove)
1 T. Worcestershire sauce
1 T. chopped fresh parsley
1 egg, lightly beaten
salt and pepper, to taste
olive oil as needed
Cook bacon in a skillet over medium heat until brown and crispy. Crumble bacon (chop or use food processor) and place in large mixing bowl to cool. Add bacon grease from pan, leaving 1-2 tsp. to cook aromatics.
Saute garlic and shallots in reserved bacon grease over medium heat until softened (add a little olive oil if you don't have enough grease). Add to bacon. Once cooled, add venison, Worcestershire, parsley, egg, and salt and pepper. Work mixture together with hands until evenly combined. Add a little olive oil if it seems too dry (venison is very lean, so you need to add a little fat in the form of bacon grease or olive oil to keep it moist).
Cover and refrigerate the whole mixture for about 20 minutes. Meanwhile, preheat grill to medium-high heat. Shape chilled meat into 6 patties and grill until desired doneness (in other words, I have no idea how long my husband grilled them--but he did an excellent job).
Subscribe to:
Posts (Atom)