Showing posts with label entrees. Show all posts

Sunday, July 1, 2012

Cleaning Out the Freezer


Strange things can happen when you empty out your freezer.  I have no idea how those wonton wrappers and imitation crab got in there, but I sure wasn't going to let them go to waste.


Deep-fried cream cheese, anyone?

For more inspiration, check out these delicious recipes for beef pot stickers and crab rangoons.  Be forewarned--they both make huge batches.  Not that that's a bad thing.

Friday, June 29, 2012

Chicken Bacon Ranch Pizza


One of the worst parts about moving is changing jobs.  I've had a lot of different jobs, from my first babysitting gig as an eleven-year-old (don't worry, my parents were next door), to a summer spent opening gallon tubs of potato salad and grape jelly at a youth camp, to a torturous stint in a data entry cubicle.  I've taught piano lessons and dished up Chinese food and sorted through mountains of historic nursing school documents.  Some jobs were great; others were barely worth the paycheck.

Moving usually means you have to leave your job behind.  My last day at work was a week ago.  My job was awesome.  Yeah, it was a library, and I'm a librarian, and I was thrilled to be finally working in my field, even as just a lowly clerk.  And yeah, I was privileged to spend my afternoons with probably the best group of coworkers ever.  But one of the best parts of my job was the food (you knew there had to be some point to this, right?).  My coworkers throw a party for every major life event.  Every time someone has a birthday, there's a party.  Every time someone has a baby, there's a shower.  And we're not talking stale chips and dip here.  These are all-out feasts with salads and casseroles and five kinds of dessert.  The library hosts an annual "edible book festival" for the school and the community that celebrates books and--you guessed it--food.  On Administrative Professionals Day, half the staff brings in treats to share, because "we're all administrative professionals, right?"  The culinary arts students bring in samples of their masterpieces throughout the school year.  There are almost always donuts and candy and random treats in the staff work room.  And I was sent off with a going-away party to rival all others.  It's a miracle they didn't have to roll me out of there.

One of the repeat foods at our parties (besides Carol's brownies and Ward's artichoke casserole) was a deliciously fattening chicken bacon ranch pizza.  If you live in Fort Wayne, you should visit MJ's and try one.  If you don't, you can still make it at home--and this is a great use of that Brakebush chicken in the back of your freezer!  I haven't given any amounts for the ingredients--just use what looks good, and don't skimp on the cheese.


Chicken Bacon Ranch Pizza

Crust for one 12" to 14" pizza (follow my directions here, or use your favorite)
Bottled ranch dressing
Mozzarella cheese
Red or white onion, diced and sauteed in olive oil until tender
Cooked plain chicken, diced
Cooked bacon, crumbled (or real bacon bits)

Spread a thin layer of ranch dressing on unbaked crust, to within about 1/2" of the edge.  Layer remaining ingredients on crust in order listed.  Bake according to crust directions, or until cheese is melted.

Wednesday, June 6, 2012

Copycat Chipotle Barbacoa Beef with Cilantro Lime Rice

I can't think of a more delicious bundle of goodness than a giant Chipotle burrito, packed to the gills with barbacoa beef, black beans, corn salsa, and that most wonderful of concoctions--cilantro lime rice.  I don't think I will ever tire of biting into a burrito the size of my head.  It's almost as great as digging through the treasures hidden inside like some sort of excavator.

Back to reality.  There are no Chipotles in North Dakota.  (There are no Aldis either.  You would think that a business with locations in Hungary and Australia could set up a nice little store in Fargo.  Not.)  I have brainstormed a list of potential solutions to this tragic problem:  1) eat at Chipotle every day for the next month, in hopes that I will somehow sate any future cravings all at once; 2) buy a lifetime supply of Chipotle barbacoa burritos and bring them to North Dakota with me; or 3) invent my own version of Chipotle that tastes awesome and doesn't cost $8 a pop.

I went with the last one.  Shipping a freezer-ful of burritos across the country could be a logistical nightmare.


Copycat Chipotle Barbacoa Beef with Cilantro Lime Rice
Time:  Begin at least 8 hours ahead

Filling options:
Black beans, drained, rinsed, and heated
Cooked sweet corn, cut from the cob and heated (leftover grilled corn is my favorite)
Tomato, diced
Lettuce, finely chopped
Cheddar or Mexican-blend cheese, shredded
Sour cream
Guacamole (or thinly sliced avocado)
Barbacoa beef (see below)
Cilantro lime rice (see below)

Another option is corn salsa with lime (combines black beans, corn, tomatoes, and onion with seasonings).  I haven't tried it yet, but it looks good!

Flour tortillas (8-inch or burrito-size)

Slow-Cooker Barbacoa Beef (from this recipe)
While this doesn't taste exactly like the Chipotle version, it is pretty tasty.  I haven't made any major changes to the original recipe--mostly I cut down the amounts to make a smaller recipe.  I also think that there are much better uses for beef brisket, so I used an arm roast that I found at the co-op months ago.  Any inexpensive roast will do.  If you go with a tougher cut of meat, however, you will need to cook it "low and slow."  I found that the method of cooking on high then on warm was not enough to break down the meat fibers.

2 chipotle peppers in adobo sauce (from a can), chopped, plus 2 T. of the sauce
1/2 bunch cilantro, coarsely chopped
1/2 red onion, peeled and cut into large chunks
5-6 large garlic cloves, peeled and smashed
3 dry bay leaves
1 tsp. ground cloves
1 tsp. ground cumin
1 1/2 tsp. kosher salt
juice of 2 limes
1/4 cup cider vinegar
3 to 4 pound beef roast (see note above), excess fat removed
2 to 3 cups beef or chicken stock

In a food processor, pulse together chipotle peppers and sauce, cilantro, red onion, and garlic. Combine with clove, cumin, salt, lime juice, and cider vinegar in the insert of a slow cooker. Place the beef on top (cut it into pieces if doesn't fit). Add stock to cover the meat and place bay leaves on top.

Cook on low for at least 6 to 8 hours.

Remove meat from slow cooker and place on rimmed baking sheet. Use two forks to pull the meat apart. Place shredded beef in large bowl and ladle cooking liquid over the top, until it is saturated but not soupy.

The remaining liquid can be frozen for use in other recipes.  The meat itself also freezes well (for tips on making an extra-large batch, see the original recipe).

Cilantro Lime Rice
I roughly followed the recipe here, but modified it for use in my rice cooker.  Whatever method you use to cook the rice, just toss it with the other ingredients and serve hot.

1 cup white or basmati rice, cooked with 2 cups water and 1 tsp. salt
2-3 tsp. lime juice
3 T. fresh chopped cilantro
2-3 tsp. vegetable oil

Friday, May 18, 2012

Spicy Sausage Wraps with Onions and Spinach

I posted this recipe on Facebook before my blog even got started.  I've added some pictures (after digging up my old, not-so-wonderful camera) and made a few changes.  My husband claims this is one of his favorite recipes.  They're yummy.  They're easy.  Make them.


I saw this tasty, inexpensive recipe in the local newspaper while on vicarage.  The original recipe calls for spicy turkey sausage meat, but you can use any variety of turkey or pork bulk sausage.  Of the co-op varieties, I've used both the Italian and the Amish-style pork sausages.  To keep the spicy flavor, I usually add 1/4 tsp. red pepper flakes or cayenne powder at the end.  I buy my tortillas at Aldi; a 10-ct. package is $.99.  (Unfortunately, the Aldi brand doesn't seem to freeze as well as others.)  Aldi also has fairly reasonable prices on chunk cheese (about $2 for 8 oz.) if you can't find it at the co-op or on sale elsewhere.  I also use the Aldi Parmesan/romano cheese blend ($2.39)--admittedly not as good as fresh Parmesan, but it's my favorite "brand" of the pre-grated stuff.

Spicy Sausage Wraps with Onions and Spinach
Time:  30-45 minutes
Serves: 4-6

1 lb. bulk sausage (turkey or pork, spicy if possible)
1 Tb. olive oil
2 medium onions, thinly sliced (about 4 cups)
8 cups chopped fresh spinach (I just use the whole 10-oz. bag)
1 Tb. minced garlic
8 oz. mozzarella cheese, shredded
1/3 cup grated Parmesan cheese
ground black pepper, to taste
1/4 tsp. red pepper flakes OR 1/4 tsp. cayenne powder, optional
six 8-inch flour tortillas

In a large skillet over medium-high, cook sausage meat until no longer pink, about 6 minutes.  Drain; transfer sausage to a paper towel-lined dish and set aside.

Return skillet to the stove over medium heat.  Add oil and onions, then saute until golden and softened, about 9 minutes.  Stir in the garlic; cook 1 minute.  Add spinach; cover the pan and cook, stirring occasionally, until the greens are tender, 4 to 6 minutes.  Stir in the reserved sausage until mixture is well combined.  Gently stir in the mozzarella and Parmesan.  Add red pepper flakes or cayenne pepper, if desired.  Season with pepper.


Divide filling among the tortillas.  Roll up, placing the wrap seam-side down on a microwave-safe plate.  Microwave until heated through, about 1 to 2 minutes.  (Alternatively, heat wraps in a 350 F oven for 5-7 minutes.)

Sunday, May 13, 2012

Chicken with Curried Mango Sauce

I'm not really into dishes that combine fruit with meat.  I love meat.  I love fruit.  But apples with pork chops just aren't my thing.  Sometimes, though, I feel adventurous and try out a recipe that I normally wouldn't, just to make sure my taste buds aren't missing out.  Tonight I made these Pecan Crusted Chicken Wraps with Strawberry Honey Mustard.  They were pretty tasty, if you ask me.  My husband (who shares my fruit+meat opinions) thought they were too sweet.  I probably won't make them again, but they were a nice change of pace.

We both agree, however, that this mango chicken is basically awesome.  Since my [husband's] camera died this week, and since I don't make any major changes to the recipe, you'll just have to go here to make it.  You can substitute green or yellow bell pepper for the red.  I think the basmati rice is delicious with the tropical-ish flavors, but plain white or brown rice will work as well.  Just remember to start cooking it before you begin the chicken.  Butterflying the chicken breasts--or cutting them in half horizontally--will help them cook faster.  I also find that 1 tsp. oil is not nearly enough to keep the chicken from sticking to the pan, especially if it's been butterflied, so start with 1 T. oil, then add a little water later if the meat is still sticking.  Enjoy!

P.S.  Fresh chicken breasts are on sale at Kroger this week (through Thursday) for $1.88/lb.

P.P.S.  Aldi has some great deals on produce this week (through Wednesday), including 3-pack cucumbers for $0.69, 1-pound baby carrots for $0.69, 8-ounce mushrooms for $0.69, 10-ounce grape tomatoes for (you guessed it) $0.69, and 3-pack bell peppers for $1.29.  I love Aldi.

Saturday, April 28, 2012

Classic Beef Enchiladas


My grandmother was still in her teens when she married my grandfather, a man ten years her senior.  She was one hundred percent German.  He was one hundred percent Hispanic (mostly Mexican).  You can guess that food and favorite dishes were not a point of one hundred percent agreement between the two of them.  Needless to say, my grandma learned all about cooking chorizo and tamales and enchiladas--her mother-in-law's way--pretty quickly.  My dad and his brothers and sister grew up eating homemade Mexican dishes on a regular basis.  By the time I came along, tamale-making was a steadfast family tradition at Christmas, and my dad had recipes for fidello and picadillo and homemade flour tortillas close at hand.  And there is most certainly a "Mexican" section in my own recipe binder now.  My grandma still makes the world's best German potato salad.  But now she leaves most of the Mexican cooking up to us. :)

As promised, here's the recipe for my dad's classic enchiladas.  This is another one where I scribbled down some notes and later turned them into a real recipe with measurements and numbers.  Most of these family recipes focus more on technique and ingredients than specific amounts--those are left up to your own tastes and preferences.  Feel free to taste as you go, but don't skip important steps like lightly frying the tortillas or using from-scratch taco meat.  You won't regret it.  Yum.

Classic Beef Enchiladas
Time:  50-55 minutes (doesn't count the 20 minutes to prepare meat)
Serves 6-8

1 can (15-16 oz.) tomato sauce
1 heaping tsp. chili powder
1/4 tsp. garlic salt
1/4 tsp. seasoned salt
14-15 corn tortillas
2 cups (approx.) sharp cheddar cheese, diced
1 small to medium onion, diced
1/2 to 3/4 lb. taco meat
canola oil, for frying

Combine first 4 ingredients in a bowl; set aside.  Set up a work station with onions, cheese, and meat in separate bowls nearby.  Lightly grease a 9x13 casserole or pan (glass or metal both work) and set near your work station.

Make sure tortillas are dry (especially if they have been frozen and thawed).  Have lots of paper towels close at hand.  Heat about 1/4" oil in a large skillet over high heat (I use a skillet with 2" sides to prevent the oil from spattering).  The oil is ready when a drop of water sizzles when added to pan.  Reduce heat to medium high.  Using a pair of tongs, cook tortillas one by one in oil until softened, but NOT hard, about 10 seconds on each side.  Place on a plate lined with paper towel.

Assemble tortillas in sets of four or five, working quickly so they do not harden.  (It helps to have a second person rolling up the tortillas while the other fries them.)  Fill each tortilla with meat, cheese, and diced raw onions; roll up and place seam down in 9x13 pan.  You should be able to fit about 14 filled tortillas into the pan.

Cover completed tortillas with sauce; sprinkle with more cheese.  Cover.  Bake at 375 F for 20-30 minutes or until cheese is melted and enchiladas are heated through.  May be frozen before baking.

Saturday, April 14, 2012

Homemade Pizza


Probably the biggest ongoing disagreement in my marriage has to do with pizza.  Our list of domestic disputes is short.  We don't argue about the proper way to use up a tube of toothpaste, or whether the end of the toilet paper goes on the front of the roll or on the back, or which way the silverware should point in the dishwasher (mostly because we don't use our dishwasher).  However.  I, being a (mostly) rational and intelligent person, use a pizza cutter to cut my pizza, while my husband insists that the job must be done with a pair of kitchen shears.  His greatest triumph occurred when we received a pizza stone as a wedding shower gift, complete with a pair of scissors.  If I ask him to cut the pizza before dinner, you can guess that he doesn't grab the tool designed for the purpose.

Whatever.  At least we agree on the important things, such as the deliciousness of pizza.  And now that we're finally getting the hang of making really good homemade pizzas (after lots and lots of mediocre ones), we're turning it over to you.  If you already know how to make a perfect pizza, keep it up (and tell us how you do it).  If you've turned out some flops like I have, give these tips a try and let us know how it goes.  And if you believe that scissors are the only way to slice your food, just don't tell my husband.


Homemade Pizza
Time:  Begin at least 2-1/2 hours in advance
Yield:  One 14-inch pizza

From the bottom up...

The Crust
After experiments with Jiffy pizza crust mix (quick but lame) and from-scratch yeast dough (tasty but time-consuming), I finally broke down and gave our garage sale bread machine a try.  If you have one, I would definitely recommend using it for pizza dough.  It takes 90 minutes to do its thing, but you don't have to worry about kneading or temperature control or any of that mess.  If you don't have a bread machine, there are lots of traditional recipes out there.  Just don't do Jiffy.  Trust me.

For a single 12" or 14" crust:
3/4 cup + 3 T. warm tap water
2 T. oil
2 1/2 cups all purpose flour
1/2 tsp. sugar
1/2 tsp. salt
2 tsp. dry yeast (one packet usually has about 2 1/4 tsp. yeast)

Add liquids to bread machine pan.  Add dry ingredients in order, putting yeast into a small well at the top of other dry ingredients.  Program machine for dough (should take 90 minutes).

When dough cycle is complete, remove and knead 1 minute on a lightly floured surface.  Let rest 15 minutes.  Roll out into 12" or 14" inch circle (depending on your pan).  I like to sprinkle the surface with cornmeal before rolling; it makes it easier to move the dough around and transfer it to the pan, especially if you're working with a hot pizza stone.  Let rise 20-25 minutes before transferring to pan.

The Pan
I honestly think a pizza stone does a much better job than a regular pizza pan or baking sheet.  I just wish I had figured this out a long time ago.  For the first few uses, you'll want to season the stone with oil and cornmeal (the stone should come with directions).  For baking, place the stone in a cold oven and let it heat to 450 F (I put it in after rolling out the dough).  Pull it out of the oven, add the crust that's been rising for 20 minutes, add your toppings, and turn the heat down to 425 F for baking.  It helps to have two people to transfer the dough to the hot stone and quickly arrange the toppings.

If you don't have a pizza stone, you can let the crust rise right on the pizza pan.  Preheat the oven to 425 F while you wait.

The Sauce
If you have a source for homemade pizza sauce, lucky you.  If not, you can still doctor up the canned or jarred stuff for extra flavor.  I use about 1 cup (8 oz.) sauce for a 14-inch pizza.  Regardless of whether it's seasoned pizza sauce or plain tomato sauce, I always add (per cup of sauce):

1 tsp. dried basil
1 tsp. dried oregano
1/2 tsp. garlic powder
2-3 T. Parmesan cheese

The Cheese
I never believed it would work, but my husband showed me a neat trick that's quite delicious:  put the cheese on after the sauce and before the other toppings.  Just do it.  And don't skimp on the cheese.  It's one of the best parts.

For a basic pizza, I generally use pre-shredded mozzarella, which is usually the same price as chunk cheese; Kroger often has the 1-lb. bags on sale for $3.  They freeze well, so stock up if you see a good deal.

The Toppings
Make sure all your toppings are ready in advance.  You don't want to be rushing to chop olives while your pizza stone sits there getting cold (and/or baking the empty crust as it sits).  Resist the urge to use fifty different toppings all at once.  Go with two or three that compliment each other.  For the one in these pictures, I used pepperoni (Aldi has the best price for that), sauteed onions (red or white/yellow are both good), and chopped jarred artichokes (water packed or marinated, also from Aldi).  Sauteed or (gasp!) canned mushrooms are another favorite of mine.

The.. um... Baking
Bake your completed masterpiece in a preheated 425 F oven for 10-15 minutes.  My oven makes perfect pizzas at 13 minutes; you may need to keep a close eye on yours and do a little trial-and-error experimentation before you figure out the best timing for your oven.

Monday, April 9, 2012

Artichoke Stuffed Leg of Lamb, Part 2

As promised, here are a few photos of this year's rolled leg of lamb, start to finish.  I decided to be extra adventurous and bone and butterfly the meat myself, with the help of Lance the Butcher and his "leeg of laimb."  If you're planning to try this yourself, I would definitely follow the video and not my pictures, but I thought it would be interesting to show the whole process.

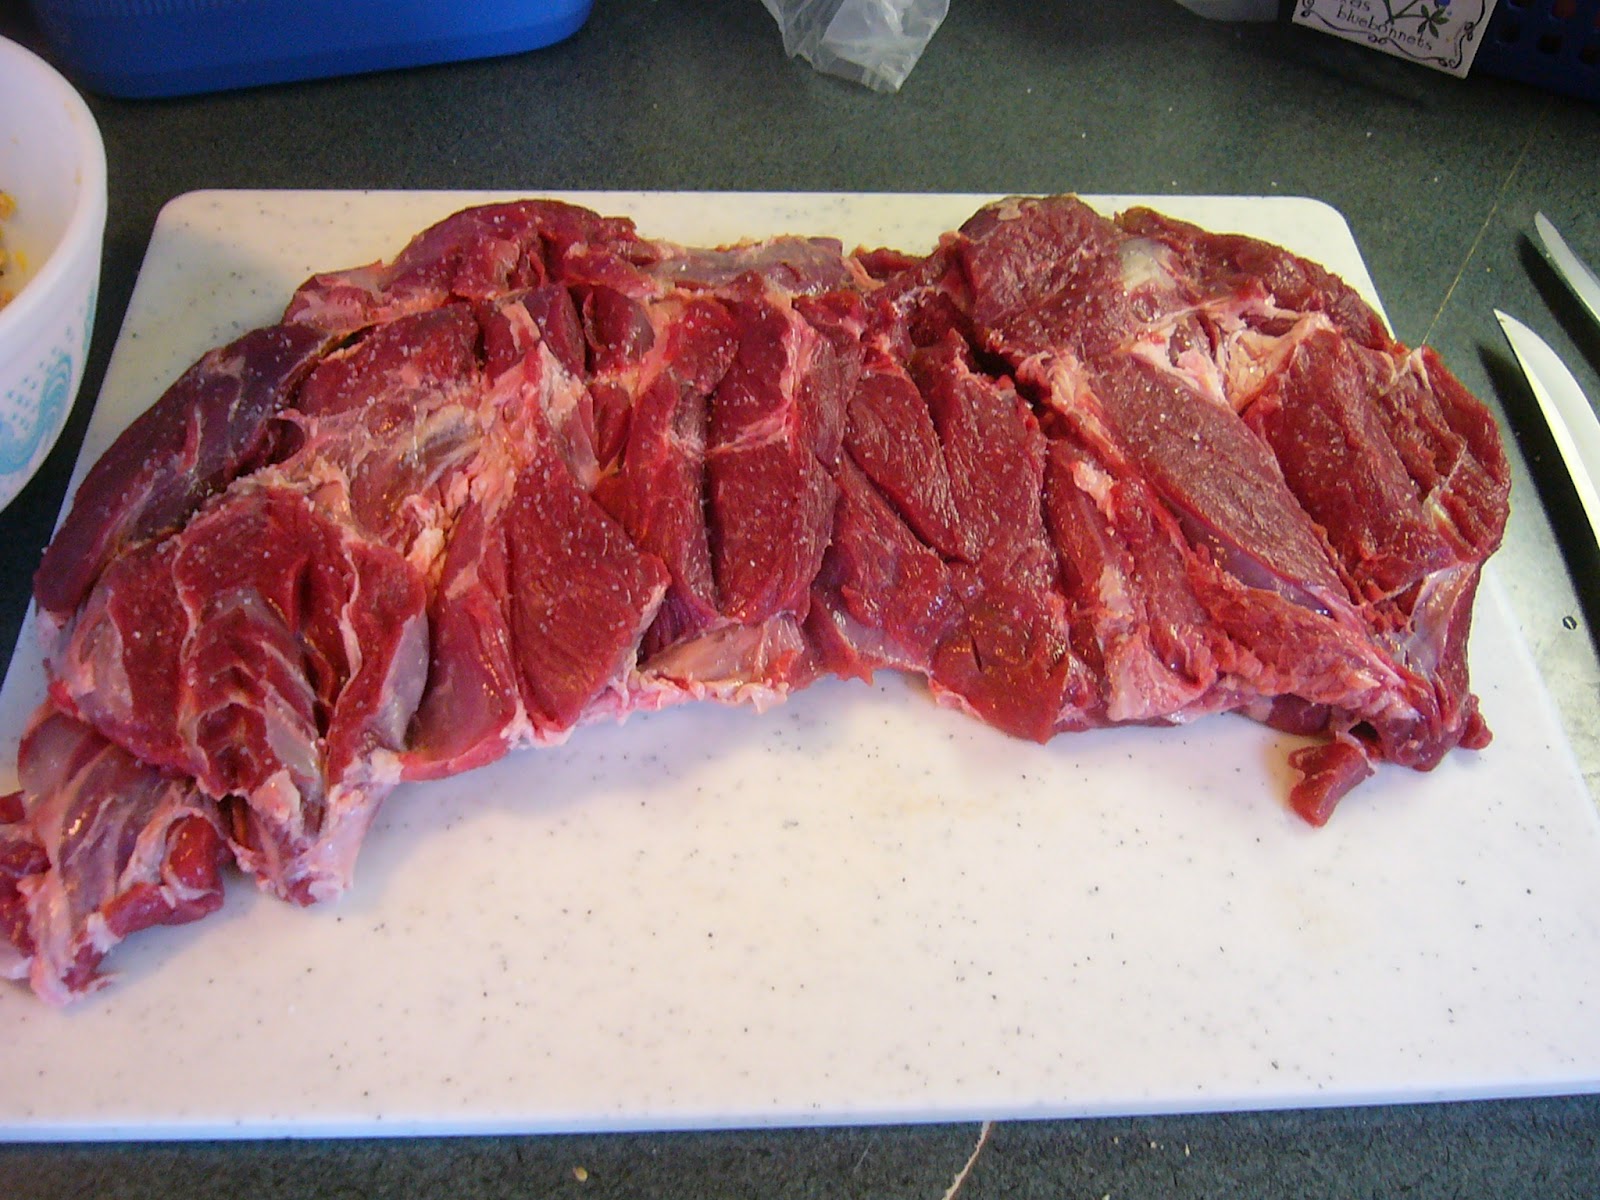
Start with your leg of lamb.  Mine was 7 pounds and semi-boneless, which basically meant the hip bone and socket had already been separated and the extra piece removed.  You can see the exposed hip bone in the upper center of the cut part here.


Get used to working with the meat by cutting off any excess fat, especially on the skin side of the meat.  This helps reduce any gamey flavors.  I ended up removing at least half a pound of fat.


Carefully cut around the exposed hip bone with the tip of your (freshly sharpened) knife, separating it from the surrounding meat and tendons.


Cut along both sides of the bone on both ends, beginning to free it from the surrounding meat while at the same time keeping the meat in a single piece.


Turn the whole thing over and cut along the bottom side of the bone (hoof end), pulling the meat back from the bone on the bottom half.


Repeat on the other end (near the hip joint).


Eventually you will be able to cut the bone free from a single piece of meat.  Don't forget to freeze the bone for making broth or stew.


Make a few more cuts to open up the thickest parts, and there you have it: a butterflied leg of lamb!


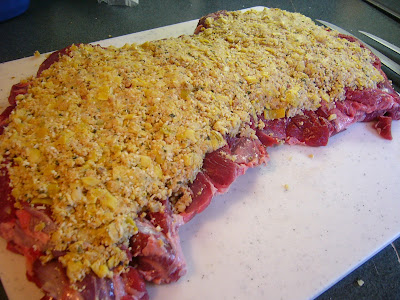
Spread with your delicious artichoke/bacon/Parmesan concoction (prepared the day before).


Roll the whole thing up.


Tie with kitchen string so it all stays together and looks fancy.


Roast; remove string; plop on a platter.  Ooh and aah.


Carve at the table.  Or let your husband do it.  Whatever.


Devour.

Wednesday, April 4, 2012

Artichoke Stuffed Leg of Lamb

After much deliberation, I have decided that I am not really a fan of ham.  Especially for Easter.  First you devour giant slices of it with scrambled eggs at the church Easter breakfast.  Then you eat clove-studded, honey-glazed slabs for Easter dinner at your grandmother's.  Then you pick at the leftovers all week, until ham sandwiches and ham spread are coming out of your ears and the very mention of ham makes you run for a glass of water.

In my house, ham sits in the freezer for months until I finally run out of dinner ideas and reluctantly get it out to thaw.  Maybe I'm just not a ham-cooking expert (actually, I know that's the case), but about two bites in, I usually decide that I'm really not a fan.  So it sits in the fridge for a week, while I bravely try to put it on sandwiches and salads and turn it into spread.  Then we forget about the spread until it turns an interesting shade of gray and my husband decides he'd rather not risk dying by eating it.  I try to tell him it always does that, then I take a few halfhearted bites before deciding that I don't feel like dying either.  And so the ham dies instead.

Forget the ham.  This year, make this beautiful leg of lamb--boned, butterflied, stuffed with artichokes and bacon and Parmesan, rolled, roasted, and served in mouthwatering glory--instead.  It may have been beginner's luck, but mine turned out perfectly last year.  Hopefully this year's attempt goes just as smoothly.  My mouth is watering just thinking about it.

Of course, you're not going to find leg of lamb at the co-op.  This recipe is a splurge, but it's well worth it.  Meijer has a good sale on semi-boneless leg of lamb this week for $3.99 a pound (regularly $7/lb.).  Last year they boned and butterflied it for me; I just had to go back the next day to pick it up.  If you want to do the work yourself, try following a YouTube video like this one (the lady is kind of obnoxious, but you have to love the New Zealand accents).

Jarred artichokes (get water packed, not marinated) are $2.49 at Aldi.  Pre-shredded Parmesan is $1.99 for 5 oz., also at Aldi.  If you use bacon (the original recipe calls for pancetta), be sure to remove as much excess fat as possible.  Fresh mint is under $2 a bunch at Meijer (and don't omit the mint sauce--it's so much better than that nasty mint jelly stuff).  All that, plus a few ingredients that you probably already have on hand, adds up to about $35--not too bad for a fancy entree that serves 8 to 10. 

Plan at least 2 hours for prep time and 2 hours for cooking and resting.  You can do a lot of the work, such as preparing the sauce and stuffing, in advance.  An instant-read thermometer (or a meat thermometer at minimum) is a must; I found mine at Wal-Mart for a decent price and I use it all the time.  You'll also need to buy kitchen twine; last year I could only find it at Bed Bath and Beyond, for maybe $5.  It lasts forever and will come in handy for cooking turkey, not to mention your future adventures in lamb roasting.

Artichoke Stuffed Leg of Lamb (based on this recipe from Martha Stewart Living)

Time:  2 hours prep, 2 hours cooking/resting
Serves 8-10

1 whole head garlic
4 ounces bacon (uncooked), finely chopped
1/2 cup finely grated Parmesan cheese (1 oz.)
1/2 cup fresh plain breadcrumbs (don't use the dry kind in a can)
1/4 cup fresh mint, finely chopped
3 T. fresh lemon juice (from about 1 1/2 lemons)
coarse salt and freshly ground black pepper
2 jars (12 oz. each) quartered artichoke hearts packed in water (NOT marinated), finely chopped
1 leg of lamb, bone removed (7-8 pounds), butterflied
olive oil, for rubbing

Mint sauce:
1/2 bunch fresh mint, finely chopped
1/2 cup olive oil
1 T. white-wine vinegar
1 1/2 tsp. fresh lemon juice
1/2 tsp. sugar
1/2 tsp. coarse salt (or 1/4 tsp. table salt)

Prepare stuffing:  Place head of garlic in a small saucepan lined with a steamer basket.  Add 1 cup water (or enough to reach the bottom of the steamer).  Cover; bring to a boil.  Reduce heat; simmer 10 minutes.  Transfer garlic to a plate; let cool.  Squeeze garlic out of the skins into a food processor.  Add bacon, cheese, breadcrumbs, mint, lemon juice, 1 tsp. coarse salt (or 1/2 tsp. table salt), and some pepper.  Pulse until combined.  Add artichokes; pulse a few times, keeping mixture chunky.

Prepare mint sauce:  Combine all ingredients in a jar.  Cover; shake to combine.  Refrigerate until ready to use (keeps up to 1 month).

Prepare lamb:  Lay lamb flat on a work surface (I use a large cutting board), skin side down.  Remove any excess fat (it's good to have a little fat, but that's where any gamey flavors will come from).  Season with salt.  Spread artichoke mixture over top, leaving a 1/2-inch border all around.  Tightly roll lamb, and tie with kitchen twine at 2-inch intervals to hold (here's how).  (Prepared lamb can be refrigerated for up to 4 hours; bring to room temperature before roasting.)

Rub lamb with oil, and season generously with salt and pepper.  Transfer to a roasting pan fitted with a roasting rack, and add water to pan (about 1/2 inch).   Roast for 30 minutes at 450 F. Reduce oven temperature to 350 F.  Continue to roast until an instant-read thermometer reaches 135 degrees (for medium-rare), 1 hour to 1 hour 15 minutes.  Let rest (loosely covered with foil) for 20 to 30 minutes before carving. Serve with mint sauce on the side.

----

I took a few pictures of the process last year; unfortunately, none of my pictures of the finished roast turned out.  I'll have to post more after this year's attempt.

Butterflied leg of lamb--you may need to make a few cuts to get it to lay flat.
Topped with artichoke stuffing.
Rolled and tied.
Oh, and I made this delicious lemon-blueberry bundt cake last year--recipe here

Thursday, March 29, 2012

Baked Macaroni and Cheese


Every Sunday after church, my family eats macaroni and cheese for lunch.  The kind from a box.  With powdered orange "cheese."  With peanut butter and crackers on the side.  What a bunch of weirdos.

Actually, they probably eat much more sophisticated lunches now that I'm out of the house.

And actually, my husband and I started the tradition on vicarage of eating boxed mac and cheese every Sunday after church.

And actually, we still do.

*Sigh*

I've honestly never been much of a fan of homemade macaroni and cheese, probably because I was used to the boxed stuff as a kid and thought that it was the real thing, to which no other macaroni could compare.  On the other hand, I can't even remember the last time I've tried a bowl of the homemade stuff.  Apparently, I've been missing out.  This week, inspired by the Good Eats episode "For Whom the Cheese Melts 2" (recipe here), I made a baked version from the magazine Fine Cooking.  It was good.  Not that you can really go wrong with three kinds of cheese and a crispy, golden brown topping.

As usual, I made a few minor changes, like substituting panko for the fresh breadcrumbs.  (Panko, by the way, is great for all kinds of toppings and breadings.  It's under $2 for a box and keeps forever.  You should be able to find it in the Asian section at Meijer or Kroger.)  Next time, I'll probably cut down on the thyme, which was slightly overpowering this time around.  I stuck with the basic version, but the recipe also suggests some extras, like ham or hot chilies, that you can add for a new level of deliciousness.  Maybe next Sunday I'll add some bacon.  You can bet I won't be opening a box.

Baked Macaroni and Cheese (based on this recipe)
Serves 4
Time:  45 minutes

Kosher or coarse salt
3 T. butter
1 small onion, finely diced
3 T. flour
1 1/2 tsp. Dijon or spicy mustard
2 cups 2% or whole milk
1 large sprig fresh thyme, plus 1/2 tsp. chopped fresh thyme leaves (OR 1/4 tsp. dry thyme leaves)
1 bay leaf
4 oz. (1 packed cup) grated extra-sharp Cheddar
2 oz. (1/2 packed cup) grated Monterey Jack
1/4 tsp. Worcestershire sauce
1/4 tsp. Tabasco sauce
freshly ground black pepper  
1/2 lb. elbow macaroni or other small pasta, such as small shells  
3 T. butter, melted
1 cup panko (Japanese breadcrumbs)
1/4 cup Parmesan

Heat the oven to 400°F and put a large pot of well-salted water on to boil over high heat.

Meanwhile, in another large pot or Dutch oven (I only have one big pot, so I used a large skillet with high sides), melt 3 T. butter over medium heat. Add the onion and 1/4 tsp. salt and cook, stirring occasionally with a wooden spoon, until softened, 4 to 5 minutes. Add the flour and cook, stirring, until slightly darker, 1 to 2 minutes. Stir in the mustard.

Switch to a whisk and gradually add the milk, whisking constantly. Go slowly at first, whisking until the mixture is smooth before adding more milk.

Switch back to the spoon and stir in the thyme sprig, bay leaf, and 1/4 tsp. salt. Bring to a bare simmer, and cook, stirring frequently, for 15 minutes (reduce the heat to medium low or low as needed to maintain the bare simmer).  Discard thyme sprig and bay leaf. Add Cheddar and Jack cheeses, stirring until melted, then add the Worcestershire and Tabasco. Season to taste with salt and pepper. Keep warm, stirring occasionally.

Cook the pasta until al dente. Drain thoroughly. Add the pasta to the cheese sauce, and stir until well combined. Spread mixture in a lightly greased casserole. (I used an oblong, 2 1/2-quart dish.  If you follow the original recipe, use a 9x13-inch casserole; I've halved the recipe here.)

In a medium bowl, toss the panko, Parmesan, melted butter, chopped thyme, 1/4 tsp. salt, and 1/8 tsp. pepper. Scatter mixture evenly over the pasta.

Bake, uncovered, until topping is golden, about 15 minutes. Let rest for 5 to 10 minutes before serving.

Wednesday, March 21, 2012

Crispy Chicken Quesadillas


It's hot.  Today it was hotter in Fort Wayne than in Dallas, Atlanta, Miami, and, yes, even the Bahamas.  Eighty-seven degrees.  In March.  In Fort Wayne.  Pretty soon the Floridians are going to be planning spring break trips to Indiana so they can work on their tans.  And while I haven't turned on the air conditioning like some of you wimps out there, I determined that using the oven was still a dumb move.  Instead, I broke out the food processor and made ham and cheese spread.  It's not the healthiest meal out there.  I don't think it even qualifies as a meal.  It is, quite literally, ham and cheese and mayonnaise and more cheese on crackers.  Seasoned with sherry, mustard, pepper, and... definitely not salt.  My brain must've melted--it's the only possible reason I could have been talked into eating that stuff for dinner.  Or pure laziness.  Did I mention it was hot?

Anyway, if you're looking for something a bit more reasonable that also doesn't involve turning your kitchen into a blazing inferno (more on that another time), I suggest these tasty quesadillas.  I adapted them from a recipe found on Pinterest, and you can make your own changes too, although the combination of chicken, rice, and black beans is hard to top.  I used small tortillas, which worked either as quesadillas or folded in half and stuffed; larger (burrito size) tortillas can be made into wraps, as described in the original recipe.

Crispy Chicken Quesadillas
Time:  30 minutes (plus rice- and chicken-cooking time)
Serves 6


1 1/2 cups cooked rice (I used one bag of boil-in-bag brown rice to save time)
1 1/2 cups cooked shredded chicken
1 can black beans, rinsed and drained
1 green onion, finely sliced (white and green parts)
1 (4 oz.) can diced green chilies
1/4 cup fresh cilantro, chopped
juice of 1 lime
2 tsp. chili powder
2 tsp. ground cumin
1/2 tsp. garlic salt
butter or cooking spray
1 pkg. small flour tortillas
about 2 cups shredded cheese (I used sharp cheddar
sour cream, shredded lettuce, and diced tomatoes, for serving (optional)

Thoroughly combine first 10 ingredients (through garlic salt).  If necessary, heat mixture in microwave (it should be warmer than room temperature).


Preheat a skillet over medium heat.  For each quesadilla, butter two tortillas on one side only.  Place one tortilla, butter side down, on hot pan.  Quickly sprinkle cheese over tortilla, leaving narrow border around edges, then allow to partially melt (to speed this process, top with a lid--avoid overcooking the tortilla).  Spread chicken mixture over cheese.  Top with second tortilla, butter side up.  When bottom tortilla is browned, flip the whole quesadilla and brown the second side (I use two spatulas, one to flip and the other to "catch" the quesadilla on its way down).

Serve with sour cream, lettuce, and tomato (avocado is yummy, too!).

Sunday, March 18, 2012

Venison-Bacon Burgers


You know you want one.  The weather's perfect, the grill is calling, and you've got one last little bit of venison in the freezer.  And did I mention the bacon?  Why waste perfectly good bacon by covering it in chocolate or deep-frying it to death, when you can turn it into a deliciously juicy burger?

Venison-Bacon Burgers (from this recipe)
Time:  1 hour or less
Serves 6

6 slices bacon
2 minced shallots (I used green onions)
2 lbs. ground venison
1 tsp. minced garlic (about 1 clove)
1 T. Worcestershire sauce
1 T. chopped fresh parsley
1 egg, lightly beaten
salt and pepper, to taste
olive oil as needed

Cook bacon in a skillet over medium heat until brown and crispy.  Crumble bacon (chop or use food processor) and place in large mixing bowl to cool.  Add bacon grease from pan, leaving 1-2 tsp. to cook aromatics.

Saute garlic and shallots in reserved bacon grease over medium heat until softened (add a little olive oil if you don't have enough grease).  Add to bacon.  Once cooled, add venison, Worcestershire, parsley, egg, and salt and pepper.  Work mixture together with hands until evenly combined.  Add a little olive oil if it seems too dry (venison is very lean, so you need to add a little fat in the form of bacon grease or olive oil to keep it moist).

Cover and refrigerate the whole mixture for about 20 minutes.  Meanwhile, preheat grill to medium-high heat.  Shape chilled meat into 6 patties and grill until desired doneness (in other words, I have no idea how long my husband grilled them--but he did an excellent job).

Monday, March 12, 2012

Greek-Style Chicken Wraps of Awesomeness, with Homemade Olga Bread and Tzatziki Sauce


Yesterday, in honor of my birthday and the uncharacteristically warm and beautiful weather, my husband and I made these Greek-inspired chicken wraps.  Everything was made from scratch, from the yeasty-sweet flatbread, to the tangy yogurt and cucumber sauce, to the juicy grilled chicken skewers.  They. were. so. good.  If you never cook another thing from this blog, you must give these a try.

Granted, it took us about three hours, start to finish (if partly due to poor planning on my part), and the ingredient list is half a mile long.  I can suggest a few shortcuts:  1. Use store-bought flatbread or pita bread.  2. Use sliced Brakebush chicken and drizzle on the marinade.  3. Buy a wrap from King Gyro's.

Seriously, guys.  This isn't Quick Cooking.  If you want food this good, sometimes you really have to spend a little extra time to make it.  Trust me--it's time well spent.  Just wait for a leisurely, warm weekend, fire up the grill, and do a little planning ahead so you don't waste an extra hour (like me).  Not that I minded.  I got to spend half my birthday eating and cooking with my husband, and it was pretty great.

Some tips before you begin:
-If possible, make the tzatziki sauce a day ahead of time to allow the flavors to meld.
-It's also a good idea to begin marinating the chicken a day ahead, or at least in the morning.
-If you do end up making everything at once, start with the chicken, then make the bread.  While the bread rises and chicken marinates, you can make the sauce, chop vegetables, and start the grill.  With two people, the whole process should take about two hours.


Greek-Style Chicken Wraps (based on the recipe here)
Serves 4-6
Time:  50 minutes, plus 1-24 hours for marinading

Marinade:
3/4 cup balsamic vinaigrette salad dressing (NOT straight balsamic vinegar)
3 T. lemon juice (from 1 1/2 lemons)
1 T. dried oregano
1/2 tsp. freshly ground black pepper
3 to 4 fresh boneless, skinless chicken breasts, cut into 1-inch cubes

Tzatziki Sauce:
1/2 cup seeded, shredded cucumber
1 tsp. coarse or kosher salt
1 cup plain yogurt
1/4 cup sour cream
1 T. lemon juice (from 1/2 lemon)
1/2 T. rice vinegar (OR white vinegar)
1 tsp. olive oil
1 clove garlic, minced
1 to 2 tsp. dill weed (OR 1 T. chopped fresh dill)
1/2 tsp. Greek seasoning (I make my own from the recipe here)

Toppings:
1 small head romaine lettuce, thinly chopped
1 red onion, thinly sliced
1 large tomato, diced
1 cup crumbled feta cheese (optional)

In a small bowl, combine first four marinade ingredients.  Place chicken in a large resealable plastic bag.  Add marinade; toss to coat.  Refrigerate for at least one hour.

Meanwhile, soak wooden skewers (if using) in water.  Prepare Olga bread (recipe below).  Chop lettuce, red onion, and tomato.  Preheat an outdoor grill for high heat (you can also broil the chicken, if you must, but it won't be nearly as tasty).

Prepare tzatsiki sauce (best if made the day ahead):  Toss cucumber with coarse salt, and allow it to sit at least 5 minutes (the salt releases excess moisture).  In a medium bowl, combine remaining sauce ingredients.  Squeeze cucumber to remove excess water; stir drained cucumber into sauce.  Cover and refrigerate until ready to use.

Remove chicken from marinade and place evenly on skewers.  Discard remaining marinade.  Grill chicken until juices run clear (my husband did this part, so I don't know how long it takes).  Remove from heat and wrap in foil to keep warm.

Serve chicken, tzatsiki sauce, and toppings wrapped in warm Olga bread, pita bread, or flatbread.


Homemade Olga Bread (recipe from my parents)

This is the easiest yeast bread I've ever made.  Once you get the hang of it, the rolling and pan frying goes quickly.  It helps to have two people--one to roll the dough while the other cooks it--but the dough can also be rolled all at once (stack lightly floured dough rounds on a plate, then stack them back on another plate as they're cooked).  The result:  a yeasty, slightly sweet flatbread that beats anything you could ever buy at Meijer.  It tastes best fresh out of the pan, but I suppose it could be frozen (although I've never actually tried doing so).  Yum.

Yield:  16 flatbreads
Time:  1 hour, plus 1 hour for rising

1 cup milk
1/4 cup honey
1/4 cup butter
1 tsp. salt
1 pkg. yeast (2 1/4 tsp.)
1/4 cup warm water
1 tsp. sugar
4 cups flour (divided)
1 egg

Scald milk in a small saucepan by heating it over medium-low, stirring with a whisk, until it reaches 120 F (milk will just barely begin to cook to the bottom of the pan).  Reduce heat to low.  Add honey and butter; whisk until melted.  Remove from heat; cool to lukewarm.

Meanwhile, combine yeast, warm water, and sugar in a small bowl.  Let stand 5 minutes to allow yeast to activate (mixture will become bubbly).  Pour milk mixture into a large mixing bowl.  Add 1 1/2 cups flour and beat well.  Add yeast mixture and egg; beat well again.  Gradually add remaining 2 1/2 cups flour until sticky dough forms (if using a hand mixer, you may need to finish out with a mixing spoon).  Do not add more flour!

Knead for two minutes (I do this right in the bowl).  Cover bowl with plastic wrap or a tea towel; place in a warm place and let rise until double in size, about 1 hour.  Punch down and divide into 16 pieces.  (Roll the dough into a ball, cut in quarters with a sharp knife, roll quarters into balls, then quarter again.)  Roll each piece into a ball.  On a lightly floured surface, roll each ball to 1/8 inch thick (about 7 inches in diameter).

Heat a skillet over medium-high heat.  (I use a regular metal skillet, not a nonstick or cast iron one.)  When skillet is very hot, begin cooking bread (do not add any oil or butter--cook on the dry pan).  Cook each piece for 15 seconds on the first side, then flip with a thin, wide spatula and cook 10 seconds on the second side (yes, you do have to stand there and count).  Serve warm.

Friday, March 2, 2012

Chicken and Broccoli Casserole


One of my favorite meals while growing up was this cozy casserole.  I'm pretty sure I requested it for almost every birthday as a child, except for the ones where I wanted chicken a la king.  I loved chicken.  I loved broccoli.  I couldn't think of a better way to eat them than nestled together on a bed of rice, under a delicious creamy sauce.  At least, that's how I'd describe it now.  As a ten-year-old, I probably just called it "yummy."

The original recipe is my grandmother's.  She called it "classic chicken divan," which always made me think of elegant ladies swooning on fancy couches.  (We just called it "chicken and broccoli.")  Somewhere along the way, my mom started adding the rice and some extra seasonings; I've doctored up the recipe a bit myself.  The sauce is a delicious homemade version of cream of chicken soup; it's much better than the stuff that comes in a can.  You can use cooked chicken (yay for Brakebush!) or turkey.  My mom always parboiled chicken leg quarters and tore it into bite-size pieces by hand, which I think is the best option, but this time I used grilled Brakebush chicken and some leftover cooked turkey.  I would recommend tearing up the chicken by hand, rather than cubing it with a knife--it gives you more control over removing bits of fat and gristle.

As for the broccoli, either fresh or frozen works--whatever you use, cook it before adding it to the casserole.  Fresh broccoli can be steamed or microwaved, but don't overcook it, or you will end up with a mushy, unappetizing blob.

Since there are quite a few steps to this recipe (cooking the rice and broccoli, preparing the chicken, making the sauce), it helps to make the individual components ahead of time.  You can also assemble the entire casserole and pop it in the refrigerator until needed; just increase baking time by 5-10 minutes to make sure it heats through.


Chicken and Broccoli Casserole
Time:  60 minutes
Serves 6-8 (but this recipe is easy to halve since everything is from scratch)

2 bunches (about 1 1/4 pounds) fresh broccoli, cut into bite-size pieces (stems included) OR two 10-oz. packages frozen broccoli
2 cups uncooked rice
1 T. olive oil
1/4 onion, minced
1 garlic clove, minced
1/4 cup butter
1/4 cup flour
2 cups chicken broth
1/2 cup half-and-half OR milk (whole or 2%)
1/2 tsp. salt
dash of black pepper, cayenne pepper, and curry powder
4 cups cooked chicken, torn into bite-sized pieces
1/4 cup Parmesan cheese, plus extra for topping
dash paprika

Cook rice.  Meanwhile, cook broccoli until just tender-crisp; drain.  In a small pan, combine olive oil, onion, and garlic; saute until tender (do not preheat oil, or the garlic will burn).  Set aside.

In a medium saucepan, melt butter; whisk in flour.  Slowly add broth, whisking until smooth (be careful of the hot steam!).  Cook until thick, stirring occasionally.  Slowly stir in cream; add salt, pepper, cayenne, curry powder, and onion mixture.  Remove from heat.

Spread rice in bottom of a greased 9x13 casserole or pan.  (You can also keep the rice separate and serve it with the casserole at the table.)  Add broccoli to casserole in an even layer.  Pour half of sauce over broccoli.  Top with chicken.  Add cheese to remaining sauce and pour over chicken.  Sprinkle with extra cheese and a dash of paprika.  Bake, uncovered, at 350F for 25 minutes or until golden brown on top.  (If using a metal pan, you can also broil the casserole for the last 5 minutes to brown it.)

Monday, February 20, 2012

Indian Butter Chicken


I don't know that much about Indian food, and I know even less about Indian cooking.  Once I tried to make naan, and it came out hard as a rock.  (Incidentally, the recipe called for something like 1/4 cup of yeast.  It didn't help the bread rise at all, as far as I could tell.)  One recipe that turns out every time for me, though, is this one for Indian butter chicken.  I have no idea how authentic it is; I can't even remember where I got the recipe, although I've doctored it up a bit myself.  It uses fairly basic ingredients and isn't too time-consuming, although I wouldn't recommend it for busy week nights.  I think it tastes best over rice, with some naan (store-bought, in my case) on the side.  (I found some naan at the Asian Market on the corner of Calhoun and Pontiac, $2.50 for 6 big pieces.  It was, ironically, made in Canada.)

The recipe calls for fresh chicken breast, but you could probably use pre-cooked chicken, if you add it at the very end with the butter.  I've never actually tried it that way, though.  This time I used dark thigh meat, which just wasn't as good as the white meat--it was almost too rich.  As far as the other ingredients, fresh ginger keeps for a long time if you freeze it; I bought mine for $2 a pound at one of the Asian markets.  Garam masala is a blend of various spices used frequently in Indian cooking.  There are lots of recipes online if you want to make your own garam masala, but since most of them call for a lot of unusual spices, I usually just buy it pre-made.  McCormick's Gourmet Collection is probably the best deal you can find at Meijer, but next time I'm going to try one of the Asian stores.

Indian Butter Chicken
Serves 5-6
Time:  50-60 minutes

1 onion, chopped
2 T. grated or minced fresh ginger
1 fresh jalapeno pepper, seeded and chopped
1 T. vegetable oil
3 tsp. garam masala
1 can (6 oz.) tomato paste, minus 2 T. (freeze the extra for those annoying recipes that only call for 1 or 2 T.)
2 cups chicken broth
1/2 cup half-and-half (whole milk works too)
1 1/2 pounds boneless, skinless chicken breasts, cut into small pieces (1/2" or smaller)
1/2 tsp. coarse-ground black pepper
salt
1/4 cup butter
hot cooked rice and/or naan
lime wedges (optional)

In a large, deep pot, combine onion, ginger, jalapeno, and oil.  Stir often over high heat until onion is browned (3-5 minutes).  Remove from heat; stir in garam masala.

Scrape mixture into blender; add paste and broth.  Blend until smooth.  (Or add paste and broth to aromatics in pot and use a stick/immersion blender to combine.)  Return mixture to pot, add cream, and bring to a gentle boil over high heat.  Reduce heat and simmer, stirring often, until reduced to 3 cups (5-7 minutes).

Mix chicken with pepper and sprinkle lightly with salt.  Melt 1 T. butter over high heat in a separate pan; add chicken and cook until it is no longer pink on the surface.  Add chicken to sauce and simmer over medium heat, stirring often, until chicken is cooked through (3-4 minutes).  Cut remaining 3 T. butter into chunks and stir into sauce until melted.

Serve over rice and/or with naan.  Squeeze with lime juice, if desired.

Saturday, February 18, 2012

Shrimp and Sausage Gumbo


Fat Tuesday is coming up next week, and while I don't usually do much to celebrate (other than pigging out on more pączki than I care to reveal), I can't think of a better time to post a recipe for a mouthwatering Louisiana favorite--gumbo.

I tried this recipe for the first time tonight, and I'm not going to lie--it took me two hours, from chopping vegetables to cooking the roux to simmering the whole vat of tastiness.  It was completely worth every minute.  I don't know that much about Creole or Cajun cooking, but I do know the more time spent on a roux, the better.  (Some people will cook it for an hour or more, but I'm just not that ambitious.)  I did decide to cook it a little longer than the recipe specified, resulting in a beautiful dark roux and a nice, deep flavor.

Don't be intimidated by the ingredient list.  After tasting the finished product, I decided it needed some extra flavor, so I added a dash of several ingredients that are common in Cajun spice blends.  You could just add a tablespoon of Cajun spice instead.  The original recipe called for andouille sausage, but I substituted a package of smoked pork sausage from the co-op.  If you're going for authenticity, use the andouille, or even chorizo, but I thought the smoked sausage worked fine.  I found the okra on clearance at Meijer.  Try to use fresh okra if you can.  It's included as a thickening agent, so don't leave it out unless you hate okra (in which case you shouldn't be making gumbo in the first place).  For tips on finding a decent deal on shrimp, see my scampi post.  The remaining ingredients (including the Cajun "holy trinity" of onion, bell pepper, and celery) are all regularly available at the co-op.

You'll want to prepare all your ingredients in advance, so you can add them quickly as needed.  Most of the time is actively spent cooking, so call up a friend or turn on some music once you get the roux going.  (I called my dad while he was working on some equally labor-intensive homemade pizza--he probably got sick of hearing about how good my gumbo was smelling.)

Shrimp and Sausage Gumbo (based on this recipe)
Time:  1 1/2 to 2 hours
Serves 4

1/2 cup vegetable oil
1/2 cup all-purpose flour
1/2 cup onion, minced (about 1 small)
1/2 cup green bell pepper, minced (about 1 small)
1/2 cup celery, minced (about 2 stalks)
4 cups (1 quart) chicken broth or stock
2 bay leaves
1/2 pound andouille sausage or chorizo (or substitute 1 pkg. smoked pork sausage), cut into 1/2-inch-thick rounds
1/2 pound fresh okra, trimmed and cut into 1/2-inch-thick rounds
1/2 pound raw shrimp, peeled and deveined
1/2 tsp. salt
1/4 to 1/2 tsp. cayenne pepper
1/4 tsp. freshly ground black pepper
dash each of oregano, basil, thyme, garlic powder, and paprika
3 cups cooked white rice
Tabasco or Frank's Red Hot sauce, optional

In large stock pot over medium-high heat, heat oil.  Reduce heat to medium-low and whisk in flour.  Cook, stirring frequently with wire whisk (don't use a spoon), until mixture becomes dark brown and has intensely nutty aroma, about 25-30 minutes.  (Take your time on this.  Don't try to brown the roux too quickly or it will burn.  You'll need to whisk the roux almost continuously, especially as it darkens, so this is where you turn on your House reruns.)

Stir in onion, pepper, and celery and cook, whisking frequently, until vegetables soften, about 2 minutes.  Gradually whisk in broth.  Raise heat to medium and bring to a simmer, then reduce heat to medium-low and simmer uncovered, stirring frequently (you can switch to a spoon), until mixture has thickened, 15-20 minutes.

Add bay leaves, sausage, and okra and simmer, uncovered, until okra is tender, about 15 minutes.  Add shrimp, salt, cayenne, black pepper, and herbs; simmer until shrimp is just cooked through, 4-5 minutes.

Serve gumbo over rice (about 1/2-1/3 cup per person) in large bowls.  Add hot sauce to taste, if desired.

Sunday, February 12, 2012

Shrimp Scampi


While I'm all about shopping frugally, making the most of the co-op, perusing grocery store circulars, and reading couponing blogs (yes, really), some days just call for a little bit of a splurge in the food department.  And while I enjoy eating out at nice restaurants as much as anyone, sometimes it's more fun to stay in, light some candles, pour some wine, and cook up a delicious dinner with your beloved.

I can get a little mushy here.  It's almost Valentine's Day, after all.

Anyway, one of my favorite little splurges is shrimp.  Shrimp was my favorite seafood even before my husband helped me to discover that not all fish is gross, and it probably still is at the top of my list.  Sadly, the frozen bags carried by Walmart do not even begin to compare with the beautiful specimens on which we feasted while on vicarage in Texas.  There are benefits to living near the ocean, y'all.  But I love shrimp too much to give it up altogether.  I suppose you can still get quality shrimp from a good meat market, but I'm still too cheap for that.  In a dish like shrimp scampi, you can't really go wrong anyway, even if you have to settle for farm-raised white shrimp.

This is my in-laws' recipe.  They traditionally serve scampi with steak for "family Christmas," before real Christmas when they eat chili and oyster stew.  (You can probably guess which meal is my favorite.)  I like to make it for Valentine's Day, birthdays, National Shrimp Scampi Day (April 29), National Shrimp Day (May 10), National Garlic Day (April 19), National Seafood Month (October), and... um... any other fake holidays that have anything to do with shrimpy deliciousness.  If you don't have a source for good fresh shrimp, I think Aldi has the best prices on frozen raw shrimp (usually under $5 per pound).  Target frequently has sales as well, and I can sometimes use an in-store coupon to get peeled shrimp for under $5 there.

You'll want to eat the scampi right after preparing it, so it's nice and hot.  Serve it with a salad or something that can be prepared ahead of time.  And while you're in the splurging mood, finish off your romantic dinner with a delicious homemade mudslide.  Mmmmm.

Shrimp Scampi
Serves 2-3
Time:  15 minutes, plus 2 hours to marinate (plus 15-30 minutes for cleaning shrimp)

3 Tbsp. butter, melted
1/4 cup olive oil
1 clove garlic, minced
1/2 tsp. salt
2 T. green onions, finely chopped
1 1/2 T. fresh parsley, minced
1/2 tsp. pepper
1 lb. raw large shrimp, peeled, deveined, and rinsed
hot cooked rice (I use about 1/2 cup uncooked rice per person)

Combine first seven ingredients; pour over shrimp.  Cover; marinate in refrigerator for about 2 hours.  Lay shrimp in single layer on broiler pan.  Broil about 3 minutes on each side (the second side may only take 1-2 minutes).  Transfer to serving dish (don't forget to scrape all the herbs and oil from the pan over the shrimp).  Serve over rice.

Saturday, February 11, 2012

Asian Chicken Salad


I have been on a huge Asian cooking kick lately.  It all started when my husband and his friends discovered Mahnin Asian Restaurant on Calhoun--a little hole-in-the-wall Thai/Burmese place featuring all sorts of delicious and authentic (and cheap!) dishes.  Right across the street is an Asian market called, oddly enough, Asian Market.  (It's right on the corner of Calhoun and Pontiac, across from Finders Keepers.)  Stepping inside that place is like entering another world.  You can buy anything from fresh Thai basil and lemongrass to shrimp the size of lobsters.  It takes five minutes to pick one bottle of fish sauce out of the zillion they carry.  You have to step around fifty-pound bags of rice and piles of cooking equipment and Asian candy to get anywhere.  The air is full of unusual incense.  English is definitely not the most prevalent language.

I was hooked.  It's probably the biggest Asian market in that area (there are at least six or seven others within a mile down Calhoun), with a huge selection and very reasonable prices (at least half what you would pay at Meijer or Kroger).  If you're at all interested in Asian cooking, or even if you need to restock your soy sauce supply, I would definitely recommend checking it out.  And then stop into Mahnin for a glorious plate of Pad Thai or Pad Kra Pao (my husband's favorite).

So far most of the Asian recipes I've been trying at home have called for lots of unusual ingredients--items that you could never find at the co-op.  This salad is less authentic, but it still has a fresh, Asian-inspired flavor, and you can customize it to fit whatever you have on hand.  You can certainly substitute a ready-made Asian vinaigrette for the dressing, but I had all the ingredients on hand to make this one and I liked the end result.  I think the most essential ingredient in the dressing is sesame oil; it's $1.99 for a 7 oz. bottle at the Asian markets (more like $6 at Kroger).

I haven't included amounts for any of the salad ingredients--just prepare as much as you need.  I served everything in separate dishes, so everyone could build their own salad as desired.

Asian Chicken Salad
Time:  15-30 minutes

Vinaigrette (makes about 1/2 cup)
3 T. unseasoned rice or wine vinegar
2 T. soy sauce
2 T. honey (brown sugar would also work)
2 T. vegetable oil
1 T. sesame oil
1/2 tsp. fresh grated ginger (optional)

Thoroughly whisk together all ingredients.

Salad
Romaine lettuce or spinach, torn into bite-size pieces
Cooked chicken, cooled and cut into strips (I used the Brakebush grilled chicken breasts; breaded chicken tenders might be good too)
Canned mandarin orange slices, drained
Carrots, grated or cut into matchsticks
Green onions, thinly sliced
Bean sprouts, rinsed well (optional--I had some on hand I needed to use up)
Chow mein noodles

Be creative!  Other ingredient options could include thinly sliced red onion, canned water chestnuts, shredded napa cabbage (in place of lettuce/spinach), sliced almonds, halved cherry tomatoes, or sliced mushrooms.