You know it's hot when your eyelids start sweating. Everything's sort of in a haze. Even the flies know better than to attempt productivity. And you just know that if you try to turn on the oven, the result will be instant vaporization. Not that it matters--can you think of anything less appetizing on a hot summer day than chicken pot pie? Nope. Meatloaf? I can almost feel myself melting.
Well, this creamy pasta recipe still requires the use of the stovetop, but it's the best I can do. I'm still not ready to get out the crock pot after my last attempt. And this is light and fresh and springy. (Hopefully it's not too late to find some decent asparagus out there.) Pair this with a nice salad or side dish for a cool summer meal, or toss in some cooked chicken or crumbled bacon to beef it up a little. You could also stir in a cup or two of chopped fresh spinach for extra flavor.
I originally made this recipe as found here, but I decided the lemon was a little too strong. What follows is my version, with some optional add-ins. I'm still learning how to make cream sauces, so if you have a better recipe, feel free to use it instead (and don't forget to send it my way!).
Creamy Asparagus Penne
Serves 4
Time: 30-35 minutes
8 ounces penne (I used whole-wheat)
1 bunch asparagus, trimmed and cut into 3/4-inch pieces (about 1 pound)
1 1/2 cups milk (whole or 2%)
4 tsp. whole-grain mustard
4 tsp. flour
1/2 tsp. salt
1/2 tsp. freshly ground black pepper
2 tsp. olive oil
3 T. minced garlic (3-4 large cloves)
1/2 cup grated Parmesan cheese, divided
2 cups chopped fresh spinach (optional)
1 cup chopped cooked chicken OR 1/4 cup chopped cooked bacon (optional)
Bring a large pot of water to a boil. Add pasta and cook for 3 minutes less than the package directions. Add asparagus and continue cooking until pasta and asparagus are just tender, 3 minutes more. Drain and return to pot.
Meanwhile, whisk milk, mustard, flour, salt, and pepper in a medium bowl. Set aside. Heat oil and garlic together in a medium saucepan over medium heat, stirring frequently, until fragrant, 30-60 seconds. Whisk in the milk mixture. Bring to a simmer, stirring constantly, and cook until thickened, 1-2 minutes.
Stir sauce into pasta and asparagus. Cook over medium-high heat, stirring, until the sauce is thick, creamy, and coats and pasta, 1-2 minutes. Stir in 1/4 cup Parmesan. Toss with spinach and chicken or bacon, if desired. Sprinkle individual portions with remaining Parmesan.
Showing posts with label vegetarian. Show all posts
Monday, June 18, 2012
Thursday, May 31, 2012
Pasta Salad
Tomorrow is the first day of June. I find this hard to believe. I'm pretty sure it was just yesterday that I was posting about soup and how much I love soup and how one winter we ate soup almost every day for a month because it's so wonderful and amazing and delicious.
Now Memorial Day is over and we've hit 90-plus degrees and I want nothing to do with soup. (Yeah, so I'm fickle. You know you don't want soup either.) Now I want salads. Giant pasta salads. Salads bursting with fresh vegetables out of the garden and tasty stuff like couscous and quinoa and lentils and barley. When it got too hot to cook (yes, that does happen in Michigan), my mom always used to make a giant vat of pasta salad, and we'd eat it on the pool deck with fruit and popsicles and other munchies that didn't require the use of an oven. You don't need a pool to enjoy pasta salad, though. In fact, it doesn't even have to be summer yet. I've made two big batches already, and they were just as delicious as I remember. And much better than soup.
This recipe is great because you can change it based on what's in your refrigerator or garden. I've listed the typical ingredients that I use, but feel free to add whatever you like. In addition to veggies like cucumber or avocado, consider adding chopped pepperoni or grated mozzarella. Be creative! For the dressing, I usually use regular or "zesty" Italian dressing from a bottle. Don't use any of the creamy versions. I've also tried using Good Seasons Italian dressing from a packet; it worked, but the flavor wasn't quite as strong as I like. Set any remaining dressing out on the table so people can add a bit more if they like.
Another trick I use is adding the broccoli and carrots to the boiling pasta water for a few seconds. Blanching these crunchier vegetables makes them a little less, well, crunchy. Just be sure not to overcook them; the last thing you want is a bunch of soggy, nasty broccoli mixed into your beautiful salad. About 60 seconds for the carrots and 30 seconds for the broccoli is plenty.
Pasta Salad
Time: 30 minutes
Serves: 8+
1 package (12-16 oz.) tri-color rotini (my favorite) or another bite-size pasta (like farfalle or small shells)
3-4 carrots, peeled and diced
1 medium head broccoli, cut into bite-size pieces (I peel the "trunk" and cut it up too)
1-2 bell peppers, diced (any color)
1 large tomato, diced (or 3/4 to 1 cup cherry or grape tomatoes, halved)
1/2 cup black olives (about half a can)
1/4 cup grated Parmesan
1 cup (8 oz.) bottled Italian dressing, plus more to taste
Boil pasta in a large pot according to package directions. One minute before pasta is done, add carrots to pot. Thirty seconds later, add broccoli. (Vegetables should be just barely tender-crisp and very bright in color--don't overcook!) Drain immediately; toss with a few ice cubes to cool. Add remaining ingredients; refrigerate until chilled. Toss before serving.
Tip: If making salad in advance, add tomatoes just before serving, as they tend to lose their freshness more quickly than the other vegetables.
Wednesday, May 23, 2012
Garden Fresh Couscous Salad
This morning as I was browsing Pinterest, trying my hardest to ignore the mountains of laundry and dirty dishes piling up around me (okay, not quite, but I was definitely avoiding packing for this weekend's camping trip), I ran across a "recipe" for bacon-wrapped corn on the cob. Then (okay, maybe there were a few dirty dishes waiting for me) I found one for deep-fried corn. I started searching for the most ridiculous corn recipes I could find (who needs clean laundry, anyway?). Chocolate fans will be disappointed to learn that my search for "chocolate-covered corn" did not result in tips for dipping whole ears in chocolate, but I did find chocolate-covered caramel corn and chocolate-covered corn dogs.
Seriously, people? Just because you can do it, doesn't mean you should. Bacon is delicious. Chocolate is delicious. Deep-fat frying is fattening and, well, delicious. But why ruin a perfectly good ear of corn with that stuff when you can turn it into this wonderfully fresh and flavorful couscous salad?
This is one of my favorite summer salads, and it's perfect for a picnic or Memorial Day cookout (you can even pair it with your bacon-wrapped bacon). The fresh corn (please don't use canned or frozen unless you absolutely must) is my favorite part, but the feta, cucumbers, cherry tomatoes, and couscous certainly don't hurt, either. Toss it with a light vinaigrette, and you can almost eat this stuff as a meal in itself (and sometimes I do).
The best part is that almost all of the ingredients are frequently available in the co-op. Corn is only $0.16 an ear this week at Meijer--the best price I've seen yet this season. I have used both regular and whole-wheat couscous with equally delicious results. If you can't find it in the co-op, it's okay to buy the less expensive couscous mixes--just leave out the seasoning packet. I usually buy my feta from Aldi, but next time I'd like to get it from George's International Market (on the corner of Broadway and Taylor). I can't remember the exact price, but I saw it there once for something like $2/lb. for a large block. Fresh parsley is under $1 for a bunch at Meijer or Kroger, and it keeps for quite a while in the fridge (put it in an unsealed zip-top bag along with a damp paper towel). Don't bother with dried parsley; it's not worth it.
Garden Fresh Couscous Salad (original recipe found here)
Time: 30-40 minutes
Serves: 8-9 (this makes a big batch, and it's best to eat it within 2-3 days)
3 medium ears sweet corn, husks removed
1 cup chicken broth or vegetable broth
1 cup uncooked couscous
1 medium cucumber, peeled, halved lengthwise, and sliced
1-1/2 cups cherry tomatoes, halved (or bigger tomatoes, diced)
1/2 cup crumbled feta cheese
1/4 cup chopped red onion
3 T. minced fresh parsley
3 T. olive oil
3 T. lemon juice
1 tsp. dried oregano
3/4 tsp. ground cumin
1/2 tsp. salt
1/2 tsp. pepper
Wrap ears of corn in a single layer of plastic wrap; microwave on high for about 5 minutes. Remove from microwave (wear oven mitts!) and slit plastic open; allow to cool. (You can also boil the corn, but I find microwaving is the easiest and fastest cooking method.)
Meanwhile, in a small saucepan, bring broth to a boil. Stir in couscous. Remove from heat; cover and let stand for 5-10 minutes or until water is absorbed. Fluff with a fork and set aside to cool.
In a large bowl, combine the cucumber, tomatoes, cheese, onion and parsley. Cut corn kernels from the cobs (if they are still too hot to handle, run cold water over them; pat dry). Add to cucumber mixture. Stir in couscous.
In a small bowl, whisk together oil, lemon juice, and seasonings. Pour over couscous mixture; toss to coat. Serve immediately or cover and refrigerate until chilled.
Sunday, May 20, 2012
Guacamole
My brother came down for a visit this weekend. He came even though I warned him that he would have to spend all his time with me, since my husband is working on a 20-page paper and doing a billion other things besides. He came even though I'm a wee bit jealous of his fancy camera and make him take all sorts of food pictures for my blog. I figure it makes up for all the guacamole he devours when he comes to visit.
Anyway, while my husband slaved away, my brother and I took a trip to the Foellinger-Freimann Botanical Conservatory in downtown Fort Wayne. He took some cool pictures of the Butterflies of Malaysia exhibit that's there right now:
And some others of the various growing things around the conservatory:
I also dragged him along with me to Meijer, where we found an entire cart of clearance avocados. Tomatoes were on sale, too. Coincidence? I think not. In payment for his photography efforts (or maybe just to keep him from devouring all my food), I made two huge bowls of guacamole over the weekend. And then made him take some pictures of it.
This is my own guacamole recipe. (That's right--for once I'm not stealing it from someone else!) It makes a pretty small batch, but it can easily be multiplied based on the number of avocados. I usually increase the other ingredients by a smaller amount; for example, a triple recipe would use three avocados but only two tomatoes, two tablespoons lime juice, etc. I try not to spend more than $.75 per avocado. Aldi frequently has them on sale for $.49, and you can sometimes find them on clearance at Meijer (I paid $2 for three). Cilantro is usually $.89/bunch at Meijer and $.50 at Kroger. Fresh jalapenos cost next to nothing if you buy just one or two in bulk. The other ingredients are usually available at the co-op. My favorite tortilla chips are the multigrain ones at Aldi; they're just $1.69 (other Aldi varieties are cheaper still).
Guacamole
Yield: 1 cup
Time: 30 minutes
1 large avocado
1 T. fresh lime juice
1 roma tomato, finely diced
1 T. onion, finely minced (OR 1 T. green onion, thinly sliced)
1 garlic clove, minced
1 small fresh jalapeno, seeds removed and finely chopped (don't forget the gloves)
1 heaping T. minced cilantro
2 tsp. Frank's Red Hot sauce (or your favorite red pepper sauce)
Cut and peel the avocado (for tips go here). Scoop out the flesh with a spoon; place it in a bowl and gently mash with a fork. Add lime juice; combine well. Add remaining ingredients; serve with tortilla chips.
Tips:
~ For smoother guacamole, puree the finished mixture in a food processor.
~ For chunkier guacamole, peel the halved and seeded avocado (the skin should peel right off unless it is underripe), then dice the flesh (overripe avocados will not work as well).
~ The lime juice helps prevent the guacamole from turning brown. When making a large batch of guacamole, add the juice to the bowl first, then toss it with each avocado that you add.
~ Reserve one of the avocado seeds and add it to the finished guacamole; this will help prevent browning as well. Guacamole should be eaten immediately, if possible, but covering it with plastic wrap (right on the surface of the mixture) can help prevent discoloration (do this with leftovers too).
Anyway, while my husband slaved away, my brother and I took a trip to the Foellinger-Freimann Botanical Conservatory in downtown Fort Wayne. He took some cool pictures of the Butterflies of Malaysia exhibit that's there right now:
And some others of the various growing things around the conservatory:
I also dragged him along with me to Meijer, where we found an entire cart of clearance avocados. Tomatoes were on sale, too. Coincidence? I think not. In payment for his photography efforts (or maybe just to keep him from devouring all my food), I made two huge bowls of guacamole over the weekend. And then made him take some pictures of it.
This is my own guacamole recipe. (That's right--for once I'm not stealing it from someone else!) It makes a pretty small batch, but it can easily be multiplied based on the number of avocados. I usually increase the other ingredients by a smaller amount; for example, a triple recipe would use three avocados but only two tomatoes, two tablespoons lime juice, etc. I try not to spend more than $.75 per avocado. Aldi frequently has them on sale for $.49, and you can sometimes find them on clearance at Meijer (I paid $2 for three). Cilantro is usually $.89/bunch at Meijer and $.50 at Kroger. Fresh jalapenos cost next to nothing if you buy just one or two in bulk. The other ingredients are usually available at the co-op. My favorite tortilla chips are the multigrain ones at Aldi; they're just $1.69 (other Aldi varieties are cheaper still).
Guacamole
Yield: 1 cup
Time: 30 minutes
1 large avocado
1 T. fresh lime juice
1 roma tomato, finely diced
1 T. onion, finely minced (OR 1 T. green onion, thinly sliced)
1 garlic clove, minced
1 small fresh jalapeno, seeds removed and finely chopped (don't forget the gloves)
1 heaping T. minced cilantro
2 tsp. Frank's Red Hot sauce (or your favorite red pepper sauce)
Cut and peel the avocado (for tips go here). Scoop out the flesh with a spoon; place it in a bowl and gently mash with a fork. Add lime juice; combine well. Add remaining ingredients; serve with tortilla chips.
Tips:
~ For smoother guacamole, puree the finished mixture in a food processor.
~ For chunkier guacamole, peel the halved and seeded avocado (the skin should peel right off unless it is underripe), then dice the flesh (overripe avocados will not work as well).
~ The lime juice helps prevent the guacamole from turning brown. When making a large batch of guacamole, add the juice to the bowl first, then toss it with each avocado that you add.
~ Reserve one of the avocado seeds and add it to the finished guacamole; this will help prevent browning as well. Guacamole should be eaten immediately, if possible, but covering it with plastic wrap (right on the surface of the mixture) can help prevent discoloration (do this with leftovers too).
Thursday, May 10, 2012
Black Bean and Tomato Quinoa
You're right. This isn't exactly a co-op recipe. Not because the main ingredient is nowhere to be found at the co-op (that never stopped me from posting fresh chicken recipes), but because it's so annoyingly expensive. In fact, the only reason I have quinoa on hand is because my mother-in-law bought a giant bag of it at Sam's Club and generously bestowed half of it on me. (Yes!) I had never even heard of quinoa (pronounced KEEN-wah) at that point, much less tasted it, and after some very, um, interesting experiments with quinoa muffins and other weird recipes, I found this one on Epicurious. And this is the one. If you have a sad and lonely bag of quinoa hiding in the back of your pantry, get it out and celebrate, because this tasty little salad is the best thing since... whatever I posted last time. And if you don't have millions saved to buy quinoa at Meijer, convince a rich friend with a Costco membership to split a bag with you. It'll be worth it.
Black Bean and Tomato Quinoa (based on this recipe)
Serves 6 as a side dish
Time: 45 minutes
2 tsp. grated lime zest
2 T. fresh lime juice
2 T. butter, melted and cooled
1 T. vegetable oil
1 tsp. sugar
salt and freshly ground pepper
1 cup quinoa
1 (14- to 15-oz.) can black beans, rinsed and drained
2 green onions, thinly sliced
1/4 cup chopped cilantro
2 medium tomatoes, diced
Whisk together first five ingredients, plus 1/2 tsp. salt and 1/4 tsp. pepper, in a large bowl. Set aside.
Rinse quinoa in three changes of cold water (you can do this in a bowl and drain in a sieve, or just put it in a sieve and toss with one hand under the water). Transfer quinoa to a 2-qt. saucepan; add 2 cups water. Cover; bring to a boil. Reduce heat and simmer uncovered 15 minutes, stirring occasionally. Remove from heat; cover with a clean tea towel and allow to rest 5 minutes.
Add quinoa to dressing and toss until dressing is absorbed, then stir in remaining ingredients and salt and pepper to taste.
Notes: This salad can be eaten warm or cold--my husband and I both prefer it chilled. If making ahead, leave the tomatoes out until just before serving.
Saturday, April 21, 2012
Edible Vegetable Flowers
I was never a picky eater. Neither were my brothers. Sure, we turned up our noses at lima beans and brussels sprouts, but there was The Rule: we always had to try a little of everything, even if we thought (or knew) that we didn't like it. Eventually we must have figured out it wasn't worth the fight. Besides, my dad actually liked lima beans and brussels sprouts, and there was always the dream that he might actually agree to eat our share. Yeah, right.
As a result, we were known far and wide (at least by our grandparents' friends and cashiers and mailmen and hair stylists) as the children who ate everything on their plates. They shouldn't have been so impressed. One grandma served us spammies (yes, Spam sandwiches) and dinosaur cookies and pecans and grilled cheese sandwiches with real Velveeta and other exotic foods. Our other grandma baked us cookies and took us all out to Russ's and Bill Knapp's and other old people restaurants, where we could order anything we wanted. It's no wonder we cleaned our plates. There were no brussels sprouts on those kid's menus.
One of my brothers, though, developed a curious taste for raw kale--you know, the stuff they tuck next to the pickle spear as a garnish. He would collect the kale from everybody's burger platters and eat them while the grandparents marveled. I'm pretty sure he kept this up for a couple of years before realizing that he was a human, not a goat, and should be eating Grandma's spammies instead.
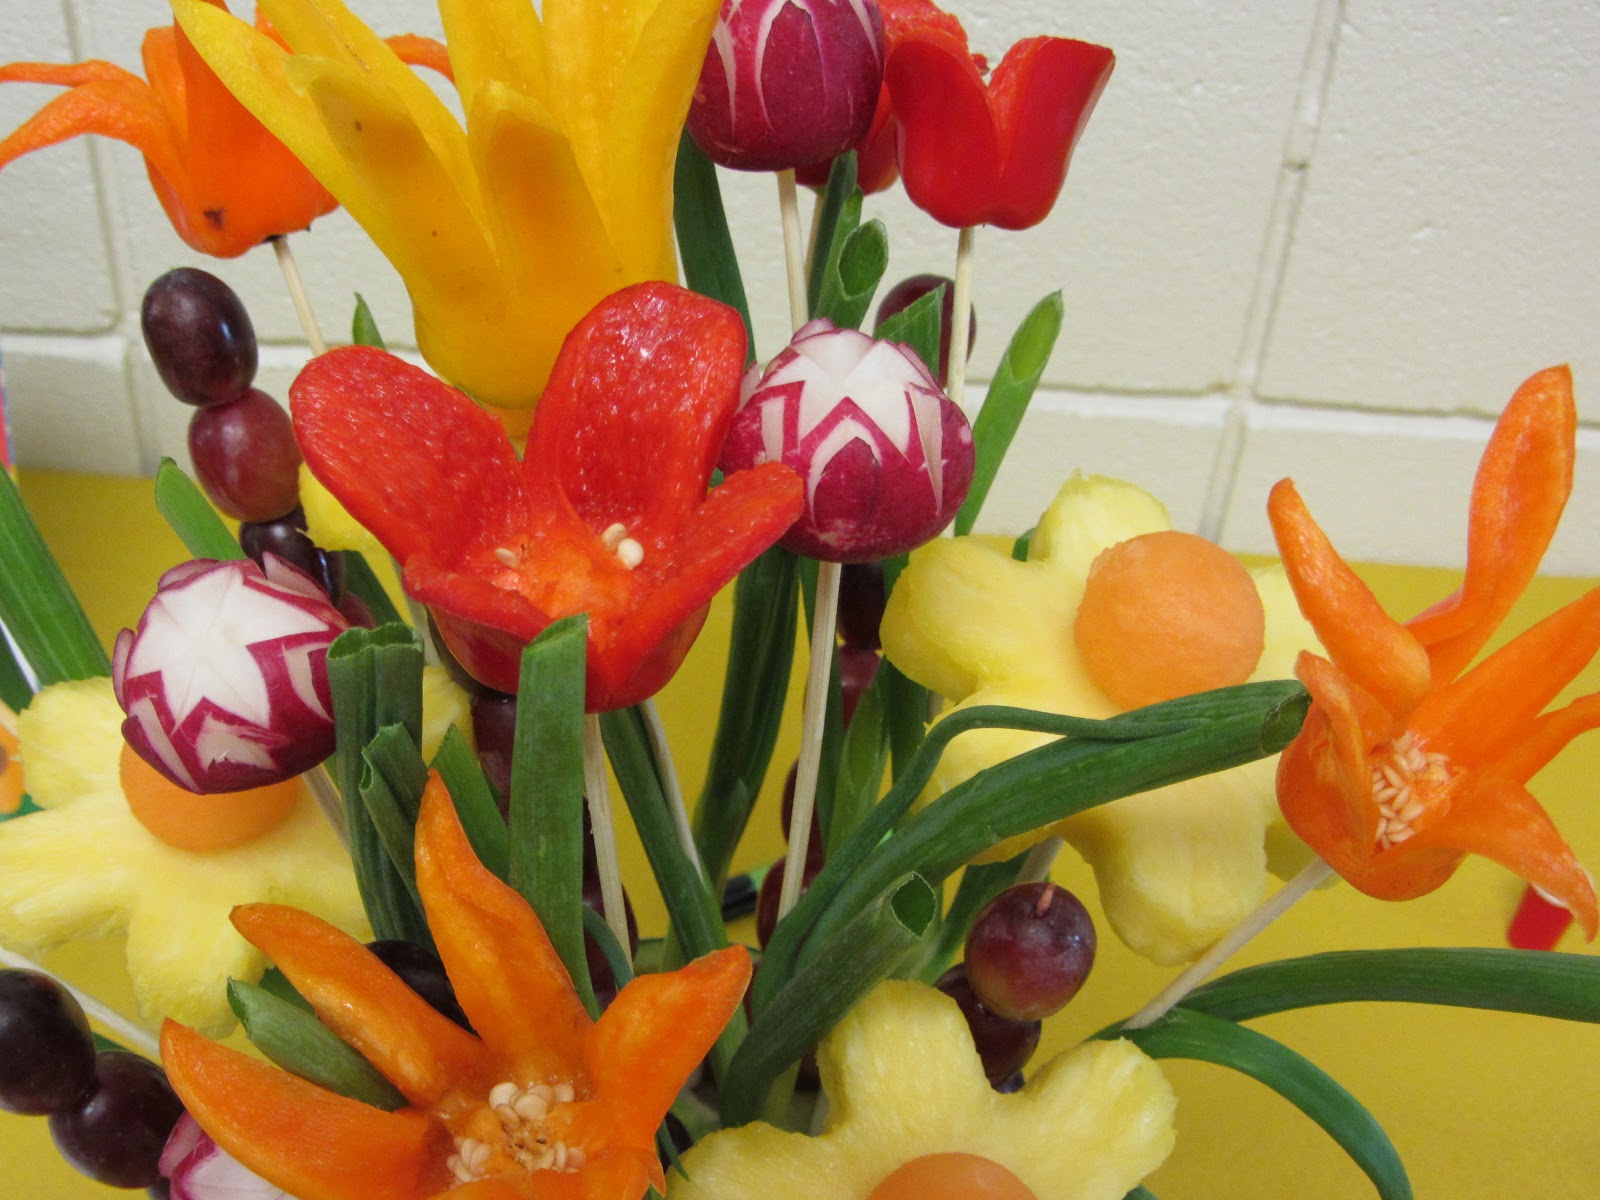
Some garnishes are pretty and delicious, though (yes, I am going somewhere with this, and it isn't to the land of Spam). A couple weeks ago I made an edible bouquet of fruit and vegetable flowers for an event at work, which turned out like this:
It was all edible, down to the green onion leaves. And now I have a new skill set to put on my resume. Or at least on my blog. I wouldn't want you to feel left out.
Flower Pots and Vases
For the base of my arrangement, I hollowed out a large cantaloupe, first cutting out an opening on top (as you would a Halloween pumpkin), then scraping out the seeds, and finally scooping out the flesh with a melon baller. I trimmed a little piece off the bottom so it wouldn't wobble. Then I packed the empty rind with large chunks of iceberg lettuce, an inexpensive filler into which you can poke skewer "stems."
If you don't want to spend the time making an edible vase, you can stuff chunks of lettuce into a flower pot or other container. Or just arrange the flowers in a vase. Or don't give them stems at all. It's up to you.
Stems and Leaves
If you do want to arrange your flowers in some kind of container (as opposed to setting them on a plate as garnish), you'll want to start with some leaves and stems. For each flower, you'll need one green onion and one skewer. Skewers are $1-2 for a package of 100 at Meijer, Kroger, Target, Walmart, etc. Look in the kitchen gadget section. I use the 12-inch ones that are about 3mm in diameter. The thicker ones are good for supporting pineapple flowers, but they won't fit inside a green onion.
Trim off the root end of the green onion, as well as the tips of any discolored or ragged leaves. I like to trim all the cut-off leaves on a diagonal. Insert the pointed end of a skewer into the root end of an onion, and carefully push it all the way up until about an inch or two of skewer sticks out at the bottom. If the skewer ends up inside a leaf (this happens a lot), poke a hole so that the leaf can hang down naturally and the end of the skewer is visible. Refrigerate until ready to use.
Radish Roses
Begin 8 hours in advance.
Pick evenly rounded radishes without any big dents or soft spots. Trim off any little hair-like roots.
Cut a thin slice off the stem end so the radish can stand upright.
Using a sharp paring knife, cut a V-shaped wedge in the root end, about 1/4" deep. Most of the root should come off; if not, it's okay.
Make two identical V-shaped cuts in the shape of an X over the first cut. This completes the top of the rose.
If you look at the radish from the side, you will see six red points. Underneath each point you will cut a petal. Using just the tip of the paring knife, make two shallow facing cuts to create one petal (see pictures below). The knife should not point into the center of the radish--this would make too deep a cut.
Use the tip of the knife to ease the petal open slightly. Repeat all the way around for a total of six petals.
Float the completed radishes in a bowl of ice water in the refrigerator for at least 8 hours--this allows the petals to open.
Pepper Lilies and Tulips
Begin 8 hours in advance.
I use mini sweet peppers (available at Aldi and any grocery store) for these flowers, but bell peppers can be cut in a similar manner. Select peppers that are straight and fairly uniform in shape; the ones on the left will work, but the others will not (extra peppers can be frozen for cooking).
Insert your paring knife straight down into the pepper, all the way through, about 3/4" from the stem. Make a cut from there to the opposite end.
Make two similar cuts to divide each half in thirds, this time cutting through only one wall of the pepper. You should end up with six equally sized segments attached at the bottom.
Now for the tricky part: Carefully trim each of the six "petals" to remove any ribs or excess flesh; you can also trim the sections into points if needed.
Leave the seeds intact; you may need to remove the surrounding ribs, however.
Float the peppers in a bowl of ice water in the refrigerator for at least 8 hours; the petals will spread open, creating a lily shape.
To make a tulip, cut off the end of a pepper; the remaining section (stem end) should be about as long as it is wide.
Make two cuts in the shape of a cross about halfway down the pepper.
Trim each of the four segments into a rounded petal. Leave the seeds intact, but trim away any ribs.
Float in ice water in the refrigerator for at least 8 hours.
Finishing Touches
One your eight hours are up, the radishes and peppers should have opened up into beautiful flowers. Drain them on paper towels and cut off any stems with kitchen shears. Any of the flowers can be used as garnishes, or you can pile them up in the center of a veggie tray (the pepper flowers are particularly tasty with hummus or white bean dip).
Or you can attach the flowers to their green onion stems. Simply stick the flower onto the pointed end of the skewer--gently rotate the flower back and forth until it's secure.
Finally, arrange the stems in a vase, or stick the exposed skewer into your lettuce-stuffed container. Voila!
As a result, we were known far and wide (at least by our grandparents' friends and cashiers and mailmen and hair stylists) as the children who ate everything on their plates. They shouldn't have been so impressed. One grandma served us spammies (yes, Spam sandwiches) and dinosaur cookies and pecans and grilled cheese sandwiches with real Velveeta and other exotic foods. Our other grandma baked us cookies and took us all out to Russ's and Bill Knapp's and other old people restaurants, where we could order anything we wanted. It's no wonder we cleaned our plates. There were no brussels sprouts on those kid's menus.
One of my brothers, though, developed a curious taste for raw kale--you know, the stuff they tuck next to the pickle spear as a garnish. He would collect the kale from everybody's burger platters and eat them while the grandparents marveled. I'm pretty sure he kept this up for a couple of years before realizing that he was a human, not a goat, and should be eating Grandma's spammies instead.
Some garnishes are pretty and delicious, though (yes, I am going somewhere with this, and it isn't to the land of Spam). A couple weeks ago I made an edible bouquet of fruit and vegetable flowers for an event at work, which turned out like this:
It was all edible, down to the green onion leaves. And now I have a new skill set to put on my resume. Or at least on my blog. I wouldn't want you to feel left out.
Flower Pots and Vases
For the base of my arrangement, I hollowed out a large cantaloupe, first cutting out an opening on top (as you would a Halloween pumpkin), then scraping out the seeds, and finally scooping out the flesh with a melon baller. I trimmed a little piece off the bottom so it wouldn't wobble. Then I packed the empty rind with large chunks of iceberg lettuce, an inexpensive filler into which you can poke skewer "stems."
If you don't want to spend the time making an edible vase, you can stuff chunks of lettuce into a flower pot or other container. Or just arrange the flowers in a vase. Or don't give them stems at all. It's up to you.
Stems and Leaves
If you do want to arrange your flowers in some kind of container (as opposed to setting them on a plate as garnish), you'll want to start with some leaves and stems. For each flower, you'll need one green onion and one skewer. Skewers are $1-2 for a package of 100 at Meijer, Kroger, Target, Walmart, etc. Look in the kitchen gadget section. I use the 12-inch ones that are about 3mm in diameter. The thicker ones are good for supporting pineapple flowers, but they won't fit inside a green onion.
Trim off the root end of the green onion, as well as the tips of any discolored or ragged leaves. I like to trim all the cut-off leaves on a diagonal. Insert the pointed end of a skewer into the root end of an onion, and carefully push it all the way up until about an inch or two of skewer sticks out at the bottom. If the skewer ends up inside a leaf (this happens a lot), poke a hole so that the leaf can hang down naturally and the end of the skewer is visible. Refrigerate until ready to use.
Radish Roses
Begin 8 hours in advance.
Pick evenly rounded radishes without any big dents or soft spots. Trim off any little hair-like roots.
Cut a thin slice off the stem end so the radish can stand upright.
Using a sharp paring knife, cut a V-shaped wedge in the root end, about 1/4" deep. Most of the root should come off; if not, it's okay.
Make two identical V-shaped cuts in the shape of an X over the first cut. This completes the top of the rose.
If you look at the radish from the side, you will see six red points. Underneath each point you will cut a petal. Using just the tip of the paring knife, make two shallow facing cuts to create one petal (see pictures below). The knife should not point into the center of the radish--this would make too deep a cut.
Use the tip of the knife to ease the petal open slightly. Repeat all the way around for a total of six petals.
Float the completed radishes in a bowl of ice water in the refrigerator for at least 8 hours--this allows the petals to open.
Pepper Lilies and Tulips
Begin 8 hours in advance.
I use mini sweet peppers (available at Aldi and any grocery store) for these flowers, but bell peppers can be cut in a similar manner. Select peppers that are straight and fairly uniform in shape; the ones on the left will work, but the others will not (extra peppers can be frozen for cooking).
Insert your paring knife straight down into the pepper, all the way through, about 3/4" from the stem. Make a cut from there to the opposite end.
Make two similar cuts to divide each half in thirds, this time cutting through only one wall of the pepper. You should end up with six equally sized segments attached at the bottom.
Now for the tricky part: Carefully trim each of the six "petals" to remove any ribs or excess flesh; you can also trim the sections into points if needed.
Leave the seeds intact; you may need to remove the surrounding ribs, however.
Float the peppers in a bowl of ice water in the refrigerator for at least 8 hours; the petals will spread open, creating a lily shape.
To make a tulip, cut off the end of a pepper; the remaining section (stem end) should be about as long as it is wide.
Make two cuts in the shape of a cross about halfway down the pepper.
Trim each of the four segments into a rounded petal. Leave the seeds intact, but trim away any ribs.
Float in ice water in the refrigerator for at least 8 hours.
Finishing Touches
One your eight hours are up, the radishes and peppers should have opened up into beautiful flowers. Drain them on paper towels and cut off any stems with kitchen shears. Any of the flowers can be used as garnishes, or you can pile them up in the center of a veggie tray (the pepper flowers are particularly tasty with hummus or white bean dip).
Or you can attach the flowers to their green onion stems. Simply stick the flower onto the pointed end of the skewer--gently rotate the flower back and forth until it's secure.
Finally, arrange the stems in a vase, or stick the exposed skewer into your lettuce-stuffed container. Voila!
Monday, February 13, 2012
Restaurant-Style Salsa
About a month ago, I finally broke down and joined Pinterest. I was afraid it would cause me to waste even more time online than I did already. I needn't have worried. I am quite capable of wasting time on Pinterest on my own.
And now, this is me.
The good news is that I've been discovering some pretty tasty looking recipes. Pinterest makes it easy to keep track of things that I "might want to make someday," so I don't have to e-mail the links to myself or print them out before deeming them worthy of precious printer ink and paper. The bad news is that now I have about 25 desserts to try, and not nearly enough marshmallow creme and Karo syrup in the pantry. *sigh*
While I still haven't given up on making my own oatmeal cream pies, this easy restaurant-style salsa is a pretty tasty Pinterest find that won't completely rot out all your teeth. Unlike my black bean salsa, this salsa is very smooth, just like the stuff they serve with chips at a lot of Mexican restaurants. Because I don't have a big food processor and I hate cleaning my blender, I decided to puree all the ingredients in batches with my little food processor. It worked okay, but took me a little longer.
You can get almost all of the ingredients at the co-op, and the others are very inexpensive. Cilantro is about $.50 at Kroger and Meijer, and you can run the leftovers through a food processor and freeze in 1 Tb. amounts for making guacamole later. Jalapenos are also inexpensive (I still had some frozen from last summer). If you don't have Rotel (or at least diced tomatoes with chilies), you can substitute another can of regular diced tomatoes, plus a small can of diced green chilies.
Restaurant-Style Salsa (based on this recipe)
Time: 10 minutes
1 (14 oz.) can diced tomatoes, undrained
1 (10 oz.) can Rotel (diced tomatoes with chilies), undrained
1/2 large cucumber, peeled and coarsely chopped
1/4 small onion, coarsely chopped
1 clove garlic, peeled and smashed
1 jalapeno pepper, seeds and ribs removed
1 tsp. honey
1/2 tsp. salt
1/4 tsp. ground cumin
1/4 cup packed cilantro leaves (wash before stripping leaves from stems)
juice of 1 lime
Combine ingredients in a food processor or blender and pulse to combine for 30 seconds or so until all the ingredients are very finely chopped and salsa is desired consistency. (See note above if using a small food processor.) Serve with tortilla chips.
Monday, January 9, 2012
Chunky Black Bean Salsa
One of my favorite things about cold weather is dusting off my pile of delicious winter recipes--roasts, soups, casseroles, and, of course, hot chocolate and pumpkin pie. Sometimes, though, I get tired of all the heartwarming comfort food and long for something fresh and summery. Yep. I'm fickle. But I'm pretty sure I'm not the only person in the world who's dived (or is it "dove"?) headfirst into a bowl of ice cream in the middle of March. (Actually, that's not a very good example, as I will happily devour ice cream no matter the day or the season.)
This black bean salsa (or, as my family likes to call it, "dip") is one of my favorite year-round recipes. It takes less than ten minutes to prepare and is great as a snack, appetizer, party contribution, or even a side dish to your favorite Mexican meal. The ingredients aren't set in stone--I make it a little differently every time--but I'll try to give the basic idea with possible variations. The best part? The ingredients are almost always available at the co-op. You'll just need to buy tortilla chips. I think Aldi has the best deal, at $1.67 a bag for several varieties. Scott's/Kroger often has them on sale for $1, but it's a smaller bag.
Chunky Black Bean Salsa
Time: 10 minutes
1 can black beans, rinsed and drained
1 can whole corn, drained
1 can diced tomatoes with green chilies, drained
1 green bell pepper, diced
1 medium tomato (or 2 roma tomatoes), diced (optional--I usually leave them out in the winter, when good tomatoes are hard to come by)
mild or medium salsa, to taste (last time I used about 1/2 cup medium Chi-Chi's salsa)*
Combine all ingredients. Serve with tortilla chips. Pretend it's summer.
*For a dryer consistency, you can leave out the jarred salsa and instead season with chili powder and cumin to taste.
Thursday, December 29, 2011
Pumpkin Dip
Every New Year's Eve, my family concludes the season of pigging out by making all sorts of tasty appetizers--bite-size spanakopitas, sausage-stuffed mushrooms, artery-clogging chili-cheese dip, piglets in the blanket, and, if they aren't already long gone, leftover tamales from Christmas dinner. After church we spend the evening grazing, playing games, and waiting for the ball to drop so we can go to bed.
Since most of us have already gained 50 pounds from cookies and eggnog at this point, I'm feeling the need to contribute something healthy. Hummus? Carrot sticks? Pumpkin dip? Pumpkin's a vegetable, right? (Or is it a squash? I can never remember.) Okay, so the main ingredient might be cream cheese. And it tastes just as good with gingersnaps as with apples. Compared with Velveeta and sausage, though, it might as well be a bowl of brussels sprouts. And no, I don't suggest bringing brussels sprouts to your New Year's party. Try making this instead.
Pumpkin Dip (from here)
3/4 cup (6 oz.) 1/3-less-fat (Neufchâtel) cream cheese, softened
1/4 cup packed brown sugar
1/2 cup canned pumpkin (NOT pumpkin pie filling)
1 T. maple syrup (use the real stuff if you can)
1/2 tsp. cinnamon
gingersnaps or apple slices, for serving
Combine cream cheese, brown sugar, and pumpkin in a medium bowl; beat with a mixer at medium speed until well combined. Add syrup and cinnamon and beat until smooth. Cover and chill 30 minutes. Serve with gingersnaps or apple slices.
A couple of tips: You can freeze the leftover pumpkin. I use an old sour cream or cottage cheese container--make sure to label it! Also, if your apples will be sitting out for a while (as in at a party), sprinkle with lemon juice to prevent them from browning.
Tuesday, December 20, 2011
Apple-Oat Muffins
At the risk of making everyone think that all I eat is soup and muffins, here's another muffin recipe. Let's face it. You can never have too many muffins. Especially ones like these, bursting with little apple nuggets and chewy oatmeal, golden brown and crusty on top, cakey and dense inside. Add a hint of cinnamon and you can almost imagine it's still autumn, even though snow is falling and all the trees are looking for their leaves. (Don't get me wrong; I like snow and winter. I just like fall more.)
If you still have a few wrinkly apples left from your visit to the orchard a couple of months ago, they will be great for this recipe. I actually used up some windfalls I still had from the co-op. If not, any kind of cooking apple will do. The original recipe calls for plain yogurt, which I happened to have on hand, but sour cream or applesauce can be substituted as well. (If you have homemade applesauce, all the better.)
Apple-Oat Muffins (from this recipe)
Yield: 1 dozen
Total time: 35-40 minutes
2 cups peeled shredded apple (about 3/4 pound)
1 1/2 cups flour
1 cup quick-cooking oats
2/3 cup packed brown sugar
1 1/2 tsp. baking powder
1/2 tsp. baking soda
1/2 tsp. salt
1/2 tsp. cinnamon
1/4 cup milk
2 T. vegetable oil
1 tsp. vanilla extract
1 cup (8 oz.) plain low-fat yogurt (OR applesauce OR sour cream)
1 egg
Place apple on paper towels; squeeze over sink until barely moist; set aside. Combine flour and next six ingredients (through cinnamon) in a medium bowl; stir with a whisk. Make a well in center of mixture. In a separate bowl, combine milk, oil, vanilla, yogurt, and egg; stir well with a whisk. Add to flour mixture, stirring just until moist. Stir in apple.
Spoon batter into 12 well-greased muffin cups (they should be filled almost to the top). Bake at 400 F for 20 minutes or until muffins spring back when touched lightly in center.
If you still have a few wrinkly apples left from your visit to the orchard a couple of months ago, they will be great for this recipe. I actually used up some windfalls I still had from the co-op. If not, any kind of cooking apple will do. The original recipe calls for plain yogurt, which I happened to have on hand, but sour cream or applesauce can be substituted as well. (If you have homemade applesauce, all the better.)
Apple-Oat Muffins (from this recipe)
Yield: 1 dozen
Total time: 35-40 minutes
2 cups peeled shredded apple (about 3/4 pound)
1 1/2 cups flour
1 cup quick-cooking oats
2/3 cup packed brown sugar
1 1/2 tsp. baking powder
1/2 tsp. baking soda
1/2 tsp. salt
1/2 tsp. cinnamon
1/4 cup milk
2 T. vegetable oil
1 tsp. vanilla extract
1 cup (8 oz.) plain low-fat yogurt (OR applesauce OR sour cream)
1 egg
Place apple on paper towels; squeeze over sink until barely moist; set aside. Combine flour and next six ingredients (through cinnamon) in a medium bowl; stir with a whisk. Make a well in center of mixture. In a separate bowl, combine milk, oil, vanilla, yogurt, and egg; stir well with a whisk. Add to flour mixture, stirring just until moist. Stir in apple.
Spoon batter into 12 well-greased muffin cups (they should be filled almost to the top). Bake at 400 F for 20 minutes or until muffins spring back when touched lightly in center.
Saturday, December 17, 2011
Curried Pumpkin Soup
As much as I love cooking, sometimes all I feel like doing when I get home from work is throwing a bunch of canned food together in a pot and calling it a meal. And while I usually just laugh at those "recipes" that call for a box of cake mix and a can of frosting, I don't think real cooking requires five-course dinners and countless hours bent over the stove or oven, either.
So here's a tasty soup for those days when all your customers are crabby and your kids are whiney and your hair looks like it got attacked by a cat and all you want is a nice hot meal to toss together before you stay up half the night untangling Christmas lights. You can get all the ingredients from the co-op, except the seasonings, which you probably have on hand already. I substituted evaporated milk for the heavy cream. The leftover evaporated milk can be stored in the refrigerator for a week or two (transfer to a plastic or glass container first).
Curried Pumpkin Soup (from a recent seminary graduate)
Serves 4
Time: 15-20 minutes
1 T. vegetable or canola oil
1 T. butter
1 medium onion, chopped
1 can (14.5 oz.) chicken or vegetable broth
1 can (14.5 oz.) black beans, drained and rinsed
1 can (14.5 oz.) diced tomatoes
1 can (15 oz.) pumpkin puree (not pumpkin pie mix)
1/2 cup heavy cream OR evaporated milk
1 1/2 tsp. curry powder
1 tsp. ground cumin
1/8 tsp. cayenne pepper
coarse salt, to taste
Heat a deep pot over medium heat. Add oil and butter. When butter melts, add onion and saute 5 minutes, until tender. Add broth, black beans, tomatoes, and pumpkin. Bring to a boil; reduce heat to low and stir in remaining ingredients. Simmer 5 minutes.
Wednesday, December 14, 2011
Crostini with White Bean Dip
'Tis the season for parties galore, and even if you're not hosting one yourself, I can pretty much bet that you've been invited to one. Maybe you're supposed to bring some food, and cheese spread and meat balls just aren't cutting it this time. Maybe your culinary creativity has been called upon to concoct some delicious appetizer for the family Christmas dinner. Or maybe you just like tasty snacks. In any case, crostini (a.k.a bruschetta) are a great place to begin, especially if you have one of those Panera baguette loaves from the co-op on hand.
The great thing about crostini ("little toasts" in Italian, in case you were wondering) is that you can pile them with all sorts of different spreads and other toppings. Tapenade and tomato-basil mixtures are the most common, I think, but I just discovered a yummy white bean dip that uses lots of co-op ingredients, so that's the one you get to hear about today.
Homemade Crostini
Time: 35-40 minutes
1 baguette loaf
2 T. olive oil
1-2 large cloves garlic, peeled
Preheat oven to 375 F. Slice baguette on an angle into 1/4" to 5/8" thick slices. I use my biggest kitchen knife, rather than a bread knife, for this. The older the bread, the harder it is to cut, so you may even want to slice it within a day or two of getting it; you can always toast it later. Also, resist the temptation to use those bags of pre-sliced bread. They work in a pinch, but they aren't nearly as good as the real thing.
Next, spread out the bread slices on a baking sheet (you'll probably need two). Cut off the wide ends of the garlic cloves, then rub the garlic over each piece of bread (sort of like you're grating the garlic).
Use a pastry brush to very lightly coat each slice with olive oil (you can also use a mister). If you don't have a pastry brush, go to the paint department at Menards and get a couple different sizes of their cheapest brushes. They have some with wooden handles and natural bristles for under a dollar. I also just saw some mini silicone brushes at Kroger/Scott's in their Christmas section for a dollar. I think the natural bristles work better with olive oil, though.
Bake for 10 minutes, then switch the pans (if you're using two) and continue to bake in 5-minute increments. Mine took about 20 minutes. I like my crostini to be quite dark, but you can go for a more golden color if you want.
Cool completely and store in sealed plastic bags for up to two weeks or so at room temperature (if they last that long). Be forewarned that your kitchen will smell very strongly of garlic after baking. If you're expecting guests, you might want to make the crostini in advance so you don't have anybody swooning.
Now for the dip. It calls for fresh rosemary, which is about $2 for the little plastic containers at Meijer and Kroger. I had some in the freezer from a recipe I made months ago, but you can just leave it out if you don't want to splurge. Just drizzle with a tablespoon of plain olive oil at the end, and sprinkle with a pinch of finely chopped dried rosemary if you have it.
White Bean Dip with Rosemary Oil (based on this recipe)
Yield: 2 cups
Time: 20 minutes
3 T. olive oil, divided
2 cloves garlic, peeled and minced
2 (15 oz.) cans white beans (I used Great Northern), drained and rinsed
2 T. fresh lemon juice
2 tsp. coarse salt (or 1/2 to 3/4 tsp. regular salt)
3 sprigs fresh rosemary, rinsed (optional--see note above)
1. In a medium pan over medium heat, stir 2 T. olive oil with the garlic until fragrant, being careful not to brown garlic, about 1 minute.
2. Pour the oil and garlic into a food processor. Add white beans, lemon juice, and salt to the food processor and whirl until smooth (it will have a creamy consistency similar to hummus). Transfer to a serving bowl.
(If you're like me and have a small food processor, do this in two batches. Pour in half the olive oil and one can of beans; repeat; then stir everything together with the lemon juice and salt in a serving bowl. If you don't have a food processor, you could try mashing the beans with a fork or spoon, then using a hand mixer to combine everything, but I haven't actually tried it, so don't take my word for it.)
3. Return the frying pan to medium heat and add the remaining 1 T. olive oil and the rosemary sprigs. Warm the rosemary in the olive oil until fragrant, about 3 minutes, stirring occasionally so the rosemary doesn't burn. Remove from heat and let cool 10 minutes.
4. Set the rosemary aside and drizzle the olive oil over the bean dip. Mince one teaspoon of the rosemary leaves and sprinkle over the dip.
5. Serve your delicious dip with crostini, pita chips, or crudites. Can be made up to 3 days in advance.
Wednesday, December 7, 2011
Lemon-Cranberry Muffins
Just before Thanksgiving, in a moment of weakness, I bought two bags of fresh cranberries without the slightest idea of what I was going to make with them. I'm not a huge fan of cranberry sauce, but I've been on a berry kick lately and I figured they had to be good for something. Right? Anybody?
After wasting large amounts of time perusing my favorite recipe website, I decided to try combining this muffin recipe with this one. The verdict? You should make them, too. They're amazing. And if nothing else, they're the perfect way to use up that last half-bag of cranberries skulking in the fruit crisper.
(Yes, I know cranberries aren't in the co-op. If you don't have any left over from Thanksgiving, Aldi had them for $.50 a bag on sale last time I looked; I think they're regularly $1.)
Lemon-Cranberry Muffins
Time: 30-45 minutes
Yield: 1 dozen
1 3/4 cups all-purpose flour
1/4 cup wheat germ (or flour, either whole wheat or AP)
2/3 cup sugar
2 tsp. baking powder
1/4 tsp. salt
1 cup chopped fresh cranberries (use a food processor if you have one)
2/3 cup milk
1/4 cup butter, melted
1 tsp. grated lemon rind (you could also use orange rind)
1/2 tsp. vanilla extract
1 egg, lightly beaten
Preheat oven to 400 F. Combine flour, wheat germ, sugar, baking powder, and salt in a large bowl; stir well with a whisk. Stir in cranberries; make a well in center of mixture. Combine milk, butter, rind, vanilla, and egg; add to flour mixture, stirring just until moist. Spoon batter into 12 greased muffin cups. Bake at for 18 minutes or until muffins spring back when touched lightly in center. Remove muffins from pan immediately; place on a wire rack.
Subscribe to:
Posts (Atom)